
The Complete Snowboard Bindings Guide: Everything You Need to Know Before You Buy


There’s a quiet truth in snowboarding that most beginners don’t hear until they’ve already spent half a season fighting their gear: your bindings are the most influential piece of equipment you own. Not your board. Not your boots. Your bindings. They are the physical, mechanical, and energy bridge between your body and everything happening beneath your feet at 40 miles per hour on an icy groomer or a pillowy powder field.
And yet, bindings are often the last thing riders think about. People agonize over board profiles and rocker types (if you’re curious, the camber vs rocker debate is a rabbit hole worth going down), spend hours picking the right boots, and then grab whatever bindings are on sale. That disconnect costs riders comfort, performance, and — most importantly — the pure joy of riding a setup that truly responds to them.
This guide exists to close that gap. Whether you’re buying your very first pair or looking to understand why your current bindings feel off after years of riding, everything you need is right here. We’ll cover every component, every technology decision, every compatibility question, and every riding-style consideration. By the end, you’ll know exactly what to look for — and more importantly, exactly what to feel for when you’re trying bindings in the shop.
1. What Are Snowboard Bindings — And Why Do They Matter So Much?
At their most basic, snowboard bindings are the mechanical interface that attaches your boots to your board. But that functional description undersells what they actually do. A binding must simultaneously accomplish several competing physical objectives: it must transfer energy precisely from your legs and feet to the board edges, absorb and dampen vibration and impact so your joints don’t take a beating, hold your boot with zero heel lift, allow natural flex patterns for comfort, and do all of this reliably in temperatures ranging from –30°C to just above freezing.
The binding determines how quickly edge transitions happen. A stiff binding transmits force immediately and directly — great for carving but punishing for beginners. A soft binding absorbs more of your body’s input and delays transfer, which is more forgiving. Neither is universally superior; the right choice depends entirely on who’s riding and how.
One important concept to understand early: bindings do not make up for a poor board-boot fit. If your boots don’t properly support your feet, or if your board’s flex profile doesn’t match your skill level and terrain preferences, the binding can’t compensate. Think of bindings as the final translator in a three-part conversation between your body, your boots, and your board.
The Energy Transfer Chain
Here’s the physics sequence that happens every time you initiate a turn: your brain sends a signal to lean onto an edge → your ankle flexes → that flex travels through your boot → the binding reads that flex and translates it into a force on the board’s edge → the edge bites into the snow → you carve. Any weakness or looseness in that chain — a floppy highback, a worn-out strap, a loose mounting bolt — and the turn response deteriorates. This is why experienced riders can feel a 0.5mm of heel lift that a casual rider would never notice.
2. Anatomy of a Snowboard Binding: Every Component Explained
To make intelligent purchasing decisions, you need to understand every part of the binding and how it contributes (or fails to contribute) to performance. Let’s walk through each component in detail.
The Baseplate
The baseplate is the foundation of the entire binding system. It sits directly on the board’s topsheet and is bolted through the binding disc into the board’s insert holes. Baseplates are manufactured from several materials, each with distinct performance characteristics:
- Nylon/Glass-filled Nylon: The most common material. Affordable, durable, and relatively light. The glass content percentage (e.g., “45% fiberglass composite”) determines stiffness. More glass = stiffer, more responsive, slightly heavier.
- Carbon Fiber: Found in premium performance bindings. Extremely stiff and light. Used in race-focused and high-performance all-mountain bindings. Expensive, but the reduced weight is noticeable over a long day.
- Aluminum: Used in select high-end models (like Union’s Falcor). Exceptional stiffness and durability, but heavier than carbon. Transfers energy with zero flex dampening — very direct feel.
- Forged Aluminum: Even stronger than cast aluminum. Rare, found only in elite competition hardware.
The baseplate also contains the footbed, which is the surface your boot sole sits on. Many modern bindings feature contoured footbeds designed to match the natural arch of your foot, which reduces fatigue during long days. Some even include gel inserts or EVA foam for added shock absorption.
The Highback
The highback rises behind your heel and calf, providing the structural support that allows your binding to respond to heel-edge pressure. Highbacks vary enormously in shape, material, height, and stiffness. Their design is arguably the most influential variable in how a binding “feels” to ride.
- Material: Plastic (various hardnesses), carbon, or aluminum. Stiffer highbacks snap back harder on heel-edge turns.
- Height: Taller highbacks offer more leverage (better for carving, harder for butters). Shorter ones allow more ankle flex freedom.
- Shape: Some highbacks are anatomically shaped to match calf curvature. Others are flat. Ergonomic shapes improve comfort but add manufacturing cost.
- Rotation: Most highbacks are rotatable so they align with your binding angle, keeping them parallel to your boot. This is critical — misaligned highbacks create pressure points.
Ankle Strap
The ankle strap wraps over the top of your boot (around the ankle area) and is the primary strap responsible for keeping your heel down. A well-designed ankle strap distributes pressure across the full width of the boot, not just in the center. Look for:
- Wide, ergonomically curved construction (not flat straps that dig in)
- Multi-density padding — firm enough to hold, soft enough not to cut circulation
- Smooth internal facing to avoid boot damage over time
Toe Strap
The toe strap secures the front of your boot. There are two fundamentally different designs, and the distinction matters:
- Over-the-Toe (Cap Strap): Hooks over the cap of your toe box. Provides excellent security and prevents any forward movement of the foot. More common in modern bindings.
- Under-the-Toe: Rests just below the toes across the upper. Easier to release but offers slightly less locking power. Better for freestyle riders who want quick entry/exit in the park.
Ratchet System
The ratchet is the locking mechanism on each strap that tightens (ratchets inward) and releases (flip-to-release lever). This tiny component bears enormous stress each session. Ratchet quality varies dramatically by brand tier:
- Budget ratchets: plastic teeth, prone to stripping and shattering in extreme cold
- Mid-range ratchets: reinforced nylon with metal reinforcement pins
- Premium ratchets: aluminum or stainless steel components, smooth as glass
Mounting Disc
The disc is the interface between your binding and your board. It sits between the baseplate and the board’s topsheet, bolting down through the board’s insert holes. Most bindings come with a disc that rotates to adjust binding angle, and the disc pattern must match your board’s insert pattern. Common patterns: 4×4, 2×4, and Burton’s proprietary Channel system. Getting a proper stance setup is impossible with a mismatched disc.

Burton Cartel Bindings — Best All-Mountain Pick
The industry benchmark for 20+ years. Unmatched comfort, precision, and durability for all-mountain riders.
Check Price on Amazon3. Snowboard Binding Flex Ratings: The Most Important Number You’ll Read
Flex is the single most defining characteristic of a binding. It determines how quickly and directly your physical inputs translate into board response. Understanding flex isn’t optional — getting it wrong means either fighting your board constantly or feeling like you have no control.
How Flex is Measured
There is no industry-standard testing method for flex ratings. Every brand uses their own scale, typically 1–10 (sometimes described as 1–5 or simply Soft/Medium/Stiff). A “6” from one brand may ride more like an “8” from another. This makes direct comparison tricky, but the relative scale within a brand is reliable.
The primary flex axis in a binding runs from heel to toe (toe edge to heel edge). Torsional flex — the binding’s resistance to twisting — is separate and also matters. A binding can be longitudinally stiff but torsionally soft, which creates an interesting feel useful for rail slides in the park.
Soft Flex (1–4): Who It’s For
Soft bindings are the domain of beginners, freestyle riders, and anyone who prioritizes comfort and playfulness over razor-sharp precision. A soft binding absorbs your body’s small movements without overreacting — you have to be more deliberate with your weight shifts to initiate turns. This is actually helpful when learning because it gives you time to correct mistakes mid-movement.
In the park, soft flex allows you to butter (nose and tail presses) with far less effort, makes rail tricks more intuitive since the board can flex naturally under load, and reduces the violence of hard landings. Freestyle-focused riders from beginner through professional often prefer ratings of 3–5.
The tradeoff: at high speeds or on hard, icy terrain, soft bindings can feel vague and unpredictable. If you’re regularly riding at speed on groomers and want to carve confidently, soft bindings will hold you back.
Medium Flex (5–7): The All-Mountain Sweet Spot
The vast majority of recreational riders live comfortably in the 5–7 range. These bindings offer enough responsiveness to carve groomers and ride varied terrain with confidence, while retaining enough give to absorb rough snow and occasional park laps without punishing your knees.
This is the category where the binding industry does its best work. The Burton Cartel (a perennial bestseller, and one of our top-reviewed bindings), Union Force, and Ride C-6 all live in this range. If you’re unsure where you fall on the skill or style spectrum, start here.
Stiff Flex (8–10): Precision Instruments for Advanced Riders
Stiff bindings are purpose-built tools. They excel in applications where immediate, precise edge control matters above everything else: alpine racing, aggressive high-speed carving, big mountain freeride, and professional-level performance. The Union Atlas (which we covered in our full review) pushes this end of the scale.
At this stiffness level, every movement you make is transmitted instantly. That means your technique must be refined — any mistakes are amplified rather than absorbed. Riding stiff bindings before you have the edge control to utilize them doesn’t just underperform; it actively makes riding harder and more fatiguing.
| Flex Rating | Rider Level | Best Terrain | Response Speed | Fatigue Level |
|---|---|---|---|---|
| 1–3 (Soft) | Beginner | Park, Pipe, Casual Runs | Slow / Forgiving | Low |
| 4–5 (Med-Soft) | Beginner–Intermediate | All Mountain Light | Moderate | Low–Med |
| 6–7 (Medium) | Intermediate–Advanced | All Mountain | Responsive | Moderate |
| 8–9 (Med-Stiff) | Advanced | Carving, Freeride | Quick | Moderate–High |
| 10 (Stiff) | Expert / Race | Groomed, Race Courses | Immediate | High |
💡 Pro Tip: Don’t Max Out Your Flex
Most riders benefit from choosing bindings that feel slightly softer than they think they need. A binding that feels too stiff will make you tense your legs constantly to control it, accelerating fatigue. A binding that’s slightly soft for your level encourages a relaxed riding stance.
4. The Three Main Types of Snowboard Bindings
Bindings broadly fall into three entry-system categories. Each has its own strengths, weaknesses, compatible boot requirements, and situational advantages. Understanding which system fits your life on the mountain is part of building a coherent gear setup.
Strap Bindings
- CompatibilityUniversal
- Setup Time~30 sec
- AdjustabilityMaximum
- Price Range$80–$600+
- Best ForAll Styles
Step-In Systems
- CompatibilityProprietary Boots
- Setup Time~3 sec
- AdjustabilityLimited
- Price Range$200–$500+
- Best ForConvenience
Rear-Entry (Clicker)
- CompatibilityStandard Boots
- Setup Time~10 sec
- AdjustabilityModerate
- Price Range$120–$350
- Best ForBeginners
Strap Bindings: The Undisputed Standard
Strap bindings dominate the market for good reason. They work with virtually any boot, offer the most precise fit adjustment, and are available from beginner to elite performance levels. The two-strap system (ankle and toe) has been refined over decades, and top-tier versions from Union, Burton, and Ride feel utterly natural after a few runs.
The main inconvenience is that you must sit or squat to strap in. This becomes a minor irritation on a busy beginner slope and a genuine annoyance on a crowded lift line. Beyond that, strap bindings have no real weaknesses for most riders.
Step-In Bindings: The New Wave of Convenience
Step-in technology has been attempted several times over snowboarding’s history, but it wasn’t until Burton Step On (2017) that a truly performance-oriented step-in system succeeded commercially. The Step On uses three connection points — two at the toe and one at the heel — creating a solid, heel-lift-free connection without straps.
The Nidecker Supermatic later challenged Burton’s dominance with an even faster engagement mechanism. Both require compatible boots and cost a premium, but the ability to click in standing up — especially when you’re exhausted after 30,000 vertical feet — is genuinely life-changing for many riders.
The limitation: you’re locked into a boot ecosystem. Step On boots don’t work with traditional bindings, and vice versa. This matters if you travel, rent, or want to experiment with different setups.
Rear-Entry Bindings: Speed Without Proprietary Boots
Rear-entry bindings fold the highback down so you can slide your foot in from behind, then click the highback back up to lock in. This is faster than strapping in while still accepting any standard boot. The downside is that rear-entry designs typically sacrifice some performance — the fold-down highback mechanism can create flex inconsistency and may lose stiffness over time.
They’re popular for beginners and older recreational riders who want faster lift-line entry without the cost and commitment of step-in systems. For performance-oriented riding, the traditional strap binding still wins.
✅ Strap Bindings Pros
- Works with any standard boot
- Maximum adjustability
- Best performance ceiling
- Widely available spare parts
- Longest proven track record
❌ Strap Bindings Cons
- Requires sitting/squatting to strap in
- Slower lift-line entry
- Straps can freeze in wet conditions
- Ratchets wear over time

Union Force Bindings — Top-Rated All-Mountain
Medium flex, ultralight Vaporlite chassis, and legendary Union durability. A go-to for intermediate through expert riders.
View on Amazon5. Highback Design, Material Science, and Forward Lean
If the baseplate is the binding’s skeleton, the highback is its musculature. The highback determines how energy from your calf and shin reaches the heel edge of your board, and its design profoundly affects both riding performance and all-day comfort.
Highback Stiffness: Matching It to Your Riding
Highback stiffness should generally match overall binding stiffness — a soft binding with a very stiff highback creates an inconsistent, unpredictable response. However, nuances exist:
- Freestyle riders prefer slightly softer, shorter highbacks that allow more ankle mobility for tricks, presses, and jib features.
- All-mountain riders want medium stiffness with good torsional rigidity — the highback shouldn’t twist under lateral pressure.
- Freeride/carving riders benefit from taller, stiffer highbacks that maximize heel-edge leverage, particularly in hard-snow conditions.
Forward Lean: The Most Underused Adjustment
Forward lean is the rearward angle at which the highback is tilted toward your toe edge. It’s measured in degrees from vertical, typically ranging from 0° (perfectly upright) to 15° or more (aggressive forward tilt). Most riders never touch this adjustment after initial setup — a significant mistake.
More forward lean means:
- Quicker, more responsive heel-edge initiation
- A naturally more athletic, bent-knee stance
- Reduced ankle flex range (your calf hits the highback sooner)
- Increased calf fatigue on long runs
Less forward lean means:
- More comfortable, upright stance
- Greater ankle mobility (better for powder surfing and freestyle)
- Slower heel-edge response (binding waits for more lean before engaging)
- Less calf fatigue over the day
The adjustment mechanism is almost always a single bolt at the back of the highback, accessible with a Phillips-head screwdriver. Start at 0–3° and increase in small increments until you find your sweet spot. It’s worth a few minutes on a flat run just testing the difference.
Highback Rotation: Often Skipped, Always Important
When you set your binding angle on the board, the highback should rotate to match that angle so it sits parallel to your boot heel. If your binding is angled at +15° but your highback is pointing straight back (0°), the pressure from the highback will be uneven on your calf — more on one side — creating discomfort and uneven edge response. Most modern bindings allow tool-free highback rotation via a simple click-adjustment.
6. Strap and Ratchet Systems: Engineering That Touches Your Body Every Run
The strap and ratchet system is where binding quality becomes tangible. You feel it every time you click in, every time you ratchet down, and every run in between. Cheap straps dig in, flatten out, or lose their stretch over time. Premium straps feel like custom orthotics wrapped around your boot.
Ankle Strap Anatomy and Technologies
Modern ankle straps are far more sophisticated than the flat nylon bands of early snowboarding. Today’s designs incorporate:
- Co-molded multi-density foam: Hard shell for structural integrity, soft foam facing for comfort, often with a secondary layer of micro-cell padding at contact points.
- Articulated/anatomic shapes: The strap curves to match boot profiles rather than flattening them. This distributes pressure evenly instead of creating hot spots.
- Hinged designs: Some straps pivot at mounting points, allowing natural movement through flex cycles without resistance.
- Non-scratch inner linings: Protect boot materials over seasons of use.
Toe Strap: Cap vs. Traditional Positioning
The modern preference is overwhelming for cap straps — straps that hook over the toe box rather than across the upper. This design provides better security with the same strap tension. The tradeoff is slightly more fumbling when removing the binding, since you need to pull the strap over the toe rather than just releasing the buckle.
Some bindings, particularly those aimed at freestyle and park riders, still use traditional under-the-toe positioning specifically for quick-release convenience. If you’re frequently removing your front binding to skate around (which many park riders do), this can matter.
Ratchet Quality: The Difference Between Frustration and Flow
Nothing breaks the rhythm of a mountain morning faster than a ratchet that skips teeth, doesn’t release cleanly, or — worst of all — spontaneously loosens during a run. Ratchet quality is directly tied to price tier, but there are specific things to check at any price point:
- Number of teeth: more teeth = finer adjustment increment = better fit precision
- Material: metal-reinforced ratchets are significantly more durable than all-plastic versions
- Release mechanism: the flip-lever should release smoothly without requiring a sharp tool or aggressive force
- Cold performance: some cheaper plastics become brittle and shatter in extreme cold; look for temperature-rated materials
Top ratchet systems in 2026: Ride’s CNC-machined aluminum ratchets, Union’s stainless-reinforced system, and Burton’s Re:Flex ratchets that come with replacement kits. Replacement ratchets are available for most brands — carry a spare set in your bag. The Union Force vs Atlas comparison breaks down exactly how their hardware differs.
⚠️ Cold-Weather Ratchet Warning
At temperatures below –20°C (–4°F), plastic ratchet teeth become significantly more brittle and prone to snapping. If you regularly ride in extreme cold, look for bindings with metal-reinforced ratchet components or carry a spare ratchet. Never force a frozen ratchet — warm it briefly with your hand before engaging.

Ride C-6 Bindings — Best Value Mid-Flex
Industry-leading strap comfort, excellent ratchets, and a neutral mid-flex that suits 80% of recreational riders perfectly.
Shop Ride Bindings on Amazon7. Step-In, Rear-Entry, and Speed-Lace Systems: The Convenience Revolution
The quest to make binding entry faster is nearly as old as snowboarding itself. After decades of incremental improvement, the last ten years have produced genuinely compelling alternatives to traditional strap systems. Here’s where the technology stands today.
Burton Step On: A System That Finally Works
Step On was not Burton’s first step-in attempt, but it was the first that riders actually adopted at scale. The three-point connection — two front posts and one heel bail — engages automatically when you step down. Exit is via a toe or heel press. No straps. No sitting in the snow.
The performance profile of Step On is legitimately competitive with mid-range strap bindings. Heel lift is minimal. Edge response is direct. The main complaints from long-term users center on boot wear at the connection points (the metal posts grind into the boot sole over seasons) and the proprietary boot requirement locking you into Burton’s ecosystem.
Worth noting: the BOA vs lace debate for the boots themselves intersects here — Step On boots typically come in BOA, traditional lace, or hybrid versions. The BOA vs speed lace comparison is worth reading before choosing your boot entry system.
Nidecker Supermatic: The Challenger
The Supermatic emerged as a credible alternative to Step On with a different mechanical approach — a single-lever mechanism that locks both the toe and heel simultaneously with one action. Engagement is arguably even faster than Step On. Critically, it’s compatible with a wider range of Nidecker’s own boot lineup.
The full breakdown of Nidecker Supermatic vs Burton Step On shows where each system wins. In short: Step On has more proven durability data; Supermatic has a more elegant mechanism and better exit under fatigue.
Rear-Entry Bindings (Flow, Gnu Flow Systems)
The rear-entry concept — folding the highback down to allow sliding your foot in — was popularized by Flow (now out of business as a standalone brand) and later adapted by others. The main surviving use case is beginner-oriented bindings where the speed advantage matters and performance ceilings are lower.
One underappreciated advantage: rear-entry bindings are often easier for riders with mobility limitations or older riders with knee problems who struggle to squat while strapping in. From a pure performance standpoint, the fold-down mechanism is always the weak link in stiffness consistency.
8. Stance Width, Binding Angles, and Setup Science
Even perfect bindings will underperform if they’re set up incorrectly. Stance setup is the single most impactful thing you can do to improve comfort and performance without spending a dollar, and it’s criminally underexplored by most recreational riders.
Determining Your Stance Width
The foundational principle: stance width should be approximately equal to shoulder width, measured binding center to binding center. Most adults fall in the 50–58cm range. However, this is a starting point, not a rule. A slightly wider stance:
- Increases stability (lower center of gravity)
- Makes landing jumps easier
- Works better for powder and freeride
- Reduces torsional leverage on the board (slightly less edge bite)
A narrower stance:
- Increases board sensitivity and response
- Improves carving leverage
- Favored by racers and carvers
- Can feel unstable during landings until you’re accustomed to it
As a practical starting point: find your shoulder width with a measuring tape, then place your bindings at that measurement. Ride several sessions and only adjust if you feel specific discomfort or performance issues. Understanding your goofy vs. regular stance biomechanics is the first piece of this puzzle.
Binding Angles: The Four Common Setups
Binding angles are measured in degrees relative to the board’s centerline. Positive degrees point your foot toward the nose; negative degrees point toward the tail.
| Setup Name | Front Angle | Rear Angle | Best For | Notes |
|---|---|---|---|---|
| Beginner Standard | +15° | 0° | New riders, learning | Comfortable, natural stance |
| All-Mountain Duck | +15° | –3° to –6° | Versatile riding | Slight duck, most popular setup |
| Freestyle Duck | +12° to +18° | –12° to –18° | Park, pipe, tricks | Equal switch / regular feel |
| Freeride / Alpine | +21° to +30° | +6° to +15° | Carving, race | Both feet forward, maximum leverage |
Centered vs. Set-Back Stance
Beyond angle, you can also position your stance set back from center (toward the tail) or dead-centered. Set-back stances shift weight toward the tail, making the nose rise in powder for float. This is especially relevant if you ride in deep snow conditions — even 10–15mm of setback makes a noticeable difference.
The detailed mechanics of this are covered in our full snowboard stance setup guide, which goes deeper into setback calculations by snow type.
9. Matching Bindings to Your Riding Style: A Detailed Guide
The greatest mistake in binding selection is choosing based on brand prestige or aesthetic rather than riding style compatibility. Here’s how to match bindings precisely to how you actually ride — not how you wish you rode.
For Beginners
New riders should prioritize forgiving flex, easy-to-use ratchets, and a reliable heel-hold above all else. The most common beginner mistake is renting or borrowing bindings that are too stiff — it makes initiating turns harder and creates a false sense of failure when the board isn’t responding to subtle body movements.
Recommended binding characteristics for beginners: flex 2–4, anatomic ankle strap with generous padding, tool-free highback adjustment (so a shop or instructor can help dial in the setup on the slope), and simple 4×4 mounting compatibility for flexibility. Budget range: $80–$180 covers solid beginner options. Consider consulting our beginner’s guide for a holistic setup perspective.
As you progress — typically after 5–15 days of riding when you’re reliably linking turns and riding varied terrain — you’ll naturally feel the soft binding’s limitations and be ready to move up.
For Park and Freestyle Riders
Park bindings prioritize feel, boot-to-binding communication for tricks, and durability against the repeated impacts of rail and kicker landings. Softer flex (3–5) is generally preferred, but many experienced park riders ride medium bindings for the added pop during lip tricks and jumps.
Key park-specific features to look for:
- Canted footbeds: Angled platforms that position your knees over your toes naturally, reducing joint stress during extended park sessions
- Lightweight construction: Park riders are in the air frequently; extra grams in the binding translate to harder landings
- Durable baseplates: Rail hits transfer impact directly through the board into the baseplate — look for reinforced versions
- Short, flexible highbacks: Mobility for pressing and buttering
Top park bindings: Union Strata, Union Legacy, Rome 390 Boss. For deeper analysis, the tested park bindings under $200 guide covers value options.
For All-Mountain Riders
All-mountain bindings are the industry’s bread and butter because the largest group of riders — those who ski groomers, venture into the trees, and occasionally hit park features — needs something that does everything competently without excelling at just one thing.
Look for medium flex (5–7), quality strap systems that hold well in variable conditions (wet snow, ice), reliable ratchets, and mounting versatility. The Burton Cartel and Union Force have dominated this category for years, and with good reason: they get the balance right.
If you’re an intermediate rider looking to level up without changing everything, new bindings in the all-mountain mid-flex range often produce the most dramatic positive improvement in riding feel for the money spent.
For Carving and Freeride
Aggressive carving and big-mountain freeride demand the highest levels of energy transfer, precision, and durability. Stiff flex (7–9+), taller highbacks with aggressive forward lean options, and exceptionally durable baseplates define this category.
The Union Atlas and Burton Cartel X (reviewed in our Cartel X deep dive) represent the pinnacle of this category. At these stiffness levels, the binding almost disappears — your movements translate directly and immediately, and the only thing standing between you and the turn is your technique.
For powder-specific setups, the considerations change: look at bindings specifically designed for resort-adjacent backcountry. The best bindings for powder article breaks down the float-vs-hold tradeoffs.
For Women Riders
Women’s bindings are not merely men’s bindings with different color schemes. Anatomically, women’s feet and calves have different proportions — narrower heels, different calf curvature, and different flex preferences influenced by muscle structure. Women’s-specific bindings feature narrower heel cup dimensions, adjusted strap widths, and often softer flex ratings calibrated for typically lighter body weights.
The best women’s snowboard bindings guide covers the full landscape of women’s-specific designs, including options from Union Rosa (reviewed in our Union Rosa review), Rome, and Ride’s women’s line.
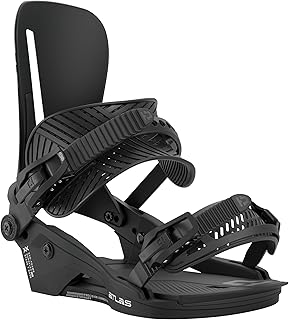
Union Atlas — Best Stiff Freeride Binding
Forged aluminum baseplate, maximum energy transfer, and bulletproof durability. The choice for aggressive all-mountain and freeride specialists.
Buy Union Atlas on Amazon10. Top Snowboard Bindings of 2026: Expert Reviews
The following are bindings that have consistently earned their reputation across multiple seasons of real-world testing, industry feedback, and rider reviews. This is not a sponsored ranking — it’s an honest assessment of what works and for whom.
Burton Cartel — The Industry Standard
The Cartel has been Burton’s flagship all-mountain binding for more than two decades. That longevity isn’t nostalgia — it’s earned. The Cartel refined its formula steadily: the current generation features a 45% fiberglass composite baseplate (stiff but not harsh), the Hammock Highback for consistent flex, and Burton’s Infinite Channel System for mounting versatility.
Flex: 6–7. Best for: intermediate to advanced all-mountain riders. The Cartel X steps up to flex 8–9 for more aggressive use cases.
| Binding | Flex | Best For | Approx. Price | Rating |
|---|---|---|---|---|
| Burton Cartel | 6–7 | All-Mountain | $300–$380 | ★★★★★ |
| Union Force | 6 | All-Mountain | $280–$350 | ★★★★★ |
| Union Atlas | 8–9 | Freeride / Carve | $340–$420 | ★★★★★ |
| Union Strata | 5–6 | Park / Freestyle | $260–$320 | ★★★★½ |
| Union Legacy | 4 | Park | $200–$260 | ★★★★½ |
| Burton Step On | 5–6 | Convenience / All-Mtn | $350–$450 | ★★★★ |
| Ride C-6 | 6 | Value All-Mountain | $190–$240 | ★★★★ |
| Rome 390 Boss | 4–5 | Freestyle / Park | $220–$280 | ★★★★ |
Union Force — Ultralight Champion
Union’s Vaporlite technology used in the Force keeps the binding weight remarkably low without sacrificing structural integrity. The Force is a medium-flex binding that punches well above its price class in fit, feel, and durability. Union’s strap quality and ratchet precision are arguably unmatched in the industry at this price point, which is why the Force vs Atlas comparison is such a useful purchase guide — they share DNA but serve different performance levels.
Union Strata — Park Performer
The Strata is Union’s park-specialist binding, built with a narrower footbed for park-oriented, closer-to-centered boot positioning, and a flex profile that rewards quick footwork and press technique. Read the full Union Strata review for spec details.
Burton Step On — Paradigm Shift
We’ve discussed Step On’s mechanics already, but as a product it deserves full recognition: it genuinely changed how many people experience snowboarding. The 3-point connection system continues to evolve with each generation, and compatibility continues to expand. If you already use Burton boots or are starting fresh, the Step On ecosystem is worth serious consideration.
💰 Getting the Best Price
Bindings rarely go on deep sale during peak season (December–February). The best windows for deals are late March through May (end-of-season clearance), and early September when new season stock arrives and prior-year inventory is discounted. Our timing guide for snowboard gear purchases has the full breakdown on liquidation cycles.
11. Binding Sizing and Compatibility: Getting It Exactly Right
Binding sizing is simpler than board sizing but still requires attention. Get it wrong and no amount of strap adjustment will deliver the fit you need.
Boot Size to Binding Size
Most bindings come in three or four size options, typically labeled S, M, L (and sometimes XL or XS). Each size covers a range of men’s US boot sizes:
| Binding Size | Men’s US Boot Size | Women’s US Boot Size | EU Size Range |
|---|---|---|---|
| XS / S | 3–6 | 4.5–7.5 | 35–39 |
| S / M | 6–8 | 7.5–9 | 38–41 |
| M / L | 8–11 | 9–12 | 41–45 |
| L / XL | 11–14+ | 12+ | 45–49+ |
If your boot size falls near the overlap between two binding sizes, err toward the larger size — you can always tighten straps but can’t expand the baseplate. Wide-footed riders have additional considerations; the wide feet boot guide pairs well with choosing correspondingly wide binding base plates.
Boot Overhang: The Drag Issue
Boot overhang occurs when your boot extends beyond the edge of the binding baseplate and, more importantly, beyond the board edge. Excessive overhang causes drag — your boot tip or heel physically scrapes the snow during a carve, limiting your edge angle and potentially catching and throwing you.
A small amount of overhang (up to 5–8mm) is generally acceptable and inevitable with larger feet. Some wide boards are designed specifically to accommodate this — if you’re riding a standard-width board with size 12+ boots, you may want to consider a wide version of your preferred board.
Insert Pattern Compatibility
As mentioned, the binding disc must match your board’s insert pattern:
- 4×4: Most common. Holes spaced 4cm apart in a square. Offers limited stance positioning.
- 2×4: Two rows of holes, 2cm apart laterally and 4cm front-to-back. Allows stance adjustments in 2cm increments across a wider range.
- 3D / Burton Channel: Burton’s proprietary system. A long slot runs the length of the board, allowing infinite positioning. Requires Burton-compatible discs.
Most major binding brands (except for older Burton models) come with a versatile disc that fits both 4×4 and 2×4. When buying online, verify disc compatibility before purchasing. The stance setup guide covers exact positioning measurements.
Do Bindings Fit All Boards?
Not always. Split board setups require specific split-compatible bindings with a different baseplate design. Some specialty boards have unique mounting systems. For traditional all-mountain and freestyle boards using the standard mounting patterns above, any standard binding will fit any standard board with the matching disc.
Rome 390 Boss — Best Park Binding
Soft-medium flex, canted footbed, and premium materials built specifically for freestyle riders who spend time in the park.
Check Rome Bindings on Amazon12. Binding Care, Maintenance, and Longevity
Quality bindings represent a significant investment. With basic seasonal care, a $350 pair should last five or more seasons — that amortizes to under $70/season, making them one of the better value propositions in gear. Neglect them and you’ll be replacing key components annually. The full snowboard maintenance guide covers your whole setup; here’s the binding-specific protocol.
Post-Season Storage Protocol
At the end of each season, before putting your board away for summer:
- Completely loosen all straps to relieve compression memory from the foam padding
- Clean all hardware with a damp cloth, removing salt residue, dirt, and grime from ratchet mechanisms
- Apply a single drop of silicone lubricant (never oil-based) to each ratchet pivot point
- Check all mounting screws and re-tighten any that have worked loose — they commonly loosen over a season of vibration
- Inspect straps and highbacks for cracks, UV degradation, or stress fractures
- Store in a cool, dry place away from direct sunlight (UV destroys nylon and plastic over seasons)
In-Season Maintenance
During the season, a quick check before each session is worth the two minutes:
- Verify mounting screws are tight — vibration gradually loosens them
- Check that ratchets engage smoothly (they may need a brief warm-up flex in very cold conditions)
- Inspect strap attachment points where the strap clips into the ratchet housing — these plastic clips are the most common failure point
- Look for any cracking at the highback pivot — early cracks become full breaks under load
Replacing Parts vs. Replacing the Binding
The good news: most binding components are replaceable without buying a whole new binding. Straps, ratchets, mounting screws, and even highbacks are sold separately by most major manufacturers.
When to replace parts: worn ratchet teeth, cracked strap mounting points, loose highback pivot that doesn’t stiffen with tightening.
When to replace the whole binding: cracked baseplate (structural failure risk), broken highback at the base, or mounting disc damage that affects alignment. Riding with a cracked baseplate is genuinely dangerous — it can cause unexpected releases at speed.
✅ Annual Maintenance Checklist
Loosen straps for storage → Clean ratchets → Lubricate pivots → Check all bolts → Inspect highback for cracks → Verify disc tightness. This 15-minute ritual extends binding life by seasons.
Binding Life Expectancy by Use Level
| Riding Frequency | Days/Season | Expected Lifespan | First Failure Points |
|---|---|---|---|
| Casual (Weekend Warrior) | 5–15 days | 6–10 seasons | Strap foam compression |
| Regular Recreational | 15–35 days | 4–7 seasons | Ratchets, strap wear |
| Dedicated / Passionate | 35–70 days | 3–5 seasons | Highback flex, disc wear |
| Semi-Professional | 70–100+ days | 1–3 seasons | Baseplate fatigue, all parts |
The total cost of snowboarding across a lifetime of riding is something thoughtful riders plan for. Factoring binding replacement cycles into your overall snowboard gear budget and amortization planning helps avoid sticker shock when everything needs replacing at once.

Burton Step On — Fastest Entry System Available
The binding that changed snowboarding. Click in standing up, skip the squat, and never sit in cold snow again.
Shop Burton Step On on AmazonBonus: Quick Buying Decision Framework
After everything we’ve covered, here’s a simplified decision tree to bring it all together when you’re standing in a shop or browsing online.
Frequently Asked Questions: Snowboard Bindings
Beginners should look for soft to medium flex (rating 1–4 on a 1–10 scale). Soft flex bindings are more forgiving, easier to initiate turns with, and reduce fatigue as you develop muscle memory. They’re also more comfortable during the inevitable falls that come with learning. As you progress, you can always upgrade to a stiffer binding — but don’t let anyone talk you into stiff hardware before you’re ready for it.
Your boot should sit completely within the binding base plate with minimal overhang (under 5mm on each side). The heel cup should cradle your boot snugly. When buckled, there should be zero heel lift — your heel stays flat even when you flex forward aggressively. If you feel pressure points or your boot shifts laterally inside the binding, try a different size binding or adjust the ladders/strap length. Bringing your actual riding boots to the shop when trying bindings is essential.
Strap bindings use two straps (toe and ankle) that you fasten while seated or standing. They offer maximum adjustability and work with almost any boot, and have the highest performance ceiling. Step-in systems (like Burton Step On or Nidecker Supermatic) let you click into the binding while standing, eliminating the need to sit in the snow to strap in. Step-in systems are faster but require compatible boots and cost significantly more. For most riders, the convenience difference is meaningful but not worth the ecosystem lock-in unless you specifically value faster lift-line entry.
Straps should be snug enough to eliminate all movement and heel lift, but not so tight that they restrict blood flow or create pressure points. A good test: flex hard into your toe edge — if your heel lifts more than 2mm, tighten the ankle strap. Your toes should not feel numb after 10 minutes of riding. Many riders over-tighten their toe strap, which restricts natural foot flex and causes discomfort — the ankle strap is doing most of the work, and the toe strap mainly prevents forward foot movement.
Start with stance width equal to your shoulder width measured binding center to binding center (typically 50–58cm for adults). For angles, a versatile starting point is +15°/0° (front/rear) for beginners, or +15°/–3° for a slight duck stance that works for most all-mountain riding. Freestyle and park riders often prefer a full duck (+12°/–12°) for switch riding symmetry. Always verify knee-over-toe alignment after setting angles to avoid joint stress. Fine-tune over several sessions rather than making big changes at once.
Traditional Burton strap bindings use Burton’s proprietary 3D and Channel mounting systems, which are not directly compatible with the standard 4×4 or 2×4 disc patterns used by most other brands without an adapter. However, Burton now includes a Universal Mounting System (UMS) disc with most of their bindings, allowing them to work on non-Burton boards with standard insert patterns. Always verify compatibility in the product specs before purchasing, especially when mixing brands.
With proper care, quality bindings should last 3–7 seasons for a regular rider (20–40 days per year). The highback and baseplate are generally the most durable components. Straps and ratchets wear faster but are replaceable parts available from most manufacturers. Key warning signs: cracked baseplate (replace immediately — safety issue), stripped ratchets that won’t hold tension, broken highback, or straps that no longer apply even pressure across the boot. Annual maintenance significantly extends useful life.
Forward lean is the angle at which the highback tilts toward your toe edge. More forward lean (5–15°) gives quicker, more responsive heel-edge initiation and suits carvers and aggressive riders. Less (0–3°) allows a more relaxed stance and suits freestyle and beginner riders. The adjustment is almost always a single Phillips-head bolt at the back of the highback, accessible without removing the binding from the board. Start neutral and increase forward lean in 2° increments if you want faster heel-side response.
Yes, most bindings are compatible across brands as long as the insert pattern matches. The most common standard is 4×4 (holes spaced 4cm apart in a square). Many modern boards also use 2×4 (two rows, 2cm apart), which gives more stance positioning options. Check that your binding’s mounting disc matches your board’s hole pattern. Burton’s Channel system requires a different disc but comes with adapters. If you plan to use bindings across multiple boards, choose a binding with a universal disc that fits multiple patterns.
Ideally yes. Boots and bindings work as a system. The binding must match the boot’s sole length (for proper sizing), and the flex profiles should complement each other — softer boots typically pair better with softer bindings for a progressive, natural feel. Mismatching a stiff boot with a soft binding creates a dead, unresponsive feel. If you’re buying separately, always bring your actual riding boots to the shop when selecting bindings so you can test fit. Read our snowboard boots guide for the full boot selection process.
Riders with wide feet should look for bindings with extra-wide baseplates or those labeled ‘W’ or ‘Wide’. Union, Ride, and Burton all offer wider footbed options in their main lines. The critical measurement is overhang: your boot edge should not extend past the binding base by more than 5–8mm or you’ll experience toe or heel drag on hard snow during deep carves. Wide boards help solve this problem too — pairing wide boots with a wide board means your binding can be centered correctly without overhang issues.
After every session, dry your bindings completely before storage — moisture is the primary cause of ratchet corrosion and brittleness in cold. Apply a small drop of silicone lubricant to the ratchet mechanism at the start of each season. Avoid over-torquing ratchets, which cracks the plastic teeth over time. Never force a frozen ratchet — hold it in your glove for 30 seconds to warm the plastic before trying to engage. Carry a spare set of ratchets in your pack; most manufacturers sell them cheaply and they take 2 minutes to swap.
Conclusion: Your Bindings Are Your Most Important Gear Decision
We started by saying that bindings are the most influential piece of equipment you own — and after 10,000+ words of detail, that case stands firmly. Flex, highback design, strap quality, entry system, stance setup, sizing, and maintenance all converge to determine whether your riding progresses or stagnates, whether each run feels like a conversation with your board or a negotiation.
The good news: the binding market in 2026 is exceptional across all price tiers. From a $120 entry-level set that genuinely performs to a $450 elite system that disappears into your riding, the options have never been better researched, tested, or refined.
Make the decision thoughtfully. Start with your riding style and terrain preference. Match flex to your skill level — err soft rather than stiff if you’re uncertain. Try before you buy when possible, or purchase from a retailer with a strong return policy. And remember: the best binding is not the most expensive one or the most popular one — it’s the one that fits your boots, your board, your style, and your progression goals.
To complete your gear picture, explore our companion guides:

Find Your Perfect Bindings on Amazon
Browse the full range of snowboard bindings with current pricing, reviews, and fast delivery. Use our tag for the best current deals.
Browse All Snowboard Bindings


