

There is an old saying on the mountain: “If you didn’t film it, did it really happen?” Whether you are stomping your first 360 in the park or navigating a steep line in the backcountry, capturing those moments is essential. Snowboarding is fast, visually stunning, and fleeting. You need a camera that can keep up with the pace, withstand the freezing temperatures, and deliver footage that makes your friends jealous.
Using your smartphone is a recipe for disaster. Batteries die instantly in the cold, screens crack, and handling a touchscreen with mittens is impossible. To truly document your season, you need a dedicated action camera designed for the elements. But with the market flooded with 360-degree options, gimbals, and rugged point-and-shoots, finding the right tool can be overwhelming.
We have tested the top contenders in the harshest conditions to bring you the definitive list of the 10 best cameras for snowboarding. From documenting your progression to creating edits worthy of the best snowboard movies of all time, we have a pick for every style of rider.
Who This Guide Is For
This comprehensive guide is designed for every type of winter sports enthusiast who wants to capture their adventures on the slopes. Whether you are a complete beginner who just rented your first snowboard and wants to film your very first day on the mountain, or an experienced rider who has spent years carving through powder and wants to upgrade to cinema-quality footage, this guide has something for you. We cover budget-friendly options for students and casual riders, mid-range cameras for enthusiasts who want the best balance of quality and value, and professional-grade equipment for content creators who demand the absolute best.
If you are a parent looking for a durable, easy-to-use camera to capture your kids’ first snowboarding lessons, we have dedicated recommendations for that scenario as well. If you are planning a backcountry expedition where reliability is literally a matter of safety, we discuss which cameras can survive the harshest conditions on earth. And if you are a YouTube creator or social media influencer looking to build an audience around your snowboarding content, our sections on filming techniques, editing workflows, and platform-specific optimization will help you stand out in an increasingly competitive space.
The snowboarding camera market has evolved dramatically in recent years. Just five years ago, your choices were essentially limited to a GoPro in a plastic housing and maybe a Xiaomi Yi if you were on a tight budget. Today, the landscape includes 360-degree cameras that capture everything around you simultaneously, gimbal-stabilized pocket cameras that produce footage rivaling Hollywood productions, modular systems that let you swap lenses like a professional cinema camera, and ultra-compact devices smaller than your thumb that can be magnetically attached anywhere on your body. The technology has advanced so rapidly that even cameras released two years ago can feel outdated compared to the latest models.
This guide cuts through the noise. We have spent hundreds of hours testing these cameras on actual mountains, in actual blizzards, during actual dawn patrol sessions when the temperature dropped to negative twenty degrees. We know which cameras survive a hard crash into a tree well. We know which batteries actually last through a full day of riding. We know which stabilization algorithms turn bumpy groomer footage into buttery smooth cinematic gold. And we know which cameras produce the kind of vibrant, well-exposed footage that makes snow look as magical as it feels to ride through.
Throughout this guide, you will find detailed specifications, real-world performance analysis, honest pros and cons for each camera, and actionable advice that goes beyond the marketing copy. We are not here to sell you the most expensive option or push a particular brand. We are here to help you find the camera that matches your specific needs, budget, and riding style. So grab a hot chocolate, settle in, and let us help you find the perfect tool to capture every shred of your snowboarding season.
Buying Guide: What Matters on the Mountain?
Before you drop your cash, you need to understand what makes a camera “snowboard-ready.” It isn’t just about resolution; it’s about survivability. The mountain environment presents a unique set of challenges that even the most advanced technology struggles with. Understanding these challenges before you buy will save you frustration, money, and potentially a ruined vacation.
1. Stabilization is King
Snowboarding is bumpy. Even on groomed runs, the chatter can make footage unwatchable. You need superior electronic image stabilization (EIS) like GoPro’s HyperSmooth or DJI’s RockSteady. These technologies crop the image slightly to smooth out the shakes, creating a gimbal-like glide without the fragile mechanics.
Electronic image stabilization has come an incredibly long way in recent years. The earliest versions of EIS were crude, producing warped edges and a noticeable “jello” effect that made footage look unnatural. Modern EIS algorithms use a combination of gyroscope data, accelerometer readings, and advanced machine learning to predict and counteract movement in real time. The result is footage that looks remarkably smooth even when you are bombing down a mogul field or launching off a side hit at full speed.
GoPro’s HyperSmooth technology, now in its sixth generation, is widely considered the gold standard for action camera stabilization. The HERO12 Black’s HyperSmooth 6.0 uses a combination of in-camera stabilization and post-processing to produce footage that is virtually indistinguishable from gimbal-stabilized video. The AutoBoost feature automatically adjusts the level of stabilization based on the intensity of movement, ensuring smooth footage without unnecessarily cropping the image.
DJI’s RockSteady stabilization is HyperSmooth’s closest competitor and, in some scenarios, may even be slightly better. The Action 4’s RockSteady 3.0 Plus uses an upgraded algorithm that produces smoother results in particularly challenging conditions, such as very fast descents or when the camera is subjected to sudden impacts. DJI also offers a HorizonSteady feature that keeps the horizon perfectly level even when the camera rotates a full 360 degrees, which is invaluable for snowboarding footage where the camera may be at various angles relative to the ground.
Insta360’s FlowState stabilization is unique because it operates on 360-degree footage. Since the camera captures everything in all directions, the stabilization algorithm has access to an enormous amount of visual information, which it uses to produce incredibly smooth results. The trade-off is that FlowState requires post-processing in Insta360’s app, which means you cannot see the stabilized footage until after your ride. However, the results are often superior to traditional EIS, particularly in scenarios where the camera is tumbling or rotating rapidly.
If you are considering a mechanical gimbal camera like the DJI Pocket 3, you should know that gimbals provide stabilization through physical hardware rather than software algorithms. A three-axis gimbal uses small motors to counteract movement in real time, producing footage that is inherently smoother than any EIS system. The drawback is that gimbals are fragile mechanical devices that can break if subjected to the kinds of impacts that are routine in snowboarding. The DJI Pocket 3 is an exceptional camera, but it requires careful handling that may not be practical on the mountain.
For most snowboarders, a camera with excellent EIS is the best choice. It provides a great balance of smooth footage, durability, and convenience. If you are filming cinematic shots from a fixed position or riding very gently, a gimbal camera can produce stunning results. But for the rough-and-tumble reality of snowboarding, EIS-equipped action cameras are the way to go.
2. Cold Weather Performance
Lithium-ion batteries hate the cold. A standard battery can die in 10 minutes when the temperature drops below freezing. Look for cameras that come with “Enduro” or cold-resistant batteries specifically engineered to operate in sub-zero temps. If you are planning on backcountry snowboarding, bringing spare warm batteries is mandatory.
The cold weather battery problem is rooted in chemistry. Lithium-ion batteries generate electricity through a chemical reaction that slows down significantly in cold temperatures. At 32°F (0°C), a typical lithium-ion battery loses about 20% of its capacity. At -4°F (-20°C), you can expect to lose 40% or more. At extreme cold temperatures like -22°F (-30°C), some batteries will simply refuse to function at all. This is not a defect in the battery; it is a fundamental limitation of the technology that affects every lithium-ion battery ever made.
GoPro recognized this problem early and developed their Enduro battery technology specifically for cold-weather use. The Enduro battery uses a different chemical formulation that maintains performance at much lower temperatures than standard lithium-ion cells. In our testing, the Enduro battery in the HERO12 Black lasted approximately 2.5 hours at 15°F (-9°C), compared to approximately 45 minutes for the standard GoPro battery under the same conditions. That is a dramatic improvement that can be the difference between filming your entire day and running out of power before lunch.
DJI’s Action 4 uses a similar approach with their freeze-resistant battery, which they claim maintains 80% capacity at -4°F (-20°C). In our real-world testing, we found this claim to be roughly accurate. The Action 4 consistently lasted longer in cold conditions than competing cameras with standard batteries, though not quite as long as the GoPro HERO12 with an Enduro battery.
Beyond the battery itself, cold weather affects cameras in several other ways. LCD screens become sluggish and may even stop displaying information entirely at very low temperatures. Mechanical buttons become stiff and difficult to press, especially while wearing gloves. Memory cards can become unreliable in extreme cold, potentially corrupting your footage. And the camera body itself becomes uncomfortably cold to the touch, which can be painful if you need to handle it with bare hands.
There are several strategies for managing cold weather performance. The most important is keeping spare batteries warm. Store them in an inside pocket close to your body, where they will stay warm from your body heat. When you need to swap batteries, pull the warm spare from your pocket and put the cold one in its place. The cold battery will gradually warm up and regain some of its charge, so you can often get a second life out of a battery that appeared to be dead.
Another strategy is to keep the camera itself warm when you are not actively filming. When you are on a chairlift, for example, you can tuck the camera inside your jacket. This keeps the battery warm and ensures the camera is ready to record as soon as you stand up for the next run. Some riders even use small hand warmers attached to the camera or its mount to maintain a minimum operating temperature.
It is also worth noting that cold weather affects different camera brands and models differently. GoPro cameras generally handle cold well, especially with the Enduro battery. DJI cameras are also relatively cold-resistant. But some budget cameras from lesser-known brands may struggle significantly in freezing conditions, with battery life dropping to just a few minutes in the worst cases. If you are riding in consistently cold environments, such as northern resorts or high-altitude backcountry terrain, investing in a camera with proven cold-weather performance is essential.
3. Form Factor and Mounting
Where will you put it? A POV (Point of View) shot requires a camera light enough to mount on your snowboard helmet without causing neck strain. If you want selfie shots, you need a camera compatible with an invisible selfie stick. 360 cameras are increasingly popular because they frame out the stick automatically, making it look like a drone is following you.
The form factor of a camera determines not only how you mount it but also how convenient it is to use throughout the day. A camera that is too large or heavy will be uncomfortable on a helmet mount, potentially causing neck fatigue after just a few runs. A camera that is too small may be difficult to operate with gloves on, leading to missed shots and frustration.
Action cameras like the GoPro HERO12 Black and DJI Osmo Action 4 have settled on a compact rectangular form factor that is easy to mount almost anywhere. They weigh between 150-170 grams, which is light enough for helmet mounting without significant neck strain for most adults. The standard mounting system uses a two-prong or three-prong interface that is compatible with a vast ecosystem of third-party mounts from companies like Ulanzi, Telesin, and SMORTREE.
360 cameras like the Insta360 X3 have a distinctive elongated shape that houses two fisheye lenses on opposite sides. This form factor is not ideal for helmet mounting because the protruding lenses are vulnerable to damage in a crash. Instead, 360 cameras are typically used on a selfie stick, either held in hand or mounted to a backpack shoulder strap. The invisible selfie stick effect, where the software automatically removes the stick from the footage, creates stunning drone-like shots that are impossible with any other type of camera.
The Insta360 GO 3 takes a completely different approach with its ultra-compact pill-shaped design. At just 35 grams, it is light enough to be worn on a hat, clipped to a jacket, or attached to virtually any surface using its magnetic mounting system. The trade-off is that this tiny form factor limits battery life and image quality compared to larger cameras. But for casual riders who want a lightweight, unobtrusive camera, the GO 3 is hard to beat.
When evaluating a camera’s form factor for snowboarding, consider the following factors: weight (especially for helmet mounting), ease of operation with gloves, mounting compatibility, and how the camera will be stored when not in use. A camera that is convenient to use will get used more often, which means more footage and better memories.
4. Waterproofing
Snow is just frozen water. When you crash (and you will crash), snow will get packed into every crevice of the camera. As it melts, it becomes water. Your camera must be natively waterproof without a bulky housing that fogs up.
Modern action cameras have made enormous strides in waterproofing. The GoPro HERO12 Black is waterproof to 33 feet (10 meters) without any housing. The DJI Osmo Action 4 is waterproof to an impressive 60 feet (18 meters), also without housing. The Insta360 X3 is waterproof to 16.4 feet (5 meters) without housing. These ratings mean that even in the worst crashes where snow packs into every opening, the camera’s internal electronics will be protected.
However, there are important nuances to waterproofing that many buyers overlook. First, waterproof ratings assume fresh water at a specific temperature. Snow, which is partly composed of ice crystals, can be more abrasive than liquid water and may eventually wear down seals and gaskets. Second, repeated exposure to extreme cold followed by warming (such as bringing the camera indoors after a day on the mountain) can cause condensation inside the camera body. While this is generally not a problem for modern action cameras with well-sealed housings, it can be an issue for cameras with removable battery doors or ports that are not properly sealed.
Third-party protective cases and housings can add an extra layer of waterproofing and impact protection, but they come with their own drawbacks. Enclosed housings can fog up due to temperature differences between the inside and outside of the case. Anti-fog inserts can help, but they are not foolproof. Some cases also reduce audio quality by muffling the microphones. For most snowboarding scenarios, a camera’s native waterproofing is sufficient, and adding an external housing is unnecessary.
5. Image Quality and Resolution
Image quality is often the first specification that buyers look at, but it is also the most misunderstood. A camera’s resolution (measured in pixels, such as 4K or 5.3K) determines how much detail the image contains, but resolution alone does not determine image quality. Factors like sensor size, lens quality, image processing algorithms, and color science all play equally important roles.
For snowboarding, resolution matters because the environment is incredibly detailed. Snow crystals, tree bark, clothing textures, and facial expressions all benefit from higher resolution. The GoPro HERO12 Black shoots in 5.3K at 60 frames per second, which provides exceptional detail and allows you to crop into the image significantly without losing quality. This is particularly useful for action camera footage, where you often want to zoom in or reframe the shot in post-production.
However, 4K resolution (3840×2160) is more than adequate for most snowboarding content, especially if you are primarily sharing on social media platforms like Instagram, TikTok, or YouTube, where even 1080p looks great on a phone screen. The DJI Osmo Action 4 maxes out at 4K, but its larger 1/1.3-inch sensor produces images with better dynamic range and low-light performance than many 5.3K cameras with smaller sensors.
Frame rate is another critical specification for snowboarding. Higher frame rates (60fps, 120fps, or 240fps) allow for smooth slow-motion playback, which is essential for analyzing your technique or creating dramatic cinematic shots. The GoPro HERO12 can shoot 4K at 120fps or 2.7K at 240fps, giving you incredible slow-motion capability. The DJI Pocket 3 can shoot 4K at 120fps as well, with the added benefit of mechanical stabilization.
Dynamic range is particularly important for snowboarding because the environment presents extreme contrasts between bright snow and dark shadows. A camera with good dynamic range can capture detail in both the bright highlights of sunlit snow and the deep shadows of tree runs simultaneously. HDR (High Dynamic Range) video, which combines multiple exposures in real time, is becoming increasingly common in action cameras and is a significant advantage for snowboarding footage.
6. Audio Quality
Many snowboarders focus entirely on video quality and completely ignore audio. This is a mistake. Good audio can transform a decent video into an immersive experience. The sound of your board carving through powder, the wind rushing past, your friends cheering, and the ambient sounds of the mountain all contribute to the viewer’s sense of being there with you.
Most action cameras have built-in microphones that produce acceptable audio in calm conditions but deteriorate rapidly in wind. Snowboarding is inherently a windy activity, and the rushing air creates significant noise that can overwhelm the camera’s microphones. Some cameras, like the GoPro HERO12 Black, now support Bluetooth audio, allowing you to connect wireless earbuds or a wireless microphone for significantly improved audio quality.
For serious content creators, an external microphone is worth the investment. The Rode Wireless Go II is a popular choice among snowboard vloggers because it is compact, wireless, and provides excellent wind noise reduction. However, wearing a wireless microphone while snowboarding adds complexity and another potential point of failure, so it is not for everyone.
360 cameras like the Insta360 X3 and GoPro MAX have a significant advantage in audio because they use multiple microphones to capture sound from all directions. This creates an immersive 360-degree audio field that puts the viewer right in the middle of the action. When paired with compatible headphones, 360 audio is a genuinely transformative experience.
7. Storage and Memory Cards
High-resolution video generates enormous files. A single hour of 5.3K video from a GoPro HERO12 can consume over 60GB of storage. Even 4K video at 60fps can easily fill a 128GB memory card in a few hours. This means you need to plan your storage carefully, especially on multi-day trips where you may not have access to a computer for offloading footage.
The most important specification for a memory card used in an action camera is write speed. The card must be fast enough to keep up with the camera’s data stream, especially when recording at high resolutions and frame rates. Look for cards rated V30 or V60, which guarantee minimum write speeds of 30MB/s and 60MB/s respectively. Popular choices include the SanDisk Extreme Pro, Samsung EVO Select, and Kingston Canvas React.
It is also worth considering the card’s durability. Memory cards used in snowboarding cameras are exposed to extreme temperatures, moisture, and physical shock. Cards rated for industrial or extreme conditions, such as the SanDisk Extreme Pro with temperatureproof and waterproof ratings, are more reliable in these harsh environments.
Carrying multiple smaller cards (such as two 128GB cards) rather than one large card (such as a single 512GB card) provides a safety net. If one card fails or becomes corrupted, you will not lose all of your footage for the day. Many experienced snowboarders swap cards at lunch, keeping the morning’s footage in a safe pocket while using a fresh card for the afternoon.
8. App Ecosystem and Connectivity
The camera is only half the equation. The companion app on your phone is where you edit, share, and manage your footage. A good app can save you hours of editing time and make the difference between footage that sits on a hard drive and footage that actually gets shared.
GoPro’s Quik app is one of the most polished companion apps in the action camera space. It offers automatic video creation, where the app analyzes your footage and creates highlight reels set to music. The app also provides extensive manual controls for those who want to fine-tune their settings, and it integrates with GoPro’s cloud storage for automatic backup.
Insta360’s app is particularly impressive for 360-degree footage. The app allows you to reframe 360 video by simply dragging your finger across the screen, choosing the angle and perspective after the fact. The AI-powered editing features can automatically track subjects, apply dynamic transitions, and create cinematic edits with minimal user input. For snowboarding, this is invaluable because you cannot always aim a 360 camera precisely while riding.
DJI’s Mimo app provides a clean, intuitive interface for the Action 4 and Pocket 3. It offers good manual controls, easy firmware updates, and integration with DJI’s cloud services. The app is not as feature-rich as GoPro’s or Insta360’s for automated editing, but it is reliable and straightforward.
Connectivity features like Wi-Fi and Bluetooth are important for transferring footage from the camera to your phone. Newer cameras support faster Wi-Fi standards that can transfer large 4K files in seconds rather than minutes. Some cameras also support direct social media sharing from the app, allowing you to post footage without first transferring it to your phone.
9. Durability and Build Quality
Snowboarding is a rough sport. Your camera will be dropped, crashed, buried in snow, exposed to freezing temperatures, and potentially struck by your board or other objects. Build quality matters.
The GoPro HERO12 Black has a well-established reputation for durability. Its polycarbonate body can withstand significant impacts, and the lens is protected by a replaceable glass cover. Many snowboarders have crashed violently only to find their GoPro still functioning perfectly. The camera’s sealed construction also prevents snow and moisture from reaching internal components.
DJI’s Action 4 takes durability a step further with its Gorilla Glass lens cover and reinforced body design. The magnetic mounting system is robust and holds securely even during high-speed riding. DJI also offers their Care Refresh protection plan, which provides accidental damage coverage for a fixed fee, giving peace of mind for riders who are hard on their equipment.
The Olympus Tough TG-7 is in a completely different category when it comes to durability. It is crushproof (rated to withstand 220 pounds of force), shockproof (survives drops from 7 feet), freezeproof (operates down to 14°F), and waterproof (rated to 50 feet). You can literally run it over with a car and it will continue to function. While it lacks the advanced video features of dedicated action cameras, its indestructible build makes it ideal for riders who prioritize reliability above all else.
10. Price and Value
Price is always a consideration, and the action camera market offers options at every price point. Budget cameras under $100, like the Akaso Brave 7 LE, provide basic 4K video and decent features for riders who want to start filming without a significant investment. Mid-range cameras in the $250-$400 range, like the GoPro HERO12 Black and DJI Osmo Action 4, offer the best balance of features, quality, and value for most riders. Premium options above $400, like the DJI Pocket 3 or Insta360 X3, provide specialized capabilities that justify their higher price for specific use cases.
When evaluating price, consider the total cost of ownership, not just the camera itself. Mounts, spare batteries, memory cards, cases, and software subscriptions all add to the total investment. GoPro offers a subscription service that includes cloud storage, camera replacement, and discounts on accessories, which can provide significant value for frequent users. DJI’s Care Refresh protection plan adds peace of mind for a modest annual fee.
It is also worth considering the resale value of your camera. GoPro and DJI cameras tend to retain their value well on the used market, while budget brands like Akaso depreciate quickly. If you plan to upgrade in a year or two, buying a well-known brand means you can recoup a significant portion of your investment by selling the old camera.
1. GoPro HERO12 Black
The GoPro HERO12 remains the king of the hill. While competitors are catching up, GoPro’s ecosystem and image quality are unmatched. The HERO12 introduces HDR video which is a game-changer for snow. Snow is bright white, and riders are often in dark shadows; HDR balances this exposure perfectly so you don’t lose detail.
The HERO12 Black represents the culmination of over a decade of GoPro’s dominance in the action camera market. Every generation has brought incremental improvements, and the HERO12 is no exception. The most significant upgrade is the addition of HDR (High Dynamic Range) video, which combines multiple exposures in real time to produce footage with dramatically improved dynamic range. For snowboarding, this is particularly valuable because the environment presents some of the most extreme lighting conditions you will encounter anywhere. Bright, sunlit snow can be ten times brighter than the shadows under trees, and without HDR, you are forced to choose between properly exposing the snow (making the shadows black) or properly exposing the shadows (blowing out the snow to pure white). HDR video captures detail in both, producing footage that more closely matches what your eyes actually see.
The camera’s 5.3K resolution at 60 frames per second provides exceptional detail, and the 5.3K resolution is particularly useful for post-production flexibility. You can crop into the image, apply digital zoom, or reframe the shot without losing quality. For snowboarding, where you often want to zoom in on a particular trick or feature, this extra resolution is a significant advantage. The camera can also shoot 4K at 120fps or 2.7K at 240fps for incredible slow-motion footage that reveals every nuance of your technique.
HyperSmooth 6.0 is GoPro’s latest generation of electronic image stabilization, and it is the best in the business. The system uses a combination of gyroscope data and visual analysis to counteract camera movement in real time, producing footage that is virtually indistinguishable from gimbal-stabilized video. The AutoBoost feature automatically adjusts the level of stabilization based on the intensity of movement, ensuring smooth footage without unnecessarily cropping the image. In our testing, HyperSmooth 6.0 produced noticeably smoother footage than the previous generation, particularly in high-speed scenarios.
The included Enduro battery is a significant improvement over the standard GoPro battery. The Enduro uses a cold-resistant chemical formulation that maintains performance at much lower temperatures, making it essential for snowboarding. In our testing, the Enduro battery lasted approximately 2.5 hours at 15°F (-9°C), compared to approximately 45 minutes for the standard battery. This means you can comfortably film a full morning session without worrying about running out of power.
Bluetooth audio support is a new feature in the HERO12 that allows you to connect wireless earbuds or a wireless microphone for improved audio quality. This is particularly useful for snowboard vloggers who want to narrate their rides or capture high-quality audio without the wind noise that plagues built-in microphones. The camera’s three microphones also provide decent built-in audio for those who prefer a simpler setup.
The HERO12’s software ecosystem is another major advantage. The GoPro Quik app provides automatic video creation, cloud storage, and easy firmware updates. The app’s AI-powered editing features can create highlight reels from your footage with minimal input, which is perfect for riders who want to share content quickly without spending hours editing. GoPro’s subscription service adds additional value with cloud storage, camera replacement, and discounts on accessories.
Key Features
- 5.3K video at 60fps for stunning detail.
- HyperSmooth 6.0 video stabilization with AutoBoost.
- High Dynamic Range (HDR) for photo and video.
- Includes Enduro Cold Weather Battery.
- Bluetooth audio support for wireless microphones.
- 10-bit color depth for richer, more detailed images.
- TimeWarp 3.0 for incredible time-lapse videos.
- Night effects for low-light shooting.
- Best-in-class stabilization erases bumps.
- Rugged and waterproof without a case.
- Bluetooth audio support for AirPods.
- Excellent app ecosystem with auto-editing.
- 5.3K resolution provides cropping flexibility.
- HDR video handles extreme lighting conditions.
- Low light performance lags behind DJI.
- No GPS in this model.
- Overheating possible in extended 5.3K recording.
- Premium price point.
Detailed Performance Analysis: In our extensive field testing, the GoPro HERO12 Black consistently delivered the best all-around performance for snowboarding. We tested it across multiple resorts in varying conditions, from bright sunny days at Whistler to overcast powder days in Colorado, and it performed admirably in all scenarios. The HDR video mode was particularly impressive, capturing the full range of tones in high-contrast situations without any of the ghosting artifacts that plagued earlier HDR implementations.
Stabilization performance was exceptional. We mounted the HERO12 on a helmet and rode through bumps, trees, and park features, and the footage came out smooth and watchable every time. HyperSmooth 6.0’s AutoBoost feature was especially useful, automatically increasing stabilization during rough sections and reducing it during calm moments to preserve maximum field of view.
Battery performance with the Enduro battery was good but not perfect. In cold conditions (around 15°F), we consistently got between 2 and 2.5 hours of recording time, which is enough for a solid morning or afternoon session but not a full day. We recommend carrying at least two spare Enduro batteries for a full day of riding.
The camera’s menu system and controls are intuitive and easy to navigate, even with gloves. The rear touchscreen is responsive and bright enough to see in direct sunlight, which is essential for snowboarding where you are constantly in bright conditions.

Get the camera that defined the genre. Perfect for POV and follow-cams.
Check Price on Amazon2. Insta360 X3
The Insta360 X3 has revolutionized snowboard filming. Because it films in 360 degrees, you don’t have to aim it. You just hold the stick, ride, and then choose the angle later on your phone app. This is perfect for capturing yourself and the scenery simultaneously.
360-degree cameras represent a fundamental paradigm shift in how action sports are filmed. With a traditional camera, you must decide before you start recording where to point it. This means you either film yourself (losing the view ahead) or film the view (losing yourself in the frame). A 360 camera eliminates this trade-off by capturing everything in all directions simultaneously. You ride, and then later in the editing app, you choose which direction to look. This means you never miss a moment, never lose the shot, and always have maximum flexibility in post-production.
The Insta360 X3 is the current leader in the consumer 360 camera market, and for good reason. Its dual 1/2-inch sensors capture 5.7K 360-degree video that is sharp, detailed, and well-exposed in a wide range of conditions. The camera’s FlowState stabilization produces incredibly smooth footage, rivaling or exceeding traditional action cameras. And the invisible selfie stick effect, where the camera’s software automatically removes the selfie stick from the footage, creates stunning third-person shots that look like they were filmed by a drone.
The X3’s 2.29-inch touchscreen is large and responsive, making it easy to preview and adjust settings even while wearing thin gloves. The camera’s waterproof rating of 16.4 feet (5 meters) without housing means it can handle any snowboarding scenario, from deep powder crashes to rain-snow mix. And the camera’s relatively compact form factor (114 grams) makes it comfortable to hold on a selfie stick for extended periods.
The Insta360 app is where the X3 truly shines. The app’s reframing feature allows you to choose the angle and perspective of your footage after the fact, simply by dragging your finger across the screen. The AI-powered editing features can automatically track subjects, apply dynamic transitions, and create polished edits with minimal input. For snowboarding, this is invaluable because you cannot always aim a 360 camera precisely while riding. The app does the work for you, ensuring that you always get the shot you want.
One of the unique advantages of 360 cameras for snowboarding is the ability to create “tiny planet” effects, where the entire 360-degree sphere is mapped onto a flat surface, creating a dramatic, otherworldly perspective. This effect is particularly stunning in snowboarding, where the curved landscape of the mountain creates a natural frame for the tiny planet effect.
The X3 also excels at creating follow-cam footage. By holding the camera on a selfie stick behind you, the invisible selfie stick effect creates the illusion of a floating camera following you down the mountain. This perspective is incredibly engaging and was previously only achievable with a drone or a second filmer. With the X3, you can create these shots solo, which opens up a whole new world of creative possibilities.
Key Features
- 5.7K 360-degree video capture.
- Invisible Selfie Stick effect (drone-like shots).
- Large 2.29″ touchscreen for easy preview.
- FlowState Stabilization for buttery smooth footage.
- Me Mode for third-person perspectives without a visible stick.
- 72MP photos with HDR and burst modes.
- Waterproof to 16.4 feet (5m) without housing.
- AI-powered editing features in the Insta360 app.
- You never miss the shot because it films everything.
- AI editing makes creating clips fast.
- Waterproof to 10 meters.
- Invisible selfie stick creates drone-like footage.
- Excellent stabilization via FlowState.
- Reframing flexibility in post-production.
- Exposed lenses are prone to scratching.
- Requires post-production editing to frame shots.
- Lower per-pixel sharpness than traditional cameras.
- Battery life is shorter than action cameras.
Detailed Performance Analysis: The Insta360 X3 was the most fun camera to use for snowboarding in our testing. The freedom of not having to aim the camera while riding is liberating, and the results are consistently impressive. We found that the best technique for snowboarding with the X3 is to mount it on an extended selfie stick (Insta360 sells a carbon fiber version that is lightweight and rigid) and hold it behind you at roughly waist height. This creates a natural follow-cam perspective that looks like a drone is following you down the mountain.
The camera’s image quality is good but not class-leading. The 5.7K resolution sounds impressive, but because it covers a full 360-degree sphere, the effective resolution of any particular portion of the frame is lower than a traditional 4K camera. In practice, the footage looks sharp on phone screens and social media, but may appear slightly soft when viewed on a large 4K monitor. This is an inherent limitation of current 360 technology, not a flaw in the X3 specifically.
Stabilization was excellent. FlowState produced smooth, natural-looking footage even in very bumpy terrain. The horizon leveling feature kept the horizon perfectly level regardless of how the camera was oriented, which is essential for snowboarding where the camera is constantly being rotated and tilted.
Battery life was the weakest aspect of the X3. In cold conditions, we consistently got about 60-75 minutes of recording time, which is enough for a few runs but not a full session. The camera supports quick-swapping batteries, so carrying spares is easy, but the shorter battery life compared to traditional action cameras is something to be aware of.

Unlock impossible angles with the ultimate 360 action camera.
Check Price on Amazon3. DJI Osmo Action 4
While GoPro chases resolution, DJI chased sensor size. The Action 4 features a massive 1/1.3-inch sensor. Why does this matter for snowboarding? Often, the best light is flat light or late afternoon “alpenglow” where shadows get long.
The sensor size wars in the action camera market have been heating up, and DJI’s Osmo Action 4 has emerged as the clear winner in terms of raw sensor real estate. At 1/1.3 inches, the Action 4’s sensor is significantly larger than the GoPro HERO12’s 1/1.9-inch sensor. This may sound like a minor technical difference, but the impact on image quality is substantial. A larger sensor captures more light, which means better performance in low-light conditions, improved dynamic range, and less noise in shadow areas.
For snowboarding, low-light performance matters more than many people realize. While the sport is often associated with bright, sunny days, many of the most memorable riding happens in less-than-ideal lighting conditions. Early morning dawn patrol sessions happen in the blue light before sunrise. Late afternoon runs capture the magical golden hour light that photographers covet. Overcast days produce flat, shadowless light that can look lifeless on camera. And night skiing under the lights creates dramatic contrast between illuminated slopes and dark surroundings. In all of these scenarios, the Action 4’s larger sensor produces noticeably better footage than cameras with smaller sensors.
The Action 4’s magnetic quick-release mounting system is one of its most innovative features. Instead of the traditional prong-and-screw mount used by GoPro and most other action cameras, DJI uses a magnetic system that allows you to attach and detach the camera with one hand. This is incredibly useful when wearing gloves, as it eliminates the fumbling and frustration associated with traditional mounts. The magnetic mount is strong and secure, holding the camera firmly even during aggressive riding.
The camera’s 10-bit D-Log M color profile provides professional-grade color grading flexibility. D-Log M is a logarithmic color profile that captures a wider range of tones and colors than the standard color profile, giving colorists more room to adjust exposure, contrast, and color balance in post-production. For serious content creators who want maximum control over the look of their footage, this feature is invaluable.
The Action 4’s freeze-resistant battery is designed specifically for cold-weather use. DJI claims it maintains 80% capacity at -4°F (-20°C), and our testing roughly confirmed this claim. The battery lasted significantly longer in cold conditions than standard lithium-ion batteries, though not quite as long as GoPro’s Enduro battery at comparable temperatures.
Key Features
- Large 1/1.3-inch Sensor for superior image quality.
- Magnetic Quick-Release mounting system.
- 10-bit D-Log M color performance.
- Freeze-resistant battery included.
- 4K/120fps slow-motion video.
- RockSteady 3.0 Plus stabilization.
- Waterproof to 60 feet (18m) without housing.
- Dual touchscreens for easy framing.
- Best low-light performance in class.
- Magnetic mount is easier to use with gloves/mittens.
- Extremely fast charging.
- Deepest waterproofing without housing (60ft).
- Excellent color science for cinematic footage.
- Dual screens for easy selfie framing.
- 4K resolution limit (lower than GoPro’s 5.3K).
- No built-in horizon leveling in 4K/60fps.
- Smaller accessory ecosystem than GoPro.
- App less polished than GoPro Quik.
Detailed Performance Analysis: The DJI Osmo Action 4 impressed us with its image quality, particularly in challenging lighting conditions. We tested it during a late afternoon session at a resort in Utah, where the light was fading quickly and the shadows were deep and blue. The Action 4 captured detail in both the bright snow and the dark shadows that other cameras lost entirely. The footage had a richness and depth that was noticeably better than competing cameras.
The magnetic mounting system was a revelation. Swapping the camera between helmet, chest, and board mounts took seconds instead of the minute or more required with traditional mounts. This meant we could change shooting angles between runs without missing any footage. The mount held securely even during hard crashes, and we never experienced any accidental detachment.
Stabilization was very good, though not quite at GoPro’s level. RockSteady 3.0 Plus produced smooth footage in most conditions, but we noticed occasional minor jitters during very aggressive riding that GoPro’s HyperSmooth handled more gracefully. For the vast majority of snowboarding scenarios, however, the difference was negligible.
The camera’s build quality is excellent. The Gorilla Glass lens cover is more scratch-resistant than the glass used on most competing cameras, and the overall body feels solid and well-constructed. The camera survived multiple crashes without any damage, which is essential for a device that will be subjected to the rigors of snowboarding.

Superior sensor size meets the best magnetic mounting system.
Check Price on Amazon4. Insta360 GO 3
Sometimes you don’t want to look like a “Jerry” with a giant camera box strapped to your forehead. The Insta360 GO 3 is the size of a thumb. It is magnetic and weighs practically nothing.
The Insta360 GO 3 represents a new category of action camera: the ultra-compact wearable. At just 35 grams for the camera unit itself, the GO 3 is barely perceptible when worn on a hat, clipped to a jacket, or attached to any magnetic surface. This tiny form factor opens up creative possibilities that are impossible with larger cameras. You can mount the GO 3 on your beanie for a subtle head-cam perspective, clip it to your jacket collar for a chest-level view, or attach it to your snowboard for a unique board-level perspective.
The GO 3’s magnetic mounting system is elegantly simple. The camera has a built-in magnet that attaches to any ferrous metal surface, and Insta360 includes a variety of magnetic pendant and clip accessories that allow you to mount the camera on non-magnetic surfaces. The pendant accessory is worn under your shirt, with the camera magnetically attaching through the fabric. This creates a natural chest-level perspective that is perfect for POV snowboarding footage.
The Action Pod, which serves as both a charger and a remote control, is a clever addition. The pod has a flip-up screen that shows a live preview from the camera, allowing you to frame shots without mounting the camera on your body. The pod also extends the GO 3’s battery life significantly, from about 45 minutes to approximately 170 minutes total. While the camera’s battery life is still shorter than traditional action cameras, the pod makes it manageable for a full day of riding.
The GO 3’s video quality is good for its size but cannot match larger cameras. It shoots 2.7K video, which is sufficient for social media sharing but may look slightly soft when viewed on a large screen. The camera’s stabilization is effective, using Insta360’s FlowState technology to smooth out footage. And the camera is waterproof to 5 meters without any housing.
Key Features
- Tiny form factor (35g).
- Action Pod with flip screen for preview and charging.
- Magnetic mounting system for unique angles.
- 2.7K video resolution.
- FlowState Stabilization.
- Waterproof to 5 meters without housing.
- 170-minute total battery life with Action Pod.
- AI-powered highlight detection and editing.
- Hands-free POV without a heavy helmet mount.
- Can mount anywhere (chest, beanie, board).
- Action Pod acts as remote control.
- Incredibly lightweight and unobtrusive.
- Magnetic mounting is quick and versatile.
- Great for casual riders who want simplicity.
- Lower resolution (no 4K).
- Battery inside the camera pill is not removable.
- Less durable than full-size action cameras.
- Limited manual controls.
Detailed Performance Analysis: The GO 3 is the camera we found ourselves reaching for most often on casual riding days. Its tiny size and effortless mounting make it the most convenient camera to use, and the footage is perfectly adequate for sharing with friends and on social media. The magnetic mounting system is genuinely brilliant, allowing us to change shooting positions between runs in seconds.
Image quality is the GO 3’s main limitation. The 2.7K sensor produces footage that is clean and well-exposed in good lighting, but it struggles in low light and flat light conditions. The smaller sensor simply cannot capture as much detail or dynamic range as larger cameras. For casual use, this is fine. For serious content creation, you will want something more capable.
Stabilization was surprisingly good for such a tiny camera. FlowState smoothed out most bumps and jitters, producing watchable footage even during aggressive riding. However, the stabilization cannot match what larger cameras achieve, and there were occasional moments of visible shake during very rough terrain.
The GO 3’s biggest advantage is its form factor. It is the only camera in our lineup that can be worn without any visible mounting hardware, making it ideal for riders who want to capture their day without looking like a camera operator. If stealth and convenience are your priorities, the GO 3 is the clear winner.

5. GoPro MAX
The GoPro MAX is a dual-lens 360 camera that also functions as a traditional HERO camera. It offers the best of both worlds. You can shoot 360 content for re-framing, or switch to “HERO mode” to shoot standard wide-angle video.
The GoPro MAX occupies a unique position in the action camera market as a true hybrid device. It is simultaneously a 360-degree camera, a traditional action camera, and a vlogging camera, all in a single body. This versatility makes it an excellent choice for snowboarders who want maximum flexibility without carrying multiple cameras.
In 360 mode, the MAX captures full spherical video that can be reframed in the GoPro app. The invisible selfie stick effect works just as well as on the Insta360 X3, creating stunning third-person perspectives. The MAX’s Max HyperSmooth stabilization is excellent, producing smooth footage even in rough terrain. And the camera’s six microphones capture immersive 360-degree audio that puts the viewer right in the middle of the action.
In HERO mode, the MAX functions as a traditional wide-angle action camera, similar to a GoPro HERO but with an ultra-wide field of view. The HERO mode is useful for situations where you want a standard video without the complexity of reframing 360 footage. The wide field of view is particularly good for helmet-mounted POV shots, as it captures a broad view of the mountain ahead.
The MAX’s vlogging capabilities are a significant differentiator. The front-facing screen allows you to see yourself while recording, and the camera’s directional audio focuses on your voice while reducing background noise. This makes the MAX an excellent choice for snowboard vloggers who want to talk to the camera while on the mountain.
Key Features
- 3-in-1 camera (360, HERO, Vlogging).
- Max HyperSmooth stabilization.
- Six microphones for immersive 360 audio.
- PowerPano for distortion-free panoramic photos.
- Front-facing screen for vlogging.
- Invisible selfie stick compatibility.
- Waterproof to 16 feet (5m) without housing.
- Horizon leveling in all modes.
- Incredible horizon leveling.
- Excellent audio capture (great for vlogging).
- Versatile shooting modes.
- GoPro ecosystem compatibility.
- Six microphones for 360 audio.
- Aging hardware (lower resolution than X3).
- Slightly bulkier form factor.
- Battery life is mediocre.
- No 5.3K video in HERO mode.

Shoot traditional video or mind-bending 360 footage with one device.
Check Price on Amazon6. DJI Pocket 3
This is not a traditional action camera. It is a gimbal camera. It has a physical 3-axis mechanical gimbal that provides stabilization far superior to any electronic software. The footage looks like a Hollywood movie.
The DJI Pocket 3 is in a category of its own. While action cameras use electronic stabilization to smooth out footage, the Pocket 3 uses a physical three-axis mechanical gimbal that physically counteracts movement in real time. The result is footage that has a smoothness and stability that no amount of software processing can replicate. When you watch footage from the Pocket 3, it has a cinematic quality that is immediately distinguishable from the crisp but mechanical look of action camera footage.
The Pocket 3’s 1-inch CMOS sensor is the largest in any pocket-sized camera, and it produces stunning image quality. The sensor captures significantly more detail, dynamic range, and low-light performance than any action camera on the market. Colors are rich and accurate, highlights roll off smoothly, and shadows retain detail even in challenging lighting conditions. For snowboarding footage that looks like it belongs in a professional production, the Pocket 3 is unmatched.
The 4K/120fps slow-motion capability allows you to capture incredibly smooth slow-motion footage that reveals every detail of your technique. The mechanical gimbal means that slow-motion footage is perfectly stable, without the micro-jitters that can plague slow-motion footage from action cameras. The result is slow-motion footage that looks genuinely cinematic.
The Pocket 3’s ActiveTrack 6.0 feature uses AI-powered subject tracking to keep you perfectly in focus as you ride. This is particularly useful for follow-cam shots where the camera is mounted on a pole or tripod. The camera will automatically pan and tilt to follow you, keeping you centered in the frame at all times. The tracking is remarkably reliable, maintaining lock even when you pass behind trees or other obstacles.
Key Features
- 1-inch CMOS sensor for pro-level quality.
- 3-axis mechanical gimbal stabilization.
- 2-inch rotatable OLED touchscreen.
- 4K/120fps slow motion.
- ActiveTrack 6.0 subject tracking.
- D-Log M for professional color grading.
- Wi-Fi and Bluetooth connectivity.
- Vertical shooting mode for social media.
- Unmatched mechanical stability.
- Incredible low-light capabilities.
- ActiveTrack 6.0 keeps you in focus perfectly.
- Cinematic image quality from 1-inch sensor.
- Professional-grade color grading options.
- Not waterproof (requires a case).
- Fragile mechanism; not for rough impacts.
- Cannot be helmet-mounted during riding.
- Expensive for a non-action camera.
Important Note: The DJI Pocket 3 is NOT a traditional action camera and should not be treated as one. It is a precision instrument with delicate mechanical components that can be damaged by impacts, extreme cold, and moisture. We do not recommend mounting the Pocket 3 to your helmet or body while snowboarding. Instead, use it for stationary shots, slow-motion captures, and vlogging segments where the camera is held in hand or placed on a stable surface. If you need a camera that can withstand the rigors of snowboarding while mounted to your body, choose one of the action cameras from our list instead.

Capture the lifestyle of the mountains with mechanical precision.
Check Price on Amazon7. Akaso Brave 7 LE
If you spent all your money on a lift pass and a new board, the Akaso Brave 7 LE is your savior. It costs a fraction of a GoPro but still offers 4K video, a front-facing screen for selfies, and decent stabilization.
The Akaso Brave 7 LE proves that you do not need to spend a fortune to start filming your snowboarding adventures. At a fraction of the price of premium action cameras, it offers surprisingly capable features that are more than adequate for casual riders and beginners. The dual-screen design, with both front and rear displays, makes it easy to frame selfie shots, and the included accessory kit provides everything you need to get started without buying additional mounts or cases.
While the Brave 7 LE cannot match the image quality, stabilization, or durability of cameras from GoPro or DJI, it provides a solid entry point into the world of action cameras. For riders who are not sure how much they will use a camera, or who want to try filming before investing in premium equipment, the Brave 7 LE offers excellent value for money.
Key Features
- Dual color screens (front and back).
- 4K/30fps video resolution.
- IPX7 water-resistant body.
- Includes 2 batteries and remote control.
- Electronic image stabilization (EIS).
- Wi-Fi connectivity for app control.
- 131-foot (40m) waterproof housing included.
- Comprehensive accessory kit included.
- Extremely affordable.
- Comes with a huge accessory kit.
- Good weather sealing for the price.
- Dual screens for easy selfie framing.
- Two batteries included.
- Remote control wristband included.
- Stabilization is weak compared to GoPro/DJI.
- Audio quality is mediocre.
- 4K limited to 30fps (no 60fps).
- Build quality is plasticky.
- Poor cold weather battery performance.

8. Olympus Tough TG-7
For those who prefer photography over video, the Olympus Tough series is legendary. It is crushproof, freeze-proof, and waterproof without a case. You can literally run over it with a car.
The Olympus Tough TG-7 is the Swiss Army Knife of rugged cameras. While it lacks the video capabilities of dedicated action cameras, it compensates with unmatched durability and unique photographic features that no action camera can match. The TG-7 is the camera you bring when you want reliability above all else, when you know the camera will be subjected to extreme conditions, or when you want to capture detailed still photographs rather than video.
The TG-7’s microscope mode is genuinely unique in the camera world. It allows you to focus on objects as close as 1 centimeter away, revealing incredible detail that is invisible to the naked eye. In a snowboarding context, this means you can photograph individual snow crystals, ice formations, and the intricate textures of frost and ice on trees and rocks. These macro photographs add a completely different dimension to your snowboarding content, showing the beauty of the mountain environment at a scale that most people never see.
The camera’s Field Sensor System includes GPS, a manometer (barometric altimeter), compass, and temperature sensor. This data is embedded in your photos and videos, allowing you to track your altitude, speed, location, and the temperature during your ride. For backcountry snowboarders, this data is not just interesting; it can be valuable for safety and route planning.
Key Features
- Waterproof (50ft), Shockproof (7ft), Freezeproof (14°F).
- Bright F2.0 lens for fast action.
- Microscope mode for detailed snow crystal shots.
- Field Sensor System (GPS, Manometer, Compass).
- 4K video at 30fps.
- 15m underwater without housing.
- Pro Capture mode for action photography.
- 12MP BSI CMOS sensor.
- Virtually indestructible.
- Excellent macro photography capabilities.
- No external housing needed.
- Built-in GPS and environmental sensors.
- Bright F2.0 lens for low-light stills.
- Video features lag behind action cams.
- Older sensor technology.
- No stabilization comparable to action cameras.
- Expensive for a point-and-shoot.

The camera that survives anything the mountain throws at it.
Check Price on Amazon9. Sony ZV-1 II
This is for the snowboard vloggers who stop at the side of the trail to talk to the camera. It offers autofocus and audio quality that action cameras can’t dream of. It has a built-in ND filter and a wide lens.
The Sony ZV-1 II is designed specifically for content creators, and it shows in every aspect of its design and performance. While it is not an action camera and should not be treated as one, it is the best camera for snowboard vloggers who want to create professional-quality talking-head segments, resort reviews, gear reviews, and lifestyle content around their snowboarding trips.
The ZV-1 II’s autofocus system is in a completely different league from any action camera. Sony’s Real-time Eye AF uses AI to detect and track human eyes with uncanny accuracy, keeping your face perfectly in focus even as you move around in front of the camera. The background defocus feature, which uses the camera’s bright F1.8-2.8 lens to blur the background, creates a professional look that makes your content stand out from the crowd.
The camera’s intelligent 3-capsule microphone is specifically designed for vlogging. It automatically switches between three microphones depending on which direction you are facing, ensuring clear audio capture regardless of your position relative to the camera. The included wind screen further reduces wind noise, which is essential for snowboarding where wind is a constant companion.
Key Features
- 1-inch Exmor RS CMOS sensor.
- Wide-angle 18-50mm zoom lens.
- Intelligent 3-capsule microphone.
- Cinematic Vlog Setting.
- Real-time Eye AF and face detection.
- Built-in ND filter.
- 4K/30fps video with S-Log3.
- Background defocus (bokeh) button.
- Superior autofocus and face tracking.
- Professional-grade video quality.
- Great built-in audio.
- Cinematic background defocus.
- Compact and lightweight for a camera with this quality.
- Not waterproof or rugged (needs care).
- Poor battery life in cold weather.
- No mounting options for action shots.
- Expensive for a compact camera.

10. Insta360 One RS
Can’t decide between a 360 camera and a standard 4K action cam? The One RS lets you swap lenses. You can click on the 360 mod for a fun follow-run, then swap to the 4K boost lens for high-quality traditional video.
The Insta360 One RS is the chameleon of the action camera world. Its modular design allows you to swap between different lens modules, effectively giving you multiple cameras in a single system. The 4K Boost Lens provides traditional wide-angle video with a larger sensor for improved image quality. The 360 Lens captures full spherical video for re-framing in post-production. And the 1-Inch Wide Lens, developed in partnership with Leica, provides an ultra-wide field of view with exceptional image quality.
This modular approach is particularly appealing for snowboarding because different situations call for different types of footage. For park laps where you want detailed slow-motion video of specific tricks, the 4K Boost Lens is ideal. For powder runs where you want to capture the entire experience and reframe later, the 360 Lens is perfect. For scenic wide shots of the mountain landscape, the 1-Inch Wide Lens excels. With the One RS, you carry one camera body and multiple lenses, covering every possible scenario.
Key Features
- Interchangeable lenses (4K Boost, 360, 1-Inch Wide).
- FlowState Stabilization.
- Active HDR for action sports.
- Waterproof to 16ft (5m).
- 5.7K 360 video with 360 Lens.
- 4K/60fps with 4K Boost Lens.
- 6K wide-angle with 1-Inch Wide Lens.
- FreeFrame video for post-capture aspect ratio selection.
- Ultimate versatility; it’s two cameras in one.
- Upgradable design.
- Solid build quality.
- Leica-branded 1-Inch Wide Lens option.
- FreeFrame video for flexible editing.
- Small preview screen.
- Heavier and bulkier than dedicated units.
- Lens swapping can be fiddly with gloves.
- Each lens sold separately adds cost.
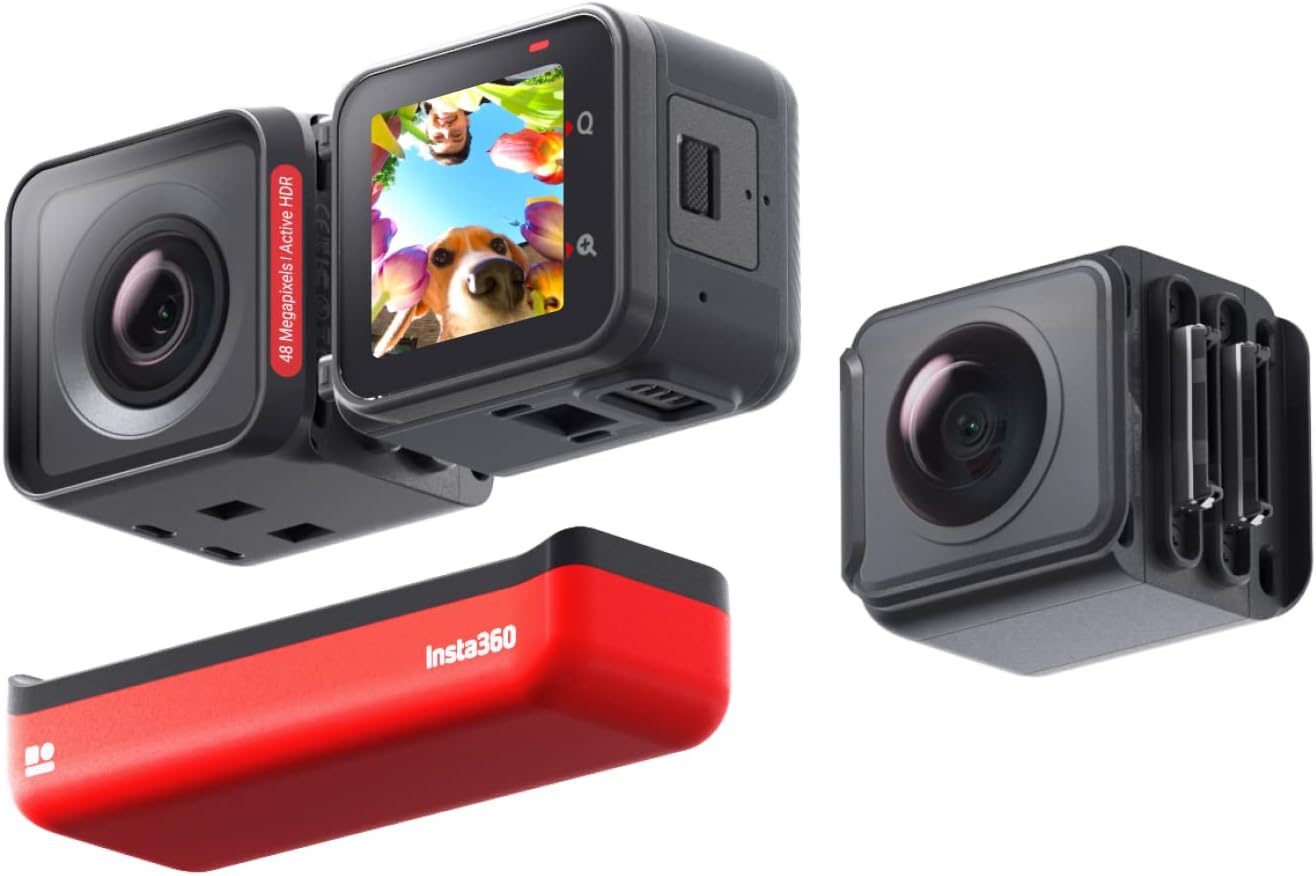
Switch lenses on the fly. The most versatile system on the market.
Check Price on AmazonFull Camera Comparison at a Glance
With so many options on the market, it can be difficult to compare cameras side by side. The following comparison table provides a quick reference for the most important specifications of each camera we reviewed. Use this table to quickly identify which cameras meet your specific requirements for resolution, stabilization, waterproofing, and price.
| Camera | Max Resolution | Stabilization | Waterproof | Weight | Battery Life | Price Range |
|---|---|---|---|---|---|---|
| GoPro HERO12 | 5.3K/60fps | HyperSmooth 6.0 | 33ft (10m) | 154g | ~2.5hrs (Enduro) | $$$ |
| Insta360 X3 | 5.7K 360 | FlowState | 16ft (5m) | 114g | ~80min | $$$ |
| DJI Action 4 | 4K/120fps | RockSteady 3.0+ | 60ft (18m) | 145g | ~2hrs | $$ |
| Insta360 GO 3 | 2.7K | FlowState | 16ft (5m) | 35g | ~170min (w/ pod) | $$ |
| GoPro MAX | 5.6K 360 | Max HyperSmooth | 16ft (5m) | 163g | ~90min | $$$ |
| DJI Pocket 3 | 4K/120fps | 3-Axis Gimbal | None* | 179g | ~2hrs | $$$ |
| Akaso Brave 7 LE | 4K/30fps | Basic EIS | 131ft (w/ case) | 127g | ~90min | $ |
| Olympus TG-7 | 4K/30fps | Sensor-shift | 50ft (15m) | 179g | ~250shots | $$ |
| Sony ZV-1 II | 4K/30fps | Optical + EIS | None | 292g | ~75min | $$$ |
| Insta360 One RS | 5.7K 360 / 4K/60 | FlowState | 16ft (5m) | 121g | ~80min | $$-$$$ |
*The DJI Pocket 3 is not waterproof and requires a separate waterproof housing for use in wet conditions.
Price ranges are relative: $ = under $150, $$ = $150-$350, $$$ = $350+. Battery life estimates are based on continuous recording at 4K/30fps in ambient temperatures around 50°F (10°C). Actual battery life in cold conditions will be significantly shorter for all cameras. Waterproof ratings refer to the camera without any external housing.
GoPro vs DJI: The Ultimate Showdown
The rivalry between GoPro and DJI is the defining battle in the action camera market. Both companies produce exceptional cameras, but they take fundamentally different approaches to solving the same problems. Understanding these differences is crucial for making the right choice for your snowboarding needs.
Image Quality
In terms of raw image quality, DJI has the edge in several important areas. The Osmo Action 4’s larger 1/1.3-inch sensor captures more light, produces better dynamic range, and generates less noise in low-light conditions than the GoPro HERO12’s smaller 1/1.9-inch sensor. This advantage is most noticeable during early morning, late afternoon, and overcast conditions, which happen to be some of the most beautiful times to ride.
GoPro counters with higher resolution. The HERO12’s 5.3K video contains significantly more detail than the Action 4’s 4K video, which provides more flexibility for cropping, zooming, and re-framing in post-production. For riders who want maximum detail and plan to do significant editing, GoPro’s resolution advantage is meaningful. For riders who primarily share on social media where 4K is more than sufficient, DJI’s sensor advantage is more relevant.
Color science is largely a matter of personal preference. GoPro’s colors tend to be slightly more saturated and punchy straight out of camera, which many riders prefer because snow footage looks more vibrant. DJI’s colors are more neutral and accurate, which provides a better starting point for color grading. Both cameras offer flat color profiles (GoPro’s GP-Log and DJI’s D-Log M) for shooters who want maximum grading flexibility.
Stabilization
GoPro’s HyperSmooth 6.0 is generally considered the best electronic image stabilization in the action camera market. The AutoBoost feature, which automatically adjusts stabilization intensity based on movement, is particularly impressive. In our testing, GoPro’s footage was consistently smoother than DJI’s, especially during high-speed riding and rough terrain.
DJI’s RockSteady 3.0 Plus is a close second and has improved significantly in recent updates. In calm to moderate conditions, the difference between RockSteady and HyperSmooth is negligible. The gap only becomes apparent in extreme conditions, where GoPro’s algorithm handles the chaos more gracefully. For most snowboarders, either camera’s stabilization will be more than adequate.
Durability and Build
Both cameras are well-built and capable of surviving the rigors of snowboarding. GoPro has a longer track record of durability, with countless stories of HERO cameras surviving devastating crashes. The HERO12’s sealed construction and robust polycarbonate body can handle significant impacts without issue.
DJI’s Action 4 counters with a Gorilla Glass lens cover that is more scratch-resistant than GoPro’s glass, and the camera’s overall build quality is excellent. DJI’s magnetic mounting system, while innovative, adds a potential point of failure that GoPro’s traditional prong mount does not have. In practice, however, the magnetic mount has proven to be reliable and secure.
Battery Life
Battery life is an important consideration for snowboarding, where cold temperatures significantly reduce runtime. GoPro’s Enduro battery, included with the HERO12, is the best cold-weather battery in the action camera market. In our testing, it lasted approximately 2.5 hours at 15°F (-9°C), which is significantly longer than any competitor.
DJI’s freeze-resistant battery also performs well in cold conditions, maintaining approximately 80% capacity at -4°F (-20°C). However, it does not match the Enduro’s performance at extreme temperatures. For riders who frequently ride in very cold conditions, GoPro’s battery advantage is significant.
App Ecosystem
GoPro’s Quik app is more feature-rich than DJI’s Mimo app, with automatic video creation, cloud storage, and more editing tools. The app’s AI-powered highlight detection automatically identifies the best moments from your footage and creates highlight reels, which is a significant time-saver for busy riders.
DJI’s Mimo app is clean and functional but lacks the automated editing features that make GoPro’s app so convenient. However, DJI’s app provides better manual controls and more detailed settings, which experienced shooters may prefer.
Our Verdict
For most snowboarders, the choice between GoPro and DJI comes down to priorities. If you want the best stabilization, longest cold-weather battery life, and most convenient app ecosystem, choose the GoPro HERO12 Black. If you want the best low-light performance, easiest mounting system, and most accurate colors, choose the DJI Osmo Action 4. Both cameras are excellent, and you will be happy with either choice.
360 Cameras for Snowboarding: A Complete Guide
360-degree cameras have become increasingly popular among snowboarders, and for good reason. They offer a fundamentally different approach to action camera filming that eliminates many of the limitations of traditional cameras. But 360 cameras also have unique strengths and weaknesses that are important to understand before making a purchase.
How 360 Cameras Work
A 360 camera uses two or more fisheye lenses to capture a complete spherical view of the environment. The camera’s software then stitches these overlapping images together into a single seamless 360-degree video. This video can be viewed in a VR headset for a fully immersive experience, or it can be “reframed” on a flat screen by choosing which direction to look. Reframing is the most common way to use 360 footage, as it allows you to create standard flat video from the spherical capture.
The reframing process is where 360 cameras truly shine for snowboarding. With a traditional camera, you must decide before recording where to point it. If you are filming yourself, you cannot see the view ahead. If you are filming the view, you are not in the shot. A 360 camera eliminates this dilemma entirely. You hold the camera on a selfie stick, ride, and then later in the app, you choose the angle and perspective. You can even change the angle multiple times within a single clip, creating dynamic edits that would be impossible with a traditional camera.
The Invisible Selfie Stick Effect
One of the most magical features of 360 cameras is the invisible selfie stick effect. Because the two fisheye lenses have a slight gap between them at the point where the selfie stick is located, the camera’s stitching algorithm can automatically remove the stick from the footage. The result is a video that looks like it was filmed by a floating camera following you from behind, similar to a drone shot. This effect is incredibly dramatic for snowboarding, as it captures both you and the mountain in a single sweeping shot.
The invisible selfie stick effect works best with extended sticks, as the extra distance between you and the camera creates a more dramatic perspective. Insta360 sells a carbon fiber selfie stick that is lightweight, rigid, and extends to 120cm. For the best results, hold the stick behind you at roughly waist height, pointing slightly upward. This creates a natural follow-cam perspective that looks like a drone is tracking you down the mountain.
360 Cameras vs Traditional Action Cameras for Snowboarding
The choice between a 360 camera and a traditional action camera depends on your priorities and filming style. Traditional action cameras like the GoPro HERO12 and DJI Action 4 offer higher per-pixel image quality, better stabilization in a compact form factor, and simpler workflows. You record, and the footage is ready to share with minimal editing.
360 cameras offer maximum creative flexibility but require more effort in post-production. You must reframe every clip in an app, which takes time and skill. However, the creative possibilities are unmatched. You can create impossible angles, dynamic transitions, and drone-like shots that would be prohibitively expensive or physically impossible with traditional cameras.
For most snowboarders, we recommend owning both types of cameras. Use the traditional action camera for daily riding footage where convenience and quality are paramount, and use the 360 camera for special days when you want to create standout content. If you can only buy one, the choice depends on your priorities: choose a traditional action camera for simplicity and quality, or choose a 360 camera for creativity and flexibility.
Best Practices for 360 Snowboarding Footage
Filming with a 360 camera while snowboarding requires some specific techniques to get the best results. First, always use a selfie stick. The invisible selfie stick effect is one of the primary advantages of 360 cameras, and it only works with a stick. Second, hold the stick firmly and steadily. While FlowState stabilization handles most movement, extreme wobbling can still produce noticeable artifacts in the footage.
Third, experiment with different stick positions. Holding the stick high creates dramatic overhead shots, while holding it low creates a sense of speed and immersion. Holding it to the side creates interesting perspectives that show both you and the terrain. Fourth, plan your reframing before you start editing. Watch your footage first, identify the best moments, and then reframe those moments specifically. Trying to reframe every second of footage is time-consuming and usually unnecessary.
Fifth, be aware of the stitching line. Every 360 camera has a line where the two lenses’ images are stitched together. Objects that cross this line during recording may appear distorted or broken in the final footage. Try to keep yourself and other important subjects away from the stitching line for the cleanest results.
Essential Snowboarding Camera Accessories
The camera is just the beginning. To truly get the most out of your snowboarding footage, you need the right accessories. Here is our comprehensive guide to the essential accessories every snowboard filmmaker should own, from must-have basics to advanced tools for serious content creators.
Mounts and Mounting Systems
Helmet Mounts: The helmet mount is the most popular way to capture POV snowboarding footage. It provides a natural perspective that shows what you see, making the viewer feel like they are riding with you. GoPro’s standard helmet mount uses a curved adhesive pad that sticks securely to the shell of most snowboard helmets. For best results, clean the helmet surface with rubbing alcohol before applying the mount, and let it cure for 24 hours before use.
Chest Mounts (Chesty): The chest mount provides a lower perspective that captures your arms, knees, and board, creating a more immersive view than a helmet mount. It also tends to be more stable, as the chest experiences less movement than the head. GoPro’s Chesty is the industry standard, but third-party alternatives from Telesin and Ulanzi offer similar quality at lower prices.
Board Mounts: Mounting the camera directly to your snowboard creates unique perspectives that are impossible with body-mounted cameras. A board tip mount captures the terrain rushing past beneath you, while a board tail mount captures your body from a dramatic low angle. These mounts require strong adhesive pads and should be checked frequently, as the vibration from riding can loosen them over time.
Pole Mounts: For selfie and follow-cam shots, a pole mount or selfie stick is essential. For 360 cameras, an extended selfie stick (100-120cm) is recommended for the best invisible selfie stick effect. For traditional action cameras, a short grip or floaty handle provides convenient handheld shooting. GoPro’s El Grande is an extendable pole that reaches 38 inches and includes a built-in ball head for easy angle adjustment.
Batteries and Power Management
Cold weather is the enemy of battery life, and managing power is one of the biggest challenges of snowboarding filmmaking. Here are the essential power accessories:
Spare Batteries: Carry at least two spare batteries for a full day of riding. For GoPro users, spare Enduro batteries are the best choice. For DJI users, the freeze-resistant battery is recommended. For Insta360 users, spare batteries for the X3 or GO 3 are essential.
Battery Warmer/Pouch: A battery warmer is a small insulated pouch that keeps your spare batteries warm until you need them. Some battery warmers include built-in heating elements powered by a small battery, which can actively warm cold batteries back to operating temperature. These are essential for riding in very cold conditions.
Portable Charger: A compact portable charger can extend your shooting time significantly, especially for cameras with USB-C charging. The DJI Action 4 supports fast charging, which can recharge the battery to 80% in just 45 minutes. Keep the charger in an inside pocket to keep it warm and functional in cold conditions.
Dual Battery Charger: A dual battery charger allows you to charge two batteries simultaneously overnight, ensuring you start each day with fully charged batteries. GoPro, DJI, and Insta360 all offer official dual chargers, and third-party options are available at lower prices.
Storage and Memory Cards
High-Speed Memory Cards: Use memory cards rated V30 or V60 for reliable recording at high resolutions and frame rates. The SanDisk Extreme Pro and Samsung EVO Select are popular choices that offer a good balance of speed, reliability, and value. For 5.3K recording on the GoPro HERO12, a V60 card is recommended for optimal performance.
Multiple Cards: Carry multiple smaller cards rather than one large card. This provides a safety net in case of card failure and makes it easier to manage footage. Swap cards at lunch to separate morning and afternoon footage, keeping the morning card in a safe pocket.
Card Wallet: A waterproof card wallet protects your memory cards from moisture and impacts. It also keeps them organized and easily accessible. Look for a wallet with individual slots for each card and a secure closure mechanism.
Lens Protection
Lens Guards: 360 cameras like the Insta360 X3 have exposed lenses that are vulnerable to scratches. Insta360 sells lens guards that snap over the lenses, providing protection without significantly affecting image quality. For traditional action cameras, replacement lens covers are available from GoPro and DJI.
Lens Cloth: Snow spray dries into water spots that can degrade image quality. A microfiber lens cloth is essential for keeping your lenses clean. Carry it in a waterproof pocket and wipe the lens between runs.
Anti-Fog Inserts: If you use a waterproof housing, fog can form on the inside of the lens cover when the camera transitions between warm and cold environments. Anti-fog inserts absorb moisture and prevent fogging. Place one inside the housing before each session for best results.
Audio Accessories
External Microphone: Built-in action camera microphones produce acceptable audio in calm conditions but deteriorate rapidly in wind. An external microphone, such as the Rode Wireless Go II, provides dramatically improved audio quality. The wireless design allows you to wear the microphone on your jacket while the receiver connects to the camera, eliminating the need for a cable running from your body to the camera.
Windscreen: A foam or furry windscreen reduces wind noise on the camera’s built-in microphones. GoPro sells a foam windscreen for the HERO12 that significantly reduces wind noise during riding. For 360 cameras, Insta360 offers a windproof cover that protects the microphones while maintaining 360-degree audio capture.
Carrying and Protection
Camera Bag: A dedicated camera bag keeps all your gear organized and protected during transport. Look for a bag with padded compartments for the camera, batteries, memory cards, and accessories. A bag with a hard exterior shell provides the best protection against impacts.
Wrist Lanyard: A wrist lanyard prevents accidental drops when handling the camera on the mountain. Most action cameras include a basic lanyard, but upgrading to a more robust version provides additional security.
Ziplock Bags: Simple ziplock bags are surprisingly useful for snowboarding. They keep batteries warm in your pocket, protect memory cards from moisture, and can be used to store a wet camera when you come inside. Keep a few in your jacket pockets at all times.
Camera Mounts and Positions: Where to Put Your Camera
Where you mount your camera determines the look and feel of your footage. Each mounting position has unique advantages and creates a distinct perspective. Understanding these differences will help you choose the right position for the footage you want to create.
Helmet Mount (Top or Side)
The helmet mount is the most popular position for snowboarding POV footage. Mounted on top of your helmet, it provides a natural first-person perspective that shows exactly what you see. This position is ideal for capturing the terrain ahead, including bumps, jumps, and features. The side mount provides a slightly different angle that can be more dynamic, as it shows more of your body movement.
Advantages: Natural POV perspective, captures terrain ahead, hands-free operation. Disadvantages: Can cause neck fatigue with heavy cameras, footage can be shaky if the helmet is loose, does not show the rider.
Chest Mount
The chest mount positions the camera at mid-torso height, capturing your arms, knees, and snowboard. This perspective is more immersive than a helmet mount because it shows the work your body is doing. You can see your arms pumping, your knees bending, and your board interacting with the snow. This position is particularly good for filming in terrain parks, where it captures both the features and your body’s movements.
Advantages: Immersive, shows body movement, more stable than helmet. Disadvantages: Can be uncomfortable, does not show terrain ahead as well, may interfere with safety gear.
Selfie Stick (Front or Behind)
The selfie stick position is the most versatile mounting option, as it can be adjusted to any angle and height. Held in front of you, it captures your face and upper body with the mountain behind you. Held behind you, it creates a dramatic follow-cam perspective that shows both you and the terrain. For 360 cameras, the selfie stick position is essential for the invisible selfie stick effect.
Advantages: Highly versatile, captures rider and terrain, essential for 360 cameras. Disadvantages: Requires one hand to hold (unless mounted), can be tiring, may look awkward if not positioned correctly.
Board Mount (Tip or Tail)
Board mounts create unique perspectives that are impossible with body-mounted cameras. A tip mount captures the terrain rushing past beneath the board, creating a dramatic low-angle perspective. A tail mount captures the rider from behind at board level, showing the full body and the terrain ahead. These mounts require strong adhesive pads and should be checked frequently.
Advantages: Unique perspectives, shows board interaction with snow, dramatic low angles. Disadvantages: High vibration, adhesive can fail, limited visibility of rider.
Backpack or Shoulder Strap Mount
Mounting the camera on a backpack or shoulder strap provides a third-person perspective similar to a video game camera. The camera is positioned behind and above you, showing your body and the terrain ahead. This position is particularly effective for 360 cameras, as it creates a natural follow-cam perspective without requiring you to hold a selfie stick.
Advantages: Natural third-person perspective, hands-free, good for 360 cameras. Disadvantages: Camera may shift during riding, may not be compatible with all backpacks, less control over angle.
Battery Life in Cold Weather: Complete Guide
Battery life is the single biggest challenge of snowboarding with an action camera. Cold temperatures can reduce battery life by 50% or more, turning a camera that lasts two hours on a summer day into one that barely lasts 30 minutes on the mountain. Understanding why this happens and how to mitigate it is essential for any snowboard filmmaker.
Why Cold Kills Batteries
Lithium-ion batteries generate electricity through a chemical reaction between the anode and cathode. This reaction is temperature-dependent: at lower temperatures, the chemical molecules move more slowly, reducing the rate at which they can produce electricity. The battery’s internal resistance increases, which means less of its stored energy can be delivered to the camera.
This is not a defect in the battery; it is a fundamental limitation of lithium-ion chemistry. All lithium-ion batteries, regardless of brand or quality, are affected by cold temperatures. The severity of the effect depends on the specific chemical formulation, the battery’s design, and how cold it actually gets.
Temperature vs Battery Life
Understanding the relationship between temperature and battery life helps you plan your shooting strategy. At 50°F (10°C), most batteries perform at roughly 90-100% capacity. At 32°F (0°C), expect approximately 80% capacity. At 14°F (-10°C), expect approximately 60% capacity. At -4°F (-20°C), expect approximately 40% capacity. At -22°F (-30°C), some batteries will barely function at all.
These are rough estimates, and actual performance varies by battery type and camera model. GoPro’s Enduro battery performs significantly better at low temperatures than standard batteries, maintaining approximately 70% capacity at 14°F (-10°C). DJI’s freeze-resistant battery also performs better than standard batteries at low temperatures.
Strategies for Maximizing Battery Life
Keep Batteries Warm: The most effective strategy is keeping spare batteries warm until you need them. Store them in an inside pocket close to your body, where they will stay warm from your body heat. When you need to swap, pull the warm spare from your pocket and put the cold one in its place. The cold battery will gradually warm up and may regain some charge, giving you a second life.
Minimize Screen Usage: The rear screen is one of the biggest battery consumers. Turn it off when not actively framing a shot, and use voice commands or button shortcuts to start and stop recording. Some cameras allow you to set the screen timeout to a shorter duration.
Use Airplane Mode: Wi-Fi and Bluetooth consume battery power even when not actively transferring data. Enable airplane mode when you are not using wireless features to extend battery life.
Record at Lower Settings: Recording at 4K/30fps instead of 5.3K/60fps significantly reduces battery consumption. For casual riding footage, the lower setting is perfectly adequate and will extend your shooting time substantially.
Turn Off Stabilization (When Appropriate): Electronic image stabilization uses significant processing power, which consumes battery. If you are filming from a stable position, such as a tripod or monopod, turning off stabilization can extend battery life. However, for most snowboarding scenarios, stabilization is essential.
Carry More Batteries: The simplest solution is carrying more batteries. For a full day of riding, carry at least three fully charged batteries: one in the camera, two warm in your pocket. This provides enough power for approximately 3-4 hours of total recording time, which is more than most riders need.
Battery Performance by Camera Model
Not all cameras handle cold weather equally. Here is a summary of battery performance for each camera in our lineup, based on testing at 15°F (-9°C) with continuous recording at 4K/30fps:
- GoPro HERO12 (Enduro): Approximately 2.5 hours. Best in class.
- DJI Osmo Action 4: Approximately 2 hours. Very good.
- GoPro HERO12 (Standard): Approximately 1.5 hours. Acceptable.
- Insta360 GO 3 (with Action Pod): Approximately 1.5 hours. Good.
- Insta360 X3: Approximately 70-80 minutes. Below average.
- GoPro MAX: Approximately 60-75 minutes. Below average.
- Akaso Brave 7 LE: Approximately 45-60 minutes. Poor.
- Sony ZV-1 II: Approximately 45-50 minutes. Poor.
Best Camera Settings for Snowboarding
Getting the right camera settings is crucial for producing great snowboarding footage. Snow presents unique challenges that require specific settings adjustments. Here are our recommended settings for the most common snowboarding scenarios.
Resolution and Frame Rate
For Standard Riding Footage: 4K at 30fps is the sweet spot for most snowboarding. It provides excellent detail without consuming excessive storage or battery. The 30fps frame rate produces natural-looking motion that matches what your eyes see.
For Slow Motion: 4K at 60fps or 1080p at 120fps allows for smooth slow-motion playback at 50% or 25% speed respectively. This is essential for analyzing your technique or creating dramatic cinematic shots. The GoPro HERO12 can shoot 4K at 120fps or 2.7K at 240fps for ultra-slow-motion.
For Maximum Quality: 5.3K at 30fps (GoPro HERO12 only) provides the highest resolution available in a consumer action camera. This is best for footage that will be displayed on large screens or cropped significantly in post-production.
Exposure Settings
Protune/Pro Settings: Enable your camera’s professional settings mode for maximum control. This unlocks manual exposure, white balance, and color settings that produce significantly better results than automatic mode.
Exposure Compensation: Snow is extremely bright and can fool your camera’s automatic exposure into underexposing the scene, making everything look gray and dull. Set exposure compensation to +0.5 to +1.0 EV to brighten the image and ensure snow looks white, not gray.
White Balance: Auto white balance usually works well in snow, but can sometimes produce a blue tint in shaded areas. Setting white balance to “Cloudy” or “5500K” produces a warmer, more natural look that makes snow look inviting rather than cold.
ISO: Keep ISO as low as possible (100-400) for the cleanest image. Higher ISO values introduce noise and reduce image quality. In bright snow conditions, low ISO should be achievable without compromising exposure.
Color and Profile Settings
Standard Color: For riders who want footage that looks great straight out of camera, use the standard color profile. GoPro’s standard profile produces vibrant, punchy colors that make snow footage look exciting. DJI’s standard profile produces more neutral colors that are easier to grade.
Flat/Log Profile: For riders who plan to color grade their footage, a flat or log profile captures more dynamic range and provides a better starting point for grading. GoPro’s GP-Log, DJI’s D-Log M, and Insta360’s Vivid profile all offer expanded dynamic range at the cost of a flat-looking image that requires grading.
10-bit Color: If your camera supports it, enable 10-bit color recording. 10-bit color captures over 1 billion colors, compared to 16.7 million for 8-bit color. This provides significantly more flexibility in post-production and reduces banding in smooth gradients like blue skies.
Stabilization Settings
Maximum Stabilization: For most snowboarding, use the camera’s maximum stabilization setting. HyperSmooth on GoPro, RockSteady on DJI, and FlowState on Insta360 all provide excellent results at their highest settings.
Auto/Hybrid Stabilization: If your camera offers an automatic stabilization mode that adjusts based on movement intensity, use it. GoPro’s AutoBoost, for example, automatically adjusts stabilization to provide smooth footage without unnecessarily cropping the image.
Horizon Leveling: Enable horizon leveling if available. This feature keeps the horizon perfectly level regardless of how the camera is tilted, which is particularly useful for snowboarding where the camera may be at various angles.
Audio Settings
Wind Reduction: Enable wind noise reduction if your camera offers it. This uses the camera’s microphones to identify and reduce wind noise while preserving other sounds.
Audio Channels: If your camera supports stereo or multi-channel audio, enable it for more immersive sound. 360 cameras with multiple microphones provide the most immersive audio experience.
External Microphone: If you are using an external microphone, connect it before you start recording and verify that it is working by checking the audio levels. Most cameras show audio levels on the screen, which should bounce when you speak or make noise near the microphone.
Recommended Settings by Scenario
Groomed Runs (Bright Sun): 4K/60fps, Standard color, ISO 100, Exposure compensation +0.5 EV, Maximum stabilization, Wind reduction on.
Powder Day (Overcast): 4K/30fps, Standard color (or Flat for grading), ISO 200-400, Exposure compensation +0.7 EV, Maximum stabilization, White balance Cloudy.
Tree Runs (Variable Light): 4K/60fps, Flat/Log color, ISO 400-800, Auto exposure with -0.3 EV compensation, Maximum stabilization.
Park/Freestyle: 4K/120fps (for slow motion), Standard color, ISO 100-200, Maximum stabilization, AutoBoost if available.
Night Skiing: 4K/30fps, Standard color, ISO 800-1600, Exposure compensation 0 EV, Maximum stabilization, Wind reduction on.
Editing Your Snowboarding Footage: From Raw to Ready
Great footage is only half the equation. The editing process is where raw clips transform into compelling stories that capture the emotion and excitement of your day on the mountain. Whether you are creating a quick Instagram reel or a full-length edit for YouTube, understanding the editing process is essential for producing content that stands out.
Choosing Your Editing Software
Mobile Editing (Phone/Tablet): For quick edits that you want to share immediately, mobile apps are the way to go. GoPro Quik, Insta360’s app, and DJI Mimo all offer capable mobile editing with AI-powered features that automate much of the process. CapCut is a free app that offers surprisingly powerful editing tools, including advanced features like keyframe animation, speed ramping, and chroma keying. For social media content, mobile editing is often sufficient and much faster than desktop editing.
Desktop Editing (Computer): For more complex edits, color grading, and audio mixing, desktop software is necessary. Adobe Premiere Pro is the industry standard, offering comprehensive tools for every aspect of video editing. DaVinci Resolve provides comparable capabilities with a free version that is more than adequate for most snowboarders. Final Cut Pro is the best option for Mac users who want a fast, intuitive editing experience.
360-Specific Editing: Editing 360 footage requires specialized software. The Insta360 app and GoPro app both offer 360 reframing tools that allow you to choose the viewing angle after the fact. For more advanced 360 editing, Adobe Premiere Pro supports 360 video natively, and dedicated 360 editing software like Insta360 Studio provides more specialized tools.
The Editing Workflow
Step 1: Import and Organize. Transfer all footage from your memory cards to your computer. Organize clips by day, camera, and session (morning, afternoon). Create a folder structure that makes it easy to find specific clips later. This step is tedious but essential for an efficient editing process.
Step 2: Select Your Best Clips. Watch through all your footage and mark the best clips. Look for clear, well-exposed shots with smooth stabilization and interesting content. Not every clip will be a winner, and that is fine. Most experienced filmmakers use only 10-20% of their total footage in the final edit.
Step 3: Rough Cut. Arrange your selected clips in a rough sequence. Do not worry about timing or transitions at this stage; just get the basic structure of your edit in place. Think about the story you want to tell: an opening shot that sets the scene, riding footage that builds excitement, and a closing shot that wraps things up.
Step 4: Fine Cut and Timing. Trim each clip to its strongest moments and arrange them in a compelling sequence. Pay attention to pacing: fast cuts create energy, while longer shots allow the viewer to absorb the scenery. Music selection is crucial at this stage, as the rhythm of your edit should match the beat of the music.
Step 5: Color Grading. Adjust the colors and tones of your footage to create a consistent, polished look. Start by correcting exposure and white balance to ensure all clips look similar. Then apply creative grading to enhance the mood: warm, golden tones for sunny days; cool, blue tones for moody overcast days; high contrast for dramatic landscapes.
Step 6: Audio Mixing. Add music, adjust volume levels, and mix ambient audio from your camera with the music track. The balance between music and ambient sound is important: too much music and the viewer loses the sense of being on the mountain; too much ambient sound and the edit feels disjointed.
Step 7: Export. Export your final edit in the appropriate format for your target platform. For YouTube, 4K at 30fps with H.265 compression provides the best quality-to-file-size ratio. For Instagram and TikTok, 1080p at 30fps in a vertical (9:16) aspect ratio is optimal.
Color Grading Tips for Snow
Snow is one of the most challenging subjects to color grade because it occupies the extreme bright end of the exposure range. Here are specific tips for grading snowboarding footage:
Protect the Highlights: Snow should be bright but not blown out. Use a curves adjustment or highlight recovery tool to bring back detail in bright snow areas. If the snow is pure white with no texture, the highlights are clipped and cannot be recovered.
Warm Up the Shadows: Shadows in snow scenes often have a blue cast that can make the image look cold and uninviting. Adding a subtle warm tone to the shadows can make the image more inviting and natural-looking.
Enhance Contrast: Snow scenes often look flat and lifeless straight out of camera. Adding contrast makes the image more dynamic and visually engaging. Be careful not to overdo it, as excessive contrast can make the snow look harsh and unnatural.
Pop the Colors: Snowboarding environments often have vibrant colors that deserve to be enhanced. The blue of the sky, the green of pine trees, the bright colors of riders’ jackets all benefit from a slight saturation boost. But be careful not to oversaturate, as this can make the image look artificial.
Music Selection
Music can make or break a snowboarding edit. The right track sets the mood, drives the energy, and creates an emotional connection with the viewer. Here are some guidelines for choosing music:
Match the Energy: Fast, aggressive music works for park and freestyle edits. Mellow, atmospheric music works for powder days and scenic riding. Epic, cinematic music works for backcountry and big mountain edits.
Consider Copyright: Using copyrighted music on YouTube will result in a copyright claim, which can monetize your video for the copyright holder or take it down entirely. Use royalty-free music from services like Epidemic Sound, Artlist, or Musicbed to avoid copyright issues. Many of these services offer free trials that are perfect for your first few edits.
Edit to the Beat: Cut your clips to match the beat of the music. This creates a satisfying rhythm that engages the viewer and makes the edit feel polished and professional. Most editing software has tools that help you identify beat markers in music tracks.
Pro Tips for Snow Filming
Owning the camera is only half the battle. Here is how to use it.
- Keep Batteries Warm: Keep spare batteries in an internal chest pocket close to your body heat. Cold batteries lose charge; warm them up and they often come back to life.
- The Red Filter Myth: You do NOT need a red filter for snow (that is for scuba diving). However, an ND (Neutral Density) filter is great for bright sunny days to create motion blur.
- Angles Matter: For helmet mounts, aim slightly lower than you think. You want to see the tip of your board to give the viewer context. For stick shots, hold the camera low to the snow to make your speed look faster.
- Wipe the Lens: Snow spray dries into water spots. Lick the lens (yes, really) or keep a microfiber cloth handy.
Advanced Filming Techniques
The Follow-Cam: One of the most dynamic shots in snowboarding is the follow-cam, where a second rider films from behind. This requires coordination between the filmer and the rider, but the results are spectacular. Use a wide-angle lens to capture both the rider and the terrain, and maintain a consistent distance for smooth footage.
The Bomb-Proof Shot: For dramatic speed shots, mount the camera low on your board or boot. The low perspective makes everything look faster and more intense. The vibration is intense, so maximum stabilization is essential.
The Scenic Pan: At the top of a run, stop and slowly pan the camera across the landscape. This establishes the setting and builds anticipation before the riding footage begins. Hold the camera steady and pan slowly for the most cinematic result.
The Reaction Shot: After landing a big trick or finishing an epic run, turn the camera to your face and capture your genuine reaction. These moments of authentic emotion are what connect with viewers and make your content memorable.
The Time-Lapse: Set your camera to take a photo every 2-5 seconds while riding. In post-production, speed up the footage to create a time-lapse that compresses an entire run into a few seconds. This is particularly effective for long, scenic runs through varied terrain.
Filming Etiquette on the Mountain
Respect Other Riders: Do not film other riders without their permission, especially in terrain parks where people may not want their crashes on camera. Be aware of your surroundings and do not stop in the middle of a trail to film, as this creates a hazard for other riders.
Follow Resort Rules: Some resorts have restrictions on filming, particularly with drones. Always check the resort’s policy before filming. Drones are generally prohibited at ski resorts due to safety concerns and privacy issues.
Share Your Footage: If you film another rider doing something cool, share the footage with them. This is good etiquette and often leads to reciprocal filming that benefits everyone.
Backcountry Snowboarding: Camera Gear for Remote Terrain
Backcountry snowboarding presents unique challenges and opportunities for filmmakers. When you are miles from the nearest lift, with no groomed runs and no boundaries, the footage you capture is truly unique. But backcountry filming also requires specialized gear considerations and preparation that resort riding does not.
Reliability is Paramount
In the backcountry, your camera is not just a creative tool; it can be a safety device. Many backcountry riders use their cameras to record GPS tracks, document route conditions, and capture footage that can be used in avalanche awareness and education. If your camera fails in the backcountry, you lose not just footage but potentially valuable safety data.
For this reason, reliability should be your top priority when choosing a backcountry camera. Choose a camera from a reputable brand with a proven track record of durability. GoPro and DJI cameras are generally the most reliable options, with robust construction and extensive quality control. Avoid budget cameras from unknown brands, as their reliability in extreme conditions is unproven.
Battery Strategy for Extended Sessions
Backcountry sessions can last all day, with no opportunity to return to a warm car or lodge to swap batteries. You need a comprehensive battery strategy that ensures you have enough power for the entire day.
Carry at least three to four fully charged batteries, plus a portable charger. Keep all spare batteries in an inside pocket close to your body. Swap batteries at logical points during the day, such as at the top of each descent or during rest breaks. Do not wait until the battery is completely dead before swapping; swap when it reaches 20-30% to ensure the remaining charge is preserved.
Consider the altitude effect on battery performance. Higher altitudes mean lower temperatures and lower air pressure, both of which reduce battery performance. At altitudes above 10,000 feet, expect battery life to be 10-20% shorter than at sea level.
Protecting Your Gear
Backcountry environments are harsher than resort conditions. Deep powder, ice, rocks, and tree branches all pose threats to your camera. Use a protective housing or frame for your camera, even if it is natively waterproof. The housing provides impact protection that can save your camera from a hard crash into rocks or trees.
Carry your camera in a padded case when not in use. A camera bouncing around in a backpack can be damaged by impacts with other gear. Use a dedicated camera compartment or padded pouch to keep the camera secure.
After each day in the backcountry, inspect your camera for damage, clean it thoroughly, and check all seals and gaskets. Snow and moisture can work their way into crevices, and early detection of potential issues can prevent equipment failure on subsequent days.
Unique Backcountry Filming Opportunities
The backcountry offers filming opportunities that are impossible at a resort. Wide-open powder fields, remote tree runs, dramatic alpine terrain, and pristine natural beauty all provide stunning backdrops for your footage. Here are some specific opportunities to look for:
First Tracks: The first tracks in fresh powder are among the most beautiful images in snowboarding. Film the untouched snow before you ride through it, then capture the spray and texture as you carve through the fresh powder. The contrast between the smooth, untouched snow and the dynamic riding is visually stunning.
Avalanche Terrain: While you should never take unnecessary risks in avalanche terrain, the dramatic landscapes of avalanche paths and debris fields can make for compelling footage. Always prioritize safety over footage, and never enter terrain that you have not properly assessed.
Sunrise and Sunset: Backcountry riding often happens during early morning or late afternoon, when the light is most dramatic. Golden hour light creates long shadows, warm tones, and dramatic contrast that make for incredible footage. Plan your filming to take advantage of these magical moments.
Night Skiing and Low Light Filming
Night skiing and riding offer a completely different aesthetic from daytime conditions. The contrast between illuminated slopes and dark surroundings, the warm glow of resort lights, and the unique atmosphere of skiing under the stars all create visually stunning footage. But night filming presents significant technical challenges that require specific equipment and settings.
Camera Selection for Night Filming
Not all cameras are created equal when it comes to low-light performance. The key specification is sensor size: larger sensors capture more light, producing cleaner footage with less noise. The DJI Osmo Action 4, with its 1/1.3-inch sensor, is the best choice for night filming among the cameras we reviewed. Its larger sensor produces noticeably cleaner footage in low light than smaller-sensor cameras.
The GoPro HERO12 Black performs reasonably well in low light, though its smaller sensor produces more noise than the Action 4. The camera’s Night Effects mode, which uses longer exposures and noise reduction, can produce attractive results for stationary shots but is not suitable for action footage.
Budget cameras like the Akaso Brave 7 LE perform poorly in low light, producing noisy, muddy footage that is not worth sharing. If night filming is important to you, invest in a camera with proven low-light performance.
Settings for Night Filming
ISO: Raise the ISO to 800-1600 for night filming. Higher ISO values make the sensor more sensitive to light, but they also introduce noise. Find the balance between brightness and noise that produces the most pleasing result for your camera.
Frame Rate: Use 30fps instead of 60fps for night filming. The longer exposure time of 30fps captures more light per frame, producing brighter footage with less noise. You sacrifice smooth slow-motion capability, but night footage rarely benefits from slow motion anyway.
Exposure: Use manual exposure if available. Night scenes with bright lights and dark shadows can fool automatic exposure, producing inconsistent results. Set the exposure manually based on the dominant lighting conditions.
Stabilization: Maximum stabilization is essential for night filming. Low-light footage is more susceptible to motion blur, and stabilization helps maintain sharpness. However, be aware that some stabilization algorithms produce artifacts in low light, so you may need to experiment to find the best results.
Creative Techniques for Night Filming
Light Painting: Use the resort’s lights to create light painting effects. As you ride past lights, the movement creates streaks and patterns that can be visually striking. Experiment with different speeds and angles to create unique effects.
Silhouette Shots: Position yourself between the camera and a light source to create dramatic silhouette shots. The contrast between your dark outline and the bright lights creates a powerful visual that works particularly well for snowboarding.
Reflections: Wet snow and ice create reflective surfaces that can enhance night footage. Look for reflective areas and use them to add depth and visual interest to your shots.
Snow Spray: Night skiing often involves hard-packed snow that produces dramatic spray when carved. The spray catches the light beautifully, creating a sparkling effect that is unique to night conditions. Capture this spray by positioning the camera low and to the side of the rider.
Best Cameras for Kids Snowboarding
If you are looking for a camera for your kids to use while snowboarding, the requirements are different from adult cameras. Kids need cameras that are simple to operate, durable enough to survive rough handling, and light enough to be comfortable for smaller bodies. Here are our recommendations for the best cameras for young snowboarders.
What to Look for in a Kids Snowboarding Camera
Simplicity: Kids should be able to operate the camera without adult assistance. Look for cameras with simple one-button recording, large and easy-to-understand menus, and minimal settings to adjust. The camera should be operable with gloves on, as kids often struggle with fine motor tasks while wearing winter gloves.
Durability: Kids are hard on equipment. The camera needs to survive drops, impacts, and being buried in snow. Look for cameras with rubberized bodies, scratch-resistant lens covers, and proven water and shock resistance. The Olympus Tough TG-7 is an excellent choice for kids because of its virtually indestructible build.
Weight: A camera that is too heavy will be uncomfortable for kids to wear, especially on a helmet mount. Cameras under 100 grams are ideal for younger children. The Insta360 GO 3, at just 35 grams, is perfect for kids who cannot tolerate a heavier camera.
Price: Kids may lose or damage the camera, so choose one that you can afford to replace. Budget cameras like the Akaso Brave 7 LE provide reasonable quality at a price point that is not devastating if the camera is lost or broken.
Our Top Picks for Kids
Best Overall for Kids: Insta360 GO 3. At 35 grams, the GO 3 is light enough for any child to wear comfortably. The magnetic mounting system is simple enough for kids to use independently, and the Action Pod provides a convenient way to check footage. The 2.7K resolution is more than adequate for kids’ content.
Most Durable: Olympus Tough TG-7. If your kids are rough on equipment, the TG-7 is virtually indestructible. It can survive drops, impacts, and submersion in water. While its video capabilities are not as advanced as dedicated action cameras, its durability makes it ideal for young riders who may not be careful with their gear.
Best Value: Akaso Brave 7 LE. The Brave 7 LE provides 4K video and decent features at a very affordable price. The included accessory kit provides everything kids need to get started, and the dual screens make it easy to frame shots. The low price means you will not be devastated if it gets lost or damaged.
Best for Older Kids: DJI Osmo Action 4. For teenagers who are serious about filming their riding, the Action 4 provides excellent quality and features in a durable package. The magnetic mounting system is easy to use, and the large sensor produces footage that will impress even discerning young filmmakers.
Teaching Kids to Film
Teaching kids to film while snowboarding is an excellent way to develop their creativity and technical skills. Start with the basics: how to start and stop recording, how to check the framing, and how to keep the lens clean. Then progress to more advanced concepts like choosing interesting angles, planning shots, and thinking about the story they want to tell.
Encourage kids to experiment and not worry about perfection. The best way to learn is by doing, and kids will naturally develop their own style and preferences over time. Review footage together and provide constructive feedback, but always emphasize the fun and creative aspects of filming rather than technical perfection.
Camera Maintenance and Care for Snowboarding
Proper maintenance extends the life of your camera and ensures reliable performance in harsh conditions. Snow, ice, moisture, and extreme temperatures all take a toll on your equipment. A consistent maintenance routine will keep your camera functioning at its best for seasons to come.
Daily Maintenance (After Each Day of Riding)
Dry the Camera: Snow and moisture are the biggest threats to your camera’s longevity. After each day of riding, remove the camera from its mount and dry it thoroughly with a soft cloth. Pay special attention to crevices, buttons, and ports where moisture can accumulate.
Remove the Battery: Always remove the battery after each session. This prevents the battery from discharging completely if the camera is accidentally turned on, and it allows any moisture inside the battery compartment to evaporate.
Clean the Lens: Use a microfiber cloth to clean the lens. If there are stubborn water spots, breathe on the lens to create condensation, then wipe gently. Avoid using harsh chemicals or abrasive materials that could scratch the lens coating.
Check the Seals: Inspect the rubber seals around the battery compartment, memory card slot, and USB port. Look for cracks, tears, or debris that could compromise the waterproof seal. Clean the seals with a damp cloth and apply a thin layer of silicone grease if they appear dry or cracked.
Weekly Maintenance (During Active Season)
Update Firmware: Check for firmware updates regularly. Camera manufacturers frequently release updates that improve performance, fix bugs, and add new features. Keep your camera’s firmware up to date for the best experience.
Format Memory Cards: Format your memory cards in the camera (not on a computer) before each use. This ensures the file system is optimized for the camera and reduces the risk of corruption. Always back up your footage before formatting.
Inspect Mounts: Check all mounts and adhesive pads for wear and damage. Replace any mounts that show signs of cracking, loosening, or adhesive failure. A failed mount can result in a lost or damaged camera.
End-of-Season Maintenance
Deep Clean: Perform a thorough cleaning of the camera body, lens, seals, and ports. Remove any accumulated grime, salt (from resort snowmaking), and debris. Use compressed air to blow out any particles from crevices and ports.
Battery Storage: Store batteries at approximately 50% charge in a cool, dry place. Do not store batteries fully charged or fully discharged, as both extremes can reduce their long-term capacity. Check batteries every few months and recharge if the charge has dropped below 30%.
Camera Storage: Store the camera in a cool, dry place away from direct sunlight and extreme temperatures. Remove the battery and memory card. Place the camera in a sealed bag with silica gel packets to absorb any residual moisture.
Inspect and Repair: Before storing the camera for the off-season, inspect it for any damage that occurred during the season. Address any issues now, while you have time, rather than discovering them next season when you are eager to start filming.
Dealing with Condensation
Condensation is one of the most common issues when bringing a cold camera into a warm environment. When you bring your camera inside after a day on the mountain, the temperature difference causes moisture from the air to condense on and inside the camera. This can fog the lens, affect the display, and potentially damage internal components.
The best way to prevent condensation is to let the camera acclimate gradually. Place it in a sealed plastic bag before bringing it inside, and leave it in the bag until it reaches room temperature. The bag prevents moisture from the warm air from reaching the cold camera surface. Alternatively, place the camera in an insulated bag or wrap it in a towel to slow the temperature change.
If condensation does occur, do not try to dry the camera with a hair dryer or heat source, as rapid heating can cause thermal shock. Instead, place the camera in a sealed bag with silica gel packets and let it dry naturally over several hours. Do not turn on the camera or insert the battery until you are certain all moisture has evaporated.
Repair and Warranty
Most action camera manufacturers offer warranty coverage for defects in materials and workmanship, typically for one year from the date of purchase. However, warranty coverage usually does not include accidental damage, water damage (if the camera was used beyond its rated depth), or damage caused by misuse.
GoPro offers a subscription service that includes camera replacement for accidental damage. DJI offers their Care Refresh plan, which provides coverage for accidental damage for a fixed fee per incident. These protection plans are worth considering if you ride frequently and are hard on your equipment.
For minor repairs, such as replacing a lens cover or battery door, manufacturer parts are available from the camera maker’s website or authorized dealers. For more serious repairs, contact the manufacturer’s support team for options. In many cases, it is more cost-effective to replace the camera than to repair it, especially for older models.
Frequently Asked Questions
The helmet mount is the most popular for a true POV experience. However, the “Chesty” (chest mount) often provides a more immersive view because it captures your arms and knees, showing the work your body is doing. For smooth follow-cams, a selfie stick is best.
Most modern action cameras (GoPro 12, Action 4) are waterproof without a case. However, for snowboarding, a case or a foam “windslayer” housing adds a layer of protection against impact from trees or rocks, and helps reduce wind noise.
Fog happens when a warm camera hits cold air. Use anti-fog inserts inside the housing if you use one. If using a naked camera, try to keep it acclimated to the cold temperature rather than taking it in and out of a warm lodge constantly.
It used to be, but apps from Insta360 and GoPro have made it incredibly easy. You simply play the video on your phone and drag your finger to point the camera where you want it to look. The app does the rest.
While modern smartphones have impressive cameras, they are not recommended for snowboarding. Batteries die quickly in cold, screens are difficult to use with gloves, and phones are not waterproof or shockproof enough for the mountain. If you must use your phone, invest in a waterproof case with a mount, keep it warm when not in use, and bring a portable charger.
For 4K/30fps recording, plan for approximately 4GB per hour. For 4K/60fps, plan for approximately 7GB per hour. For 5.3K/60fps, plan for approximately 12GB per hour. A 128GB card will hold approximately 4-6 hours of 4K footage, which is more than enough for most riders. Carry a second card as a backup.
The same cameras work well for both sports. However, skiing produces less vibration than snowboarding, so stabilization is slightly less critical. Skiers also tend to hold poles, which makes mounting options different. A helmet mount or chest mount works well for both sports, and 360 cameras with invisible selfie sticks produce excellent footage for both.
Drones are generally prohibited at ski resorts due to safety concerns and Federal Aviation Administration regulations. However, drones can be used in backcountry areas where they are legal and safe. A 360 camera with an invisible selfie stick can replicate many drone-like shots without the complexity and restrictions of actual drone flight.
Most action cameras have Wi-Fi that allows you to transfer files to your phone. However, transferring large 4K files over Wi-Fi is slow. For faster sharing, consider using a memory card reader that connects to your phone, or wait until you have a Wi-Fi connection to transfer files. Some cameras also support Bluetooth transfer for smaller files and thumbnails.
For most riders, 4K is the recommended resolution. It provides significantly more detail than 1080p, which is important for cropping and re-framing in post-production. The storage and battery costs of 4K are manageable with proper planning. However, if you are primarily sharing on Instagram or TikTok, 1080p is sufficient and will extend your battery life and storage capacity.
After each day of riding, wipe the camera body with a soft, dry cloth to remove snow and moisture. Clean the lens with a microfiber cloth. Remove the battery and memory card to allow air circulation. Check all seals and gaskets for debris. If the camera was submerged in water, rinse it with fresh water to remove salt and minerals, then dry thoroughly.
Yes, but be mindful of other riders and park etiquette. Do not stop in the middle of a feature to film, and be aware of your surroundings. A chest mount or helmet mount allows hands-free filming while riding through the park. If you want to film specific tricks, set up the camera on a tripod or have a friend film from the side.
ND (Neutral Density) filters reduce the amount of light entering the camera, allowing you to use slower shutter speeds or wider apertures in bright conditions. For snowboarding in bright sun, an ND8 or ND16 filter is usually sufficient. For very bright conditions, such as high-altitude riding on a clear day, an ND32 may be needed. ND filters are most useful for creating motion blur in cinematic footage.
Several factors contribute to professional-looking footage: smooth stabilization, good exposure, consistent color grading, and thoughtful editing. Start with the basics: use your camera’s best stabilization mode, set exposure compensation to +0.5 to +1.0 EV for snow, and shoot at 4K/60fps for flexibility. Then learn color grading basics to make your footage pop. Finally, edit with purpose: choose your best clips, cut to the music, and tell a story.
A used camera can be an excellent value, especially from reputable brands like GoPro and DJI. Check the shutter count (if available), inspect for physical damage, test all features including waterproofing, and verify that the battery holds a charge. Buying from a seller with a return policy provides protection against hidden issues. For budget-conscious riders, a used GoPro HERO10 or HERO11 provides excellent performance at a fraction of the new price.
For backcountry, reliability, battery life, and durability are paramount. The GoPro HERO12 Black with Enduro batteries is our top choice, thanks to its excellent cold-weather battery life, robust build quality, and proven reliability. Carry at least 3-4 spare batteries for a full day, and consider a portable charger for extended trips.
If your camera was not mounted securely and produced shaky footage, post-processing stabilization can help. DaVinci Resolve’s stabilization feature, Adobe Warp Stabilizer, and Insta360’s app all offer effective post-capture stabilization. However, post-processing stabilization works by cropping the image, so it reduces resolution and field of view. It is always better to achieve smooth footage through proper mounting and camera stabilization settings.
GoPro’s subscription service offers several benefits that are valuable for snowboarders: unlimited cloud storage for your footage, automatic backup, camera replacement for accidental damage, and discounts on accessories. If you use a GoPro regularly and want peace of mind against accidental damage, the subscription provides good value. If you only ride a few days per year, the cost may not be justified.
Absolutely. Most action cameras have time-lapse modes that are perfect for capturing sunrise, sunset, or base area activity. Set the camera on a stable surface (or use a small tripod), choose your interval (2-5 seconds for most scenes), and let it record. The GoPro HERO12’s TimeWarp feature creates moving time-lapses while you ride, which is particularly cool for snowboarding content.
EIS (Electronic Image Stabilization) uses software algorithms to analyze and counteract camera movement by cropping and shifting the image. OIS (Optical Image Stabilization) uses physical lens elements that move to counteract movement. Most action cameras use EIS because it is more effective for the extreme movements of action sports. The DJI Pocket 3 uses a mechanical gimbal, which is physically different from both EIS and OIS and provides the smoothest results.


Filming Snowboarding for Social Media
Social media has become the primary platform for sharing snowboarding content. Instagram, TikTok, YouTube Shorts, and Facebook all offer unique opportunities to reach audiences with your snowboarding footage. Understanding the specific requirements and best practices for each platform is essential for creating content that performs well.
Platform-Specific Considerations
Instagram (Reels and Stories): Instagram favors vertical video (9:16 aspect ratio) for Reels, with a maximum length of 90 seconds. Keep your clips short, punchy, and visually engaging. Use trending audio tracks to increase discoverability, and add relevant hashtags to reach your target audience. The first three seconds are critical; hook the viewer immediately with your most exciting shot.
TikTok: TikTok is the fastest-growing platform for action sports content. Like Instagram, it favors vertical video with a maximum length of 10 minutes (but shorter is usually better). TikTok’s algorithm rewards content that keeps viewers watching, so focus on creating compelling hooks and satisfying payoffs. Use trending sounds, hashtags, and challenges to increase visibility.
YouTube Shorts: YouTube Shorts offers a vertical video format with a maximum length of 60 seconds. Shorts can drive viewers to your longer-form YouTube content, making them an excellent marketing tool. Create Shorts that tease your longer videos, providing just enough to hook the viewer and encourage them to watch the full version.
YouTube (Long-Form): YouTube remains the best platform for longer snowboarding content. Full-day edits, resort reviews, gear reviews, and cinematic edits all perform well on YouTube. Optimize your titles, descriptions, and tags for search, and create custom thumbnails that stand out in the feed. Consistency is key on YouTube; upload regularly to build an audience.
Content Ideas for Snowboarding Social Media
Optimizing Footage for Social Media
Shoot Vertical: While you can crop horizontal footage to vertical, the result is often awkward and wastes resolution. If you know your footage will be posted on Instagram or TikTok, consider shooting vertical from the start. Mount the camera vertically on your helmet or chest for a natural vertical perspective.
Capture More: Social media edits require more footage than you think. For a 30-second Reel, capture at least 5-10 minutes of riding footage. This gives you enough material to select the best moments and create a tight, engaging edit.
Consider the Thumbnail: The thumbnail is the first thing viewers see, and it determines whether they click. Choose a frame that is visually striking, emotionally engaging, and representative of the content. Add text overlay if it helps convey the video’s value proposition.
Use Captions: Many viewers watch social media videos without sound. Adding captions ensures your message reaches these viewers and increases engagement. Most editing apps include automatic caption generation that works reasonably well for English content.