
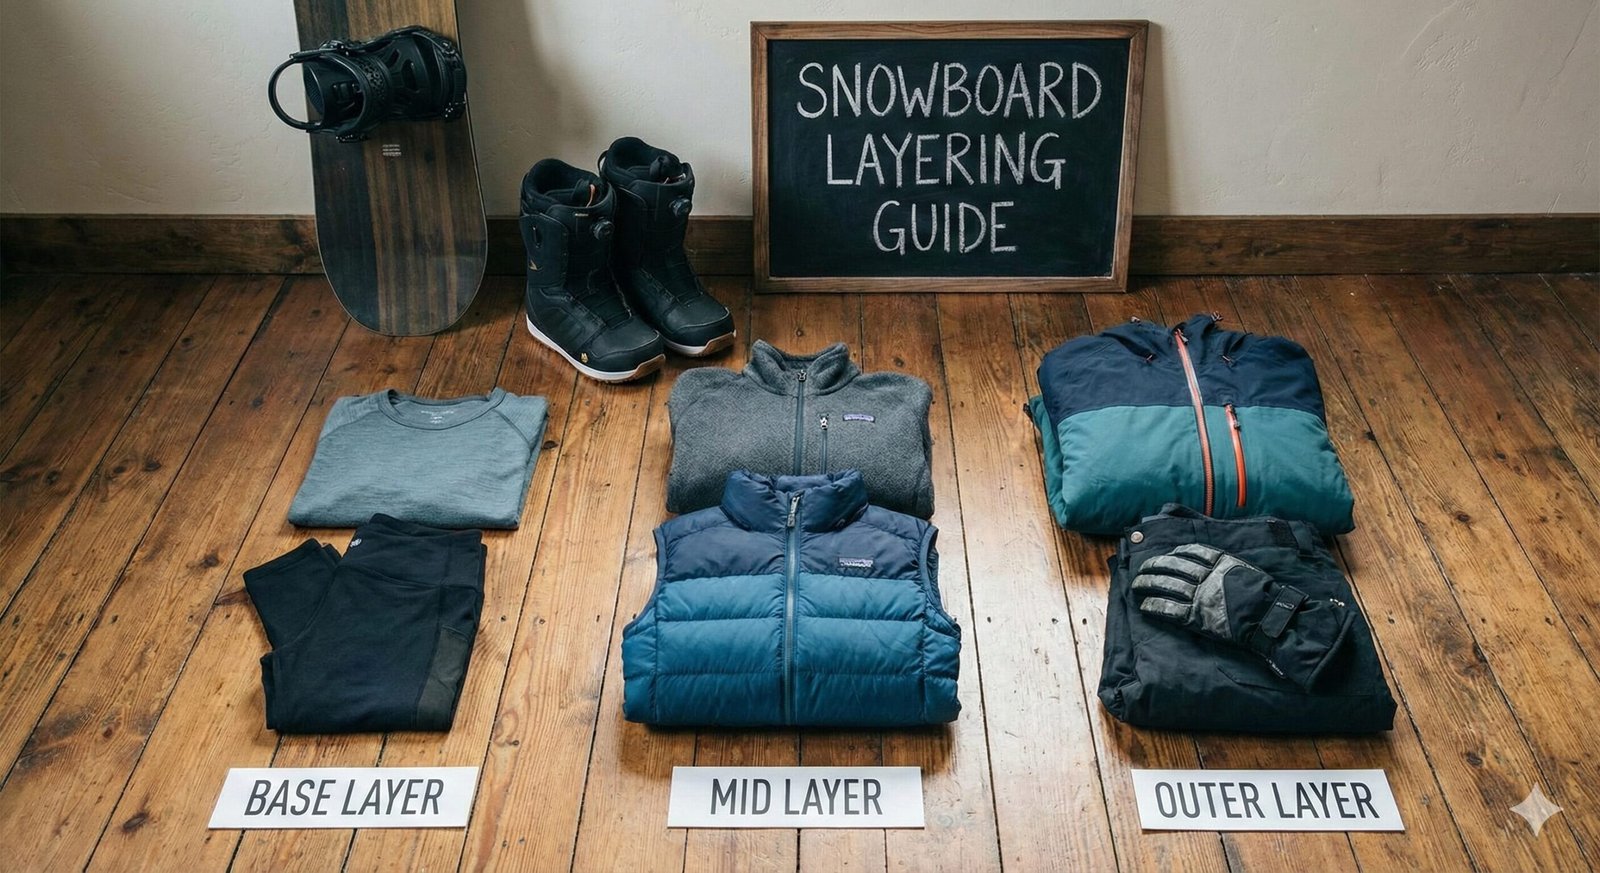
If there is one thing that ruins a powder day faster than a broken binding, it’s freezing cold sweat. We have all been there: you hike up a feature or traverse a flat spot, work up a massive sweat, and then freeze to your core the moment you sit on the chairlift. This isn’t just uncomfortable; it’s a performance killer.
Mastering your snowboard layering system is the difference between riding first chair to last call, or heading to the lodge for hot cocoa by 11 AM. It’s not about wearing the thickest coat you own; it’s about simple thermodynamics and moisture management. In this guide, we break down exactly how to layer for every condition, from deep January freeze to slushy spring laps.
Before we start, memorize this: Never wear cotton on the mountain. Cotton absorbs moisture (sweat/snow) and holds it against your skin. It loses all insulating ability when wet and chills you rapidly through evaporative cooling. Always choose wool or synthetics.
The 3-Layer System Explained
Snowboarding is a high-output activity with periods of low activity (sitting on lifts). This “stop-and-go” nature makes temperature regulation tricky. The solution is the proven 3-layer system, which allows you to add or subtract insulation as needed.
| Layer | Function | Key Requirement |
|---|---|---|
| 1. Base Layer | Moisture Wicking | Must fit tight to skin to pull sweat away. |
| 2. Mid Layer | Insulation (Warmth) | Traps body heat while letting moisture pass through. |
| 3. Outer Layer | Protection (Shell) | Blocks wind and water; allows internal vapor to escape. |
Proper layering also affects your agility. Bulky gear can limit movement, which is dangerous if you’re hitting jumps. Learn more about safety in our article on why snowboarding is dangerous and how gear mitigates risk.
How the System Works Together
The three-layer system is designed to work as an integrated moisture and temperature management system. When you sweat during active riding, the base layer pulls moisture away from your skin through capillary action. The mid layer then spreads that moisture across a larger surface area, allowing it to evaporate more quickly. Finally, the outer layer allows that water vapor to escape while preventing external moisture from penetrating inward.
This layered approach means you can adjust your warmth level throughout the day without completely changing your outfit. On a cold morning, you might wear all three layers. As the sun comes out and temperatures rise, you can remove the mid layer and stuff it in your backpack. When you’re riding the lift back up and the wind picks up, you can put it back on.
The Role of Dead Air Space
The fundamental principle behind insulation is creating “dead air space” — pockets of still air that your body heats up. Warm air rises, but when it’s trapped between fabric fibers or in lofted material like down, it stays close to your body and creates a warm boundary layer. The more dead air space you can create without adding excessive bulk, the warmer you’ll be.
This is why a bulky cotton sweatshirt doesn’t insulate as well as a thin merino wool base layer. Cotton fibers collapse when wet, eliminating dead air space. Merino wool fibers have a natural crimp that maintains loft even when damp, preserving insulating air pockets. Understanding this principle helps explain why material choice matters more than thickness.
Base Layers: Your Second Skin
The base layer is the most critical component because it touches your skin. Its job isn’t primarily to warm you, but to keep you dry. If your skin is wet, you will be cold, no matter how expensive your jacket is.
Top & Bottom Strategy
You need both a long-sleeve top and leggings (often called long johns). Look for “next-to-skin” fit. If it’s baggy, sweat will pool on your skin rather than wicking into the fabric.
Weight Matters
- Lightweight: For spring riding or people who run very hot. Typically 100-150 g/m², providing minimal insulation. Best for temperatures above 30°F (-1°C) or high-exertion activities like backcountry touring.
- Midweight: The gold standard. Versatile for 90% of winter days. Usually 150-250 g/m², providing the best balance of warmth, moisture management, and breathability.
- Heavyweight: Only for extreme cold (-10°F or lower) or very low-activity days. These 250+ g/m² layers are overkill for most riders and can cause overheating during active riding.
While discussing fit, don’t ignore your feet. A common issue beginners face is foot pain due to bunching socks inside boots. Check our guide on why do my feet hurt when I snowboard to ensure your sock game is on point.

Smartwool Merino 250 Base Layer
The industry standard for a reason. 100% Merino wool naturally resists odors, regulates temperature perfectly, and feels soft against the skin.
Check Price on AmazonBase Layer Fit Guide
Fitting your base layer correctly is crucial for performance. Too loose, and moisture wicking fails because sweat pools in the fabric folds rather than being transported away. Too tight, and you restrict blood flow, which actually makes you colder. The ideal fit is snug but not constricting — you should be able to pinch about an inch of fabric at your side.
For tops, the sleeves should reach your wrists when your arms are extended forward (as if you’re riding). This prevents gaps at the wrists where cold air can enter. For bottoms, the waistband should sit comfortably at your natural waist without rolling or bunching.
Base Layer Construction Types
Jersey Knit: The most common construction. Smooth on the outside with a soft brushed interior. Good all-around performance and the best choice for most riders.
Grid Fleece: Features a pattern of raised fleece squares separated by channels. This construction maximizes breathability while maintaining warmth. Excellent for high-output activities.
Compressive: Tight-fitting base layers that support muscles and improve blood flow. Popular with racers and backcountry touring enthusiasts.
Seamless: Knitted as a single piece without seams. Eliminates chafing points and provides a smoother fit under other layers.
Base Layer Care Tips
Proper care extends the life and performance of your base layers. Always wash in cold water on a gentle cycle. Hot water damages merino wool fibers and can melt synthetic materials. Use a mild detergent without fabric softeners, which coat fibers and reduce wicking ability. Hang dry whenever possible — machine drying on high heat can shrink merino wool by up to 30%.
For merino wool base layers, avoid washing after every wear unless they’re visibly dirty. Merino wool naturally resists odor-causing bacteria, so you can often wear a base layer 3-5 times between washes. This extends the garment’s life significantly.
Mid Layers: The Furnace
The mid layer is where you trap heat. Think of this as your thermostat. On a cold day, you wear a thick mid layer. On a warm day, you might skip it entirely. The goal is to create “dead air space” around your body that your core warms up.
Best Options for Mid Layers
- Fleece: Highly breathable and dries fast. Classic Polartec fleece is excellent because it lets sweat vapor pass through easily to the outer shell. Fleece comes in various weights from lightweight (100) to expedition weight (300+).
- Puffy Jackets (Down/Synthetic): The warmest option. Use a “packable” down jacket for extremely cold days. Synthetic insulation (like PrimaLoft) is better if you expect to sweat a lot, as it stays warm even when damp.
- Hoodies: A technical riding hoodie (synthetic, DWR-coated) is a favorite for park rats. Just ensure it’s not cotton! Technical hoodies often feature articulated seams for better mobility.
Your mid-layer choice often depends on your budget. If you are just starting out, check our breakdown on how expensive is snowboarding to see where you can save money (hint: fleece is cheaper than down).
Patagonia R1 Fleece Pullover
The legendary grid fleece that breathes incredibly well during high exertion but traps heat when you stop moving. Essential for active riders.
Find Best DealDown vs. Synthetic Insulation
Down (goose or duck feathers) offers the best warmth-to-weight ratio and compresses smaller than any synthetic alternative. High-quality down (800+ fill power) can keep you warm in temperatures well below zero. However, down loses its insulating ability when wet, making it a poor choice for wet conditions or high-sweat activities.
Synthetic insulation (PrimaLoft, Coreloft, Thermoball) mimics down’s structure using polyester fibers. While not as warm per ounce as high-quality down, synthetic insulation maintains warmth even when wet, dries faster, and is more affordable. For snowboarding, synthetic insulation is often the practical choice.
Hybrid designs combine both materials: down in the core for maximum warmth and synthetic in high-moisture areas like underarms and shoulders. These provide the best of both worlds but come at a premium price.
Mid Layer Fit and Sizing
Your mid layer should fit comfortably over your base layer without being so tight that it compresses the insulation. Compression reduces loft, which reduces warmth. At the same time, it shouldn’t be so loose that it creates excessive bulk under your shell. Pay special attention to the shoulders and arms — snowboarding requires a lot of upper body movement.
Mid Layer Hoods: Worth It?
A hooded mid layer provides additional warmth for your head and neck, which are major areas of heat loss. However, hoods add bulk around your collar and can interfere with helmet fit. For resort riding, where you’re wearing a helmet anyway, a hooded mid layer might be redundant. For backcountry use or cold conditions, the extra warmth is often worth the bulk.
Outer Layers: The Shield
Your jacket and pants (the shell) are your first line of defense against wind, snow, and rain. While some jackets come with insulation built-in (“insulated jackets”), a dedicated “shell” allows for better layering versatility.
Waterproofing vs. Breathability
You will see numbers like 10k/10k or 20k/20k on gear tags.
The first number (Waterproofing): How much water the fabric can withstand before leaking. 10k is minimum; 20k+ (Gore-Tex) is best for wet snow.
The second number (Breathability): How much sweat vapor can escape. If this is low, you will get wet from the inside out.
Understanding these numbers helps you choose the right shell for your conditions. If you ride primarily in the Pacific Northwest where rain and wet snow are common, you need higher waterproofing (20k+). If you ride in Colorado where snow is dry and cold, a 10k/10k shell might be sufficient.
Shell Construction Explained
2-Layer: The waterproof membrane is bonded to the outer fabric with a separate hanging liner inside. This is the most common and affordable construction but can feel bulky and clammy.
3-Layer: The membrane is bonded between the outer fabric and a thin inner liner. This creates a single, durable layer that’s lighter, more breathable, and more packable. 3-layer shells are more expensive but provide superior performance.
2.5-Layer: A printed or sprayed-on pattern protects the membrane without adding a full liner. Reduces weight and bulk while maintaining good breathability.
Bibs vs. Pants
For deep powder, bibs are superior as they prevent snow from getting down your pants when you crash. However, pants are easier for bathroom breaks. Choosing between bibs and pants is a personal preference, much like the debate in our guide: Skiing Bibs vs Pants: Which is Better?.

Burton [ak] GORE-TEX Cyclic Jacket
The gold standard for shells. Fully taped seams, highly breathable Gore-Tex fabric, and designed specifically for snowboard movement.
See Colors & SizesJacket Features That Matter
Beyond waterproofing, several features significantly impact functionality. Pit zips allow quick venting without opening the front. A powder skirt prevents snow from entering at the waist. A helmet-compatible hood fits over your helmet without restricting vision. Pocket placement matters — chest pockets large enough for your phone, handwarmer pockets positioned high enough to not interfere with a harness.
Materials: Merino vs. Synthetic
When buying layers, look at the tag. Here is the showdown:
Merino Wool
Pros: Naturally anti-microbial (doesn’t stink after 3 days), regulates temperature even when wet, very soft.
Cons: Expensive, can be less durable than nylon.
Synthetics (Polyester/Nylon/Spandex)
Pros: Cheaper, wicks moisture faster than wool, very durable, stretchy.
Cons: Gets smelly very fast (“perma-stink”), feels colder when wet.
Pro Tip: A blend is often the best of both worlds. Look for layers that are 50% Merino / 50% Polyester.
Understanding Merino Wool Grades
Not all merino wool is created equal. The fiber diameter, measured in microns, determines softness and performance. Superfine merino (17.5-18.5 microns) feels cashmere-soft against skin. Fine merino (18.5-19.5 microns) is slightly less soft but more durable. Medium merino (19.5-22.5 microns) is the most affordable but can feel itchy for sensitive skin.
For base layers that touch your skin directly, invest in superfine or fine merino. The softness prevents irritation during long days, and the finer fibers actually wick moisture better due to increased surface area.
Synthetic Fabric Technologies
The synthetic fabric market has evolved significantly. Polyester is the most common synthetic fiber — durable, quick-drying, and affordable, but it retains odors. Nylon is stronger and more abrasion-resistant, making it ideal for outer layers. Spandex (elastane) adds stretch, improving fit and mobility.
Proprietary technologies like Polartec Power Stretch, Under Armour ColdGear, and Smartwool PhD offer specialized performance. While more expensive, they often provide noticeable performance advantages over generic alternatives.
Coatings and Treatments
DWR (Durable Water Repellent) causes water to bead up and roll off fabric. This treatment is essential for outer layers but degrades over time and needs periodic reapplication.
Anti-microbial treatments inhibit odor-causing bacteria growth. Silver-based treatments are most common, but some manufacturers integrate anti-microbial properties into the fiber itself, which lasts longer.
UV protection treatments are becoming more common. High altitude means stronger UV radiation, and reflected UV from snow increases exposure.
Don’t Forget Extremities
Extremities (head, hands, feet) lose heat fastest because your body prioritizes core temperature. Neglecting these areas can make your entire layering system feel inadequate.
Head Protection and Warmth
Your head accounts for up to 10% of your body’s surface area but can account for up to 50% of heat loss in extreme cold. A quality beanie under your helmet provides essential warmth. Look for beanies made from merino wool or synthetic fleece that fit snugly without pressure points.
Balaclavas offer more comprehensive coverage, protecting your face, neck, and head. They’re essential for cold days and backcountry riding where wind chill is a factor. Neck gaiters (buff/neck warmers) provide versatile coverage and are lighter than balaclavas.
Hand Protection: Gloves vs. Mittens
Mittens keep your fingers together, allowing them to share warmth. They’re warmer than gloves in extreme cold but sacrifice dexterity. Gloves provide better dexterity and grip, essential for park riders and backcountry riders.
For most riders, having both options is ideal. Use mittens for cold days and gloves for warmer conditions or park sessions. Look for waterproof membranes (Gore-Tex, Hipora) and fully taped seams. Touchscreen compatibility allows phone use without removing gloves.
Footwear and Socks
Proper sock choice is essential for warm, comfortable feet. Snowboard socks should be knee-high, thin-to-medium weight, and made from merino wool or synthetic materials. Cotton socks are never acceptable — they absorb moisture, lose insulation, and cause blisters.
Multiple thin sock layers are worse than a single quality layer. Multiple layers create friction between socks, causing blisters and reducing insulation efficiency. Invest in quality single-layer socks designed specifically for snowboarding.
Layering by Temperature Scenarios
Deep Winter (0°F to 15°F / -18°C to -9°C)
- Base: Midweight to Heavyweight Merino. Full coverage from neck to wrists to ankles.
- Mid: Puffy Down Jacket or thick Fleece. A 600+ fill power down jacket provides maximum warmth.
- Outer: Insulated Shell or 3L Gore-Tex Shell (with vents closed). Fully taped seams are essential.
- Extras: Balaclava, Mittens with liners, hand warmers, toe warmers.
At temperatures below 0°F (-18°C), exposed skin can develop frostbite in minutes. Cover all skin, take frequent warm-up breaks, and know the signs of hypothermia: confusion, slurred speech, and loss of coordination.
Typical Winter Day (20°F to 32°F / -6°C to 0°C)
- Base: Midweight Synthetic or Wool.
- Mid: Fleece Vest or lightweight Fleece pullover.
- Outer: Standard Shell. Open pit zips when riding to prevent overheating.
- Extras: Neck gaiter, standard gloves.
On typical winter days, you’ll constantly add and remove layers. Start with all layers for the cold morning ride up. Open jacket vents during your first run to gauge warmth. Remove mid layer if you’re sweating. Add it back before the chairlift. This adjustment process is normal — embrace it.
Spring Slush (35°F to 50°F / 2°C to 10°C)
- Base: Lightweight synthetic tee or short-sleeve base layer.
- Mid: None (or a flannel shirt for style).
- Outer: Softshell jacket or just a Hoodie (DWR treated).
- Extras: Sunglasses, sunscreen. UV protection is critical in spring.
Backcountry Snowboarding Layering
Backcountry snowboarding presents unique layering challenges because you’re generating massive heat on the ascent and then sitting still during transitions and descents. This extreme variation requires a more sophisticated layering approach than resort riding.
The Ascent: Managing High Output
When skinning uphill, your body generates 3-5 times more heat than at rest. You need layers that breathe incredibly well while providing enough warmth for the descent. Start with a lightweight merino or synthetic base layer that wicks aggressively. Add a grid fleece or breathable softshell for the climb. Your shell should be in your pack, ready for the descent.
The key is managing moisture on the way up. If you sweat too much, your layers become wet and you’ll freeze during transitions. Adjust your pace and layering to maintain a light sweat rather than drenching your clothes.
The Descent: Maximum Protection
For the descent, you want full protection from wind, snow, and cold. Put on your shell over your base and mid layers. A hood protects your face from wind and snow spray. Speed creates wind chill, so even moderate temperatures can feel freezing at 30+ mph.
Backcountry-Specific Tips
- Carry an emergency puffy in your pack even on warm days
- Pack extra base layers in a waterproof dry bag
- Use chemical warmers as emergency heat sources
- Choose gloves with removable liners for versatility
- Layer for the descent, not the ascent — you can always vent while climbing
Backcountry conditions can change rapidly. Always carry emergency layers: an extra puffy jacket, dry base layer, and chemical warmers. The weight penalty is small compared to the safety benefit. Consider your group’s least experienced member when planning layers.
Park & Freestyle Layering
Park riders have different layering needs than all-mountain or backcountry riders. You’re constantly moving between active riding, standing in the park, and sitting on features. Mobility and style are priorities, but you still need to stay warm and dry.
Prioritizing Mobility
Freestyle snowboarding requires maximum range of motion. Choose layers that move with you — stretchy synthetic fabrics with 4-way stretch provide the best mobility. Avoid bulky layers that can catch on features or restrict your movement.
Park Layering Setup
Base Layer: Lightweight merino or synthetic. Park riders tend to run hot from constant activity.
Mid Layer: Technical hoodie or lightweight fleece. Hoodies are popular in parks because they provide warmth without restrictiveness.
Outer Layer: Relaxed-fit shell or insulated jacket. Park riders often prefer a looser fit for style and mobility.
Park Rider Accessories
Gloves take a beating in the park from grabs, rail slides, and frequent removal. Invest in durable gloves with reinforced palms. Wrist leashes are essential since you’ll be removing gloves frequently. Knee pads are becoming increasingly common for protection during falls.
Women’s Layering Guide
Women’s bodies thermoregulate differently than men’s, which affects layering choices. Women typically have less muscle mass and more body fat, which can make them feel colder in extreme conditions. However, women also tend to sweat less, which affects moisture management needs.
Women’s Base Layers
Women’s base layers are cut differently to accommodate a wider hip-to-waist ratio. Look for layers with a fitted waist and roomier hips. The chest area should provide support without compression. Merino wool is particularly popular because it’s naturally soft and non-itchy.
Women’s Mid and Outer Layers
Women’s mid layers often feature more tailored fits that follow the body’s natural curves. Cropped styles are popular for park riders, while longer styles provide more coverage for all-mountain use. Bibs are increasingly popular because they provide better fit and snow protection with a higher waist and adjustable shoulder straps.
Layering by Body Type
Petite riders may prefer shorter jackets and cropped mid layers. Taller riders should look for longer jackets and layers to prevent gaps. Athletic builds may benefit from compressive base layers. Curvier builds may prefer relaxed-fit layers. The key is finding layers that fit your body, not forcing your body into layers that don’t fit.
Kids & Youth Layering
Children have different thermoregulation needs than adults. They have a higher surface-area-to-mass ratio, meaning they lose heat faster. They also can’t always communicate when they’re cold, making proper layering essential.
Kids’ Base Layers
Children’s base layers should be snug but not tight. Look for layers with stretchy materials that grow with your child. For very young children (under 5), one-piece base layers (onesies) provide the most coverage and easiest dressing.
Kids’ Mid and Outer Layers
Children’s mid layers should be easy to put on and take off independently. Full-zip jackets are easier than pullovers. Velcro closures are easier than buttons. Bright colors help you keep track of your child on the mountain. Many kids’ jackets feature growth systems that allow the garment to expand as your child grows.
Kids’ Layering Mistakes to Avoid
- Overdressing children — they overheat easily from activity
- Using cotton layers — same rules apply as for adults
- Hand-me-down layers that are too big or worn out
- Ignoring wet layers — change immediately if clothes get wet
- Forgetting extras — pack backup gloves, socks, and layers
Layering for Different Body Types
Every body is different, and effective layering respects those differences. Your body composition, muscle mass, and metabolism all affect how you generate and retain heat.
Lean and Muscular Builds
Lean riders with high muscle mass tend to generate more heat during activity but cool down quickly when stationary. They often prefer lighter layers that can be removed easily. A thin base layer, fleece mid layer, and shell provides good flexibility.
Higher Body Fat Percentage
Body fat provides natural insulation, so riders with higher body fat percentages often need less technical layering to stay warm. However, they may overheat more easily during high-output activities. Fit is crucial — look for layers with relaxed or regular fits that provide comfort without excess material.
Metabolism and Temperature Perception
High-metabolism riders tend to run hot and may prefer lighter layers. Low-metabolism riders may need more insulation. Age also affects thermoregulation — younger riders tend to run warmer, while older riders may need more insulation.
Hot & Cold Runners: Personalizing Your System
Some riders consistently run hot, while others are always cold. These tendencies are largely genetic but can be managed with the right layering approach.
For Hot Runners
Focus on breathability and moisture management. Choose lightweight base layers that wick aggressively. Use grid fleece or breathable softshells for mid layers. Prioritize shells with good venting options (pit zips, mesh-backed vents). Consider starting with fewer layers than recommended and adding if needed.
Merino wool is often better than synthetics for hot runners because it regulates temperature more effectively. Synthetics wick moisture well but can feel clammy when you’re sweating heavily.
For Cold Runners
Invest in quality insulation and cover all skin. A heavyweight merino base layer provides more warmth without adding bulk. A puffy mid layer (down or synthetic) provides maximum insulation. Choose insulated shells over plain shells. Cover extremities with the warmest options available — mittens over gloves, balaclavas over beanies.
Layering more doesn’t always mean wearing more layers. Quality insulation is warmer than quantity of cheap layers. A single high-quality puffy jacket can be warmer than two cheap fleece layers.
Wet Weather Layering
Rain and wet snow present the ultimate challenge for snowboard layering. Water conducts heat away from your body 25 times faster than air, so getting wet can rapidly lead to dangerous conditions.
Waterproofing Hierarchy
Your shell is your first line of defense. Look for shells with 20k+ waterproofing ratings and fully taped seams. Gore-Tex is the gold standard, but alternatives like eVent, NeoShell, and Dermizax also provide excellent protection. Seam taping is critical — check that all seams are fully taped.
Wet Weather Layering Strategy
- Start with a moisture-wicking base layer (merino or synthetic)
- Add an insulating mid layer for warmth
- Wear a fully waterproof shell with all seams taped
- Seal all openings (cuffs, hood, hem) to prevent water entry
- Use waterproof gloves or mittens with gauntlet cuffs
- Protect your head with a waterproof hood or balaclava
- Carry dry backup layers in a waterproof bag
High Altitude Layering
Altitude significantly affects temperature, UV exposure, and your body’s ability to regulate heat. Snowboarders at high-altitude resorts (8,000+ feet) face unique layering challenges.
Temperature and Altitude
Temperature drops approximately 3.5°F (2°C) for every 1,000 feet (300m) of elevation gain. A valley temperature of 40°F could be 20°F at the summit. Layer for the coldest conditions you’ll encounter, typically the summit or exposed ridgelines.
UV Protection at Altitude
UV radiation increases approximately 10-12% for every 1,000 feet of elevation gain. Combined with snow reflection (up to 80% of UV), high-altitude riders face extreme UV exposure. Choose layers with UPF ratings, wear sunscreen, and use goggles with UV protection.
Altitude Layering Adjustments
- Add an extra insulation layer for above-treeline riding
- Choose wind-resistant shells over breathable-only options
- Cover all skin to prevent sunburn and windburn
- Carry chemical warmers for emergency heat
- Hydrate aggressively — dehydration accelerates heat loss
Windy Conditions Layering
Wind is one of the most underestimated threats on the mountain. It can turn a pleasant 30°F day into a bone-chilling -10°F experience through wind chill.
Understanding Wind Chill
Wind chill is the apparent temperature felt due to wind moving across exposed skin. At 20mph wind speed, a 20°F day feels like 6°F. At 30mph, it feels like -2°F. This dramatic cooling effect means wind protection is essential even on relatively mild days.
Wind-Resistant Layering
Your outer layer is your primary wind barrier. Softshell jackets block 80-90% of wind while maintaining good breathability. Hardshell jackets block 95-100% of wind but are less breathable. Some mid layers feature windproof front panels that protect your core while allowing back ventilation.
Windy Condition Tips
- Layer up before you get cold — wind chill can be sudden
- Seal all openings (cuffs, hem, hood) to prevent wind entry
- Use a neck gaiter or balaclava to protect your face
- Choose mittens over gloves for better wind protection
- Seek sheltered terrain when possible
Spring Riding Layering
Spring snowboarding is some of the most fun you’ll have all season, but the variable conditions require a flexible layering approach. Temperatures can swing 30+ degrees in a single day.
Spring Layering Basics
The key to spring layering is versatility. You need layers that can be added or removed quickly. A lightweight base layer, thin mid layer, and shell provides good protection with easy adjustability. Remove the mid layer as temperatures rise and add it back for shade or wind.
Spring Layering by Time of Day
Morning (Cold): Full layering setup — base, mid, and shell. Start with all layers and remove as needed.
Midday (Warming): Remove mid layer as temperatures rise. Open jacket vents. Consider removing your jacket entirely if temperatures exceed 50°F and conditions are dry.
Afternoon (Peak Warmth): Lightweight layers only. Apply sunscreen generously — UV exposure peaks in early afternoon.
Evening (Cooling): Add layers back as temperatures drop. Keep your mid layer accessible.
Night Riding Layering
Night riding at ski resorts offers a unique experience with fewer crowds and beautiful lighting. However, temperatures drop significantly after sunset.
Night Riding Temperature Drops
Temperatures typically drop 10-15°F after sunset. What felt comfortable at 30°F during the day may feel freezing at 20°F after dark. Wind chill is often worse at night due to temperature inversions and less solar heating.
Night Riding Layering Setup
Add extra insulation compared to daytime riding. A heavyweight base layer, thick mid layer, and insulated shell provides maximum warmth. Consider chemical hand and toe warmers. Cover all exposed skin with a balaclava and mittens.
Night Riding Tips
- Layer for colder conditions than the forecast suggests
- Use chemical warmers in gloves and boots
- Wear goggles with clear or yellow lenses for better visibility
- Take warm-up breaks more frequently
- Bring a thermos with hot drink for the chairlift
Budget Layering Options
You don’t need to spend a fortune to layer effectively. Smart shopping and prioritizing key pieces can build a functional system on a budget.
Where to Invest
Your base layer deserves the most investment. A quality merino or synthetic base layer will last for years. Your shell is the second priority — look for end-of-season sales or previous-year models to save money.
Where to Save
Mid layers can be more affordable. A $30 fleece performs nearly as well as a $150 name-brand fleece. Focus on the material (fleece, not cotton) and fit rather than brand names. Accessories like beanies, neck gaiters, and gloves can be purchased affordably.
Budget Layering System Examples
Under $100 Total
Generic synthetic base layer ($20), thrift store fleece ($15), used shell ($40), merino beanie ($15), basic gloves ($10). Functional but limited durability.
Under $250 Total
Smartwool base layer ($60), Columbia fleece ($30), 686 shell ($100), quality beanie ($20), waterproof gloves ($40). Good performance and durability.
Under $500 Total
Smartwool 250 base layer ($80), Patagonia R1 ($100), Burton Gore-Tex shell ($200), quality beanie ($25), insulated gloves ($75). Excellent performance.
Care & Maintenance
Proper care extends the life and performance of your layers. Technical fabrics require specific maintenance to maintain their properties.
Washing Technical Layers
Always follow the manufacturer’s care instructions. Most technical layers require cold water on a gentle cycle. Hot water damages merino wool and can melt synthetic materials. Use a mild detergent without fabric softeners, which coat fibers and reduce wicking ability.
For waterproof shells, use a technical wash designed for outdoor gear. Regular detergent can strip DWR coating. Reapply DWR treatment after every 5-10 washes or when water stops beading on the surface.
Drying and Storage
Hang dry whenever possible. Machine drying on high heat can shrink merino wool by up to 30%. Store layers flat or folded, not hanging. Use breathable garment bags for storage, not plastic bags.
Seasonal Care
At the end of the season, wash all layers before storing. Remove stains, dirt, and sweat that can degrade fabric. Store in a cool, dry place away from direct sunlight. Before the season starts, inspect all layers for damage and check waterproofing.
Common Layering Mistakes
Even experienced riders make layering mistakes. Avoiding these common errors can dramatically improve your comfort and performance.
Never wear cotton on the mountain. Cotton absorbs moisture and holds it against your skin, causing rapid heat loss. This includes cotton t-shirts, sweatshirts, hoodies, and underwear.
More layers doesn’t always mean warmer. Excessive layers can restrict movement and cause overheating. Overheating leads to sweating, which leads to wet layers, which leads to cold. Start with fewer layers and add if necessary.
Your head, hands, and feet lose heat fastest. Neglecting these areas can make your entire layering system feel inadequate. Invest in quality gloves, warm socks, and a good beanie or balaclava.
Conditions change throughout the day. Adjust your layers proactively rather than waiting until you’re already uncomfortable. Add layers before you get cold; remove them before you overheat.
Fashion is fun, but performance matters more on the mountain. Choose function first, then find the best-looking option that meets your performance needs.
Fabric Science Deep Dive
Understanding the science behind technical fabrics helps you make informed purchasing decisions and get the most from your layering system.
Capillary Action and Moisture Wicking
Moisture wicking relies on capillary action — the same physics that allows water to climb up a narrow tube. Synthetic fibers are engineered with channels that pull sweat away from your skin through surface tension. The sweat spreads across the fabric’s surface area, where it evaporates more quickly.
Merino wool works differently. The fiber has a natural crimp that creates air pockets, and the fiber’s hydrophilic interior pulls moisture inside the fiber itself. This keeps the surface dry to the touch while the fiber absorbs up to 30% of its weight in moisture without feeling wet.
Insulation Physics
Insulation works by trapping dead air — still air that your body heats up. Air is an excellent insulator when it’s not moving. The more dead air space you can create, the warmer you’ll be. Down’s warmth comes from its three-dimensional structure — each down cluster creates thousands of tiny air pockets.
Breathability Mechanisms
Breathability is the ability to transmit water vapor from inside to outside. Gore-Tex uses a membrane with 9 billion pores per square inch. Each pore is 20,000 times smaller than a water droplet but 700 times larger than a water vapor molecule. This allows sweat vapor to escape while preventing rain from entering.
Moisture Management
Moisture management is the foundation of effective layering. Your body produces 1-2 liters of sweat per hour during active snowboarding. Managing this moisture determines whether you stay warm and comfortable.
The Moisture Journey
Sweat starts at your skin, gets wicked into the base layer, spreads across the fabric surface, passes through the mid layer as vapor, and finally escapes through the outer shell. Each layer must perform its function efficiently. A clogged or inefficient layer creates a bottleneck that causes moisture to accumulate.
Moisture Management Tips
- Start with a moisture-wicking base layer — this is non-negotiable
- Ensure all layers fit properly — gaps and bunching trap moisture
- Open vents before you start sweating heavily
- Take breaks to allow layers to dry if sweating excessively
- Change wet base layers during lunch if possible
- Avoid over-layering, which causes excessive sweating
Temperature Regulation
Effective temperature regulation keeps you comfortable throughout the day. It requires understanding your body’s responses and having the right tools to adjust.
Proactive vs. Reactive Layering
The best layering is proactive — adjusting before you feel cold or hot. If you wait until you’re already cold, you’ve lost too much heat to recover quickly. Add layers before you get cold on the chairlift; remove them before you start riding hard.
Temperature Regulation by Condition
Cold & Calm
Focus on insulation. Layer up with base, thick mid, and shell. Cover all skin. Minimal venting needed.
Cold & Windy
Focus on wind protection. Add windproof layers over insulation. Seal all openings. Protect face.
Warm & Calm
Focus on breathability. Light layers with good venting. Remove mid layer. Open all vents.
Warm & Windy
Focus on balance. Light wind layer over base. Adjustable venting. Cover exposed skin from wind.
Brand Comparison Guide
The outdoor industry offers numerous brands, each with different strengths, price points, and target audiences.
Premium Performance Brands
Patagonia: Known for quality, sustainability, and repair programs. Their R-series fleece and Nano Puff insulation are industry standards.
Arc’teryx: The gold standard for technical shells. Their Gore-Tex jackets set the benchmark for waterproof-breathable performance.
Smartwool: Leading merino wool base layers. PhD and 250 series offer excellent warmth, comfort, and odor resistance.
Mid-Range Value Brands
Burton: Snowboard-specific brand with quality across all categories. Their [ak] line offers premium performance; standard lines provide good value.
The North Face: Versatile brand with options for all budgets. Their Fleece and Thermoball insulation provide good performance at reasonable prices.
Budget-Friendly Options
686: Snowboard-specific brand with affordable options. Good entry-level gear for new riders.
Columbia: Budget-friendly option with decent quality. Best for casual riders or those on a tight budget.
Multi-Day Trip Layering
Multi-day snowboard trips require careful layering planning. You need enough layers to stay comfortable for multiple days without access to laundry facilities.
Packing Strategy
Pack layers that can be mixed and matched across multiple days. Focus on pieces that serve multiple purposes. Pack at least two base layers so you can alternate while one dries. Two mid layers provide versatility. One quality shell should suffice for most trips.
Layer Rotation
Rotate your base layers daily to prevent odor buildup and allow thorough drying. Hang wet layers in a well-ventilated area overnight — most technical fabrics dry within 12-24 hours. Wash base layers when possible, even if it’s just a quick sink wash.
Packing List for Multi-Day Trips
- 3 base layer tops (rotate daily)
- 3 base layer bottoms (rotate daily)
- 2 mid layers (fleece and puffy)
- 1 shell (jacket and pants)
- 3 pairs of socks (rotate daily)
- 2 pairs of gloves (one backup)
- 1 neck gaiter and 1 balaclava
- Hand and toe warmers (backup)
Travel & Airline Tips
Traveling with snowboard gear presents unique challenges. Airlines have weight restrictions, space is limited, and you need to protect expensive gear during transit.
Packing for Air Travel
Wear your bulkiest layers on the plane to save luggage space. Your jacket, heaviest base layer, and boots should be worn rather than packed. Roll base layers and mid layers to save space. Place fragile items in padded cases.
Airline Restrictions
Check your airline’s weight and size restrictions before packing. Most airlines allow 50 lbs for checked bags. Carry essential layers in your carry-on — if your checked luggage is delayed, you can still ride with basic layers.
Protecting Gear in Transit
Use a padded snowboard bag for your board and boots. Wrap layers around the board for extra padding. Consider shipping gear ahead if traveling with expensive equipment — shipping services offer tracking and insurance.
Sustainable Layering
Environmental responsibility is increasingly important in the outdoor industry. Choosing sustainable layers and caring for them properly reduces your environmental impact.
Sustainable Materials
Merino wool is renewable and biodegradable, but raising sheep requires significant resources. Look for brands that practice responsible sheep farming. Recycled polyester (rPET) converts plastic bottles into fabric, reducing waste and energy consumption.
Extending Garment Life
The most sustainable layer is the one you already own. Proper care extends garment life significantly. Follow care instructions, repair damage promptly, and reapply DWR treatments. Many brands offer repair programs — Patagonia’s Worn Wear program repairs and resells used gear.
Responsible Disposal
When layers reach end of life, don’t throw them in the trash. Many brands offer take-back programs. Consider donating usable gear to organizations that provide outdoor access to underserved communities.
Frequently Asked Questions
Technically yes, but it is not recommended. Cotton sweatpants will get wet from sweat or snow and become heavy, cold, and uncomfortable. Use proper synthetic long underwear instead.
No! Never tuck anything into your snowboard boots except your socks. Tucking leggings into boots creates pressure points that can cut off circulation, causing cold feet and pain.
Start with three: a base layer, a mid-layer, and a shell. This gives you the flexibility to remove the mid-layer if you get too hot. It is always better to be slightly overdressed and shed a layer than to be freezing with no options.
A shell has no internal padding/insulation; it only blocks wind and water. An insulated jacket has built-in synthetic or down filling. Shells are more versatile because you can customize the warmth underneath.
Synthetic insulation is generally better for active riding because it continues to insulate even if it gets wet from sweat or snow. Down loses its warmth when wet, though treated hydrophobic down is improving.
Start with a lightweight base layer, add a thin mid layer or hoodie, and wear a breathable shell. Remove layers as temperatures rise and add them back for shade or wind. Always carry sunscreen and sunglasses.
Absolutely not. Jeans are cotton, which absorbs moisture and loses all insulation when wet. They also restrict movement and take forever to dry. Always choose technical snowboard pants.
Warm feet start with proper boot fit. Wear merino wool snowboard socks and avoid multiple sock layers. Consider chemical toe warmers for extreme cold. Custom footbeds and heated boot systems can help chronically cold feet.
Yes, night riding requires more insulation. Temperatures drop significantly after sunset. Add an extra mid layer, use chemical hand and toe warmers, and cover all exposed skin.
Merino wool base layers provide the best combination of warmth, moisture management, and odor resistance. Synthetic base layers wick faster and are more durable but can develop odors.
Most technical layers require cold water on a gentle cycle with mild detergent. Avoid fabric softeners. For waterproof shells, use a technical wash. Hang dry whenever possible.
Backcountry layering requires versatility. Start with a lightweight base layer, add a breathable mid layer for the climb, and carry your shell for the descent. Always carry emergency insulation.
Fleece provides excellent breathability for active riding. Puffy jackets provide maximum warmth for cold conditions. A versatile system includes both options.
Start with fewer layers and add if needed. Choose breathable fabrics and use venting options. Remove your mid layer before you start sweating. Take breaks to cool down.
Snowboard Layering for Beginners: Your First-Day Guide
If you are heading to the mountain for the very first time, the layering system can feel overwhelming. You do not need to spend a fortune on gear to stay warm and comfortable. The key is understanding what each layer does and making smart choices with the clothing you may already own.
What to Wear Under Your Snowboard Jacket
Many beginners make the mistake of wearing a heavy hoodie under their jacket, thinking more bulk equals more warmth. This backfires because cotton hoodies trap moisture against your skin. Instead, start with a simple moisture-wicking base layer top. A synthetic long-sleeve shirt from a running or hiking brand works perfectly for your first few days. You do not need to buy dedicated snowboard base layers right away.
Layer a lightweight fleece or quarter-zip pullover over your base layer for mid-layer insulation. This combination handles temperatures from about 15°F to 32°F (-9°C to 0°C) comfortably. On warmer days, you can skip the mid layer entirely and ride in just your base layer under the shell.
What to Wear Under Snowboard Pants
The same principle applies to your lower half. Avoid sweatpants or jeans at all costs. A pair of synthetic long underwear or leggings provides the moisture-wicking foundation you need. Many riders prefer a midweight base layer bottom for versatility across conditions. The fit should be snug but not restrictive, allowing full range of motion for bending at the knees and hips during turns.
If you borrowed snowboard pants from a friend or rented them, wearing your own base layer pants underneath ensures hygiene and comfort. Just make sure the base layer does not bunch up inside your boots, which can cause pressure points and cold feet.
The Beginner’s Shopping List
For your first season, here is exactly what you need to buy or borrow:
- One pair of midweight base layer tops (synthetic or wool blend)
- One pair of midweight base layer bottoms
- One lightweight fleece pullover or zip-up
- One snowboard shell jacket (3-in-1 jackets are great for beginners)
- One pair of snowboard pants or bibs
- Two pairs of snowboard-specific socks (never cotton)
- A neck gaiter or buff
- Liner gloves plus one warm pair of mittens or gloves
This core kit handles 90% of conditions you will encounter as a beginner. As you progress and ride more aggressively, you can add specialized pieces like heavyweight base layers for extreme cold or a packable down jacket for backcountry adventures.
Rent your outer layers (jacket and pants) for the first few sessions before buying. This lets you test different fits and features. Many shops let you apply rental fees toward a purchase, so you are not throwing money away while you figure out what you actually need.
Women’s Snowboard Layering Guide
Women’s bodies thermoregulate differently than men’s. Studies show women tend to have lower core temperatures and experience cold extremities more acutely. This means the layering system needs slight adjustments for optimal comfort on the mountain.
Key Differences in Women’s Layering
Women’s base layers are designed with a tapered fit that accounts for narrower shoulders and wider hips. This is not just about aesthetics; a proper fit ensures the fabric sits flush against the skin for maximum moisture wicking. Baggy men’s base layers create air gaps that reduce wicking efficiency and can cause discomfort.
Women’s mid layers often feature longer torsos to prevent the layer from riding up when bending forward in a snowboard stance. This seemingly small detail makes a significant difference in keeping your lower back covered and warm during deep turns.
Recommended Layering System for Women
- Base Layer: Women’s-specific midweight merino or synthetic top and bottom. Look for brands like Smartwool, Patagonia Capilene, or Kari Traa that offer female-specific cuts.
- Mid Layer: A fitted fleece pullover or a women’s-specific insulated vest. Vest insulation is particularly effective for women as it keeps the core warm while allowing arm mobility.
- Outer Layer: Women’s snowboard jacket with a tailored fit. Many women prefer a slightly longer hem in the back for powder protection when sitting on chairs or straps.
Women’s Specific Considerations
Many women find that they run colder than their male riding partners despite wearing similar layers. This is normal and not a sign that your gear is inadequate. If you consistently feel cold, consider upgrading your base layer to a heavier weight or adding a thin down vest as an extra mid layer on frigid days.
Another common issue women face is the fit of snowboard boots over base layer pants. Women’s boots tend to have a narrower cuff, so make sure your base layer pants are slim enough to slide into boots without bunching. A slight taper at the ankle is ideal.
For women who ride with a backpack for backcountry or all-day resort sessions, layering becomes even more critical. The pack creates an additional layer of insulation on your back, which can cause overheating during uphill travel. A highly breathable mid layer like a grid fleece allows excess heat to escape even under pack pressure.
Layering by Riding Style: Park, Powder, and Everything Between
Not all snowboarding is the same, and your layering strategy should match your riding style. A park rider hitting features all day generates vastly different heat than a powder hiker boot-packing up a ridge.
Park and Freestyle Layering
Park riders are constantly moving, hiking back up features, and generating significant body heat. The stop-and-go nature of park sessions means you need layers that vent easily and dry quickly. A lightweight base layer top with good breathability is essential. Skip the heavy mid layer entirely; a thin hoodie or light fleece vest provides just enough warmth during rest periods without causing overheating during runs.
Outer layer choice for park riding favors looser fits that allow full range of motion for grabs, spins, and rails. Many park riders prefer baggy pants and jackets that do not restrict movement. Shell jackets without insulation work best because they are lighter and allow you to fine-tune warmth with mid layers.
Powder Day Layering
Powder days typically mean colder temperatures and the possibility of deep snow contact. When you fall in waist-deep powder, snow enters every gap in your clothing. Bibs are strongly recommended over pants for powder riding because they seal at the chest and prevent snow from reaching your base layers.
For insulation, a midweight to heavyweight base layer keeps you warm during long chairlift rides in cold temperatures. Add a puffy mid layer or thick fleece for chairlift warmth, but be prepared to vent or remove it during aggressive powder runs where you generate significant heat. A shell with pit zips is invaluable for managing temperature during variable-intensity powder days.
Backcountry and Touring Layering
Backcountry snowboarding involves sustained physical exertion during the uphill climb, followed by a high-speed descent. This extreme swing in activity level demands a highly adaptable layering system. During the skin up, you generate enormous heat and need maximum breathability. Many backcountry riders start with just a base layer and shell, adding insulation only during rest breaks or summit waits.
A packable insulation piece like a lightweight down or synthetic jacket becomes critical during transitions and at the summit. Stowing layers in a backpack during the climb and adding them at the top is a fundamental backcountry skill. Your shell must be waterproof and windproof for the descent but also breathable enough for the climb. Gore-Tex Active or similar membranes strike this balance.
Cruising and All-Mountain Layering
For riders who enjoy cruising groomers, exploring the mountain, and sampling a bit of everything, the standard three-layer system works perfectly. A midweight base layer, versatile fleece mid layer, and standard shell jacket handle the full range of conditions. The key is being able to add or remove the mid layer easily, which is why zip-up mid layers outperform pullovers for all-mountain riding.
Temperature regulation for all-mountain riding is about anticipating changes. You might start the morning in shade on a cold north face and end up on a sun-baked south slope by afternoon. Packing a lightweight vest or extra base layer top in your jacket pocket gives you options without requiring a full wardrobe change.
Advanced Layering Techniques for Experienced Riders
Once you understand the basics of the three-layer system, advanced techniques let you fine-tune your comfort for any situation. These strategies separate the riders who are always comfortable from those who constantly fiddle with their gear.
The Vents-First Approach
Instead of removing layers when you get hot, use your jacket’s ventilation features first. Pit zips, mesh-lined hand warmer pockets, and back vents release excess heat without exposing you to wind or snow. This “vents-first” strategy means you stay protected while dumping heat efficiently. Many riders discover their jacket vents only after years of riding, yet they are one of the most valuable features on technical shells.
Micro-Layering for Precision
Micro-layering involves using multiple thin layers instead of one thick layer. For example, wearing two lightweight base layers creates more trapped air space than a single heavyweight layer, providing better insulation with more flexibility. You can peel off one thin layer and stash it in your pack while keeping the other on. This granular approach works especially well for riders who experience temperature swings throughout the day.
Strategic Zoning
Your body does not lose heat uniformly. Your core, head, and extremities are the priority zones for insulation. Some riders use this knowledge to create zoned layering systems: a heavier mid layer vest for core warmth combined with lighter arm coverage, or a thick base layer top with lighter bottoms. This targeted approach reduces overall bulk while maintaining warmth where it matters most.
The Layering Shuffle
On long resort days with variable conditions, experienced riders develop a rhythm of adding and removing layers throughout the day. Morning runs in full layers give way to stripped-down afternoon laps as temperatures rise. The “shuffle” involves knowing exactly when to vent, when to add a layer, and when to ride with jacket fully unzipped for maximum airflow. Mastering this flow eliminates the discomfort of being overdressed or underdressed at any point during the day.
Emergency Layering Strategies
Mountain weather changes fast. If you are caught in a sudden temperature drop, wind event, or whiteout, your layering system is your survival tool. Keep one extra insulating layer in your pack at all times. A lightweight down jacket weighs almost nothing but provides critical warmth when conditions deteriorate. Knowing you have a backup layer also provides psychological comfort that reduces stress during unexpected weather changes.
Layering Accessories Deep Dive: Gloves, Socks, and Headwear
The best layering system in the world fails if your extremities are cold. Your hands, feet, and head lose heat disproportionately fast, and no amount of core insulation compensates for freezing fingers. Let us break down every accessory category in detail.
Snowboard Gloves: The Complete Guide
Choosing between gloves and mittens is one of the most debated topics in snowboarding. Mittens consistently outperform gloves for warmth because all four fingers share heat in a single compartment. The trade-off is dexterity: adjusting bindings, using your phone, or zipping pockets is harder with mittens.
Most experienced riders solve this by wearing thin liner gloves under mittens. The liner allows phone use and fine motor tasks while the mitten shell provides primary insulation. When you need to adjust bindings, simply remove the mitten shell and work with liner gloves. This two-glove system offers the best of both worlds.
Waterproofing Your Hands
Glove waterproofing matters more than most riders realize. When you fall in wet snow, your hands push directly into it. Gloves with Gore-Tex membranes or equivalent waterproof-breathable technology keep moisture out while allowing hand sweat to escape. Cheaper gloves with DWR-treated nylon may feel warm initially but lose waterproofing after a season of hard use.
Snowboard Socks: The Foundation of Warm Feet
Your socks are arguably the most important accessory for comfort. Snowboard-specific socks differ from regular athletic socks in several critical ways: they are thinner to prevent bunching inside tight boots, they have strategic padding only where needed (shin and sole), and they wick moisture away from the foot surface.
Never wear multiple pairs of socks to “get warmer.” This creates pressure points, reduces circulation, and paradoxically makes your feet colder. A single quality pair of midweight snowboard socks outperforms three pairs of cotton socks every time.
Helmet Liners and Balaclavas
Your helmet is a critical safety device, but it also serves as a layering component. The space between your head and the helmet shell creates an insulating air pocket. On extremely cold days, adding a thin helmet liner or fleece balaclava under your helmet increases this insulation significantly. The liner also wicks forehead sweat, preventing it from dripping into your goggles and causing fog.
Balaclavas offer more coverage than helmets alone, protecting your face from wind burn and frostbite. On exposed chairs or during windy conditions, pulling the balaclava over your nose and cheeks makes an immediate difference in comfort. Choose a balaclava with moisture-wicking fabric to prevent the breath condensation from freezing against your face.
Neck Gaiters and Buffs
A neck gaiter is the most versatile cold-weather accessory. It covers your neck, can be pulled up over your nose and mouth, or folded down as a light collar. On mild days, a gaiter alone provides sufficient face protection without the bulk of a full balaclava. Choose merino wool or synthetic fleece options; avoid cotton gaiters that absorb moisture and freeze in cold conditions.
Goggle Integration
Your goggle choice affects layering indirectly but importantly. Fogging occurs when warm, moist air from your face reaches the cold goggle lens. A well-fitted balaclava or face mask channels breath away from the goggles, preventing fog. Some riders tuck their face mask under the goggle frame for a seamless seal. This integration between face covering and goggle is often overlooked but dramatically improves visibility and comfort.
The best layering system considers every interface between your body and the mountain. From the base layer touching your skin to the goggles sealing around your face, each piece works together as a system rather than individual products.
Layering for Extreme Conditions: Sub-Zero and High-Altitude Riding
Extreme cold and high altitude create layering challenges that go beyond the standard three-layer system. When temperatures plummet below -10°F (-23°C) or you are riding above 10,000 feet, the margin for error in your layering choices disappears. One wrong decision can lead to frostbite or hypothermia within minutes.
Sub-Zero Layering Protocol
When temperatures drop below 0°F (-18°C), every layer must perform at its maximum. Start with a heavyweight merino wool base layer top and bottom. Merino maintains insulating properties even when damp, which is critical when you cannot risk getting wet in extreme cold. Skip synthetic base layers in extreme cold; while they wick faster, they feel noticeably colder against the skin when temperatures are severe.
For your mid layer, a high-loft down jacket provides maximum warmth-to-weight ratio. Look for 800-fill or higher down insulation. Pack a lightweight down jacket that compresses into your pack for chairlift waits, and pair it with a breathable fleece for active riding. The combination of down for stationary warmth and fleece for active breathability covers all activity levels.
Your outer shell must be completely windproof. At sub-zero temperatures, even a slight breeze causes rapid heat loss through wind chill. A three-layer Gore-Tex shell with fully taped seams blocks wind entirely while allowing internal moisture to escape. Ensure all zippers are covered with storm flaps and your jacket has a powder skirt that seals against snow entry.
High-Altitude Layering Considerations
Altitude affects layering in ways many riders overlook. Above 8,000 feet, UV radiation increases dramatically, causing faster fabric degradation and sunburn through clothing. Your outer layers should have UPF ratings for sun protection. Additionally, thinner air at altitude means less insulation from the atmosphere itself, making wind protection even more critical.
Dehydration accelerates at altitude, and dehydration impairs your body’s ability to regulate temperature. Staying hydrated is an invisible but essential part of your layering strategy. Carry water in an insulated bottle to prevent freezing, and sip frequently throughout the day.
Layering for Extreme Cold Checklist
- Heavyweight merino base layer top and bottom
- High-loft down mid layer (800+ fill)
- Breathable fleece for active periods
- Three-layer windproof shell with powder skirt
- Balaclava with moisture-wicking fabric
- Mittens with removable liner system
- Two pairs of midweight snowboard socks (rotate between runs)
- Hand and toe warmers as backup
- UV-protective outer layer for high altitude
- Insulated water bottle for hydration
In extreme cold, never unzip your jacket fully during activity. The rapid temperature change between your warm base layers and the freezing air causes sweat to flash-freeze against your skin. Use pit zips or back vents for controlled temperature management instead of opening your jacket wide.
Common Layering Mistakes and How to Avoid Them
Even experienced riders make layering mistakes that compromise comfort and safety. Understanding these pitfalls helps you avoid the discomfort that sends riders to the lodge early or worse, puts them at risk on the mountain.
Mistake 1: Over-Layering at the Start of the Day
The most common mistake is wearing every warm layer you own for the first chair. You start the day comfortable, but by your third run, you are overheating and sweating through your base layers. Once your base layer is wet, it cannot dry fast enough to keep you warm for the rest of the day. Start slightly cold and add layers as needed. It is easier to add a layer than to dry out a soaked base layer on the mountain.
Mistake 2: Ignoring Fit
Base layers must be snug against your skin to wick moisture effectively. If your base layer is loose, sweat pools on your skin rather than transferring into the fabric. This creates the dreaded cold, damp feeling that ruins your day. Mid layers should be loose enough to trap insulating air but not so baggy that they bunch up under your shell. Your shell should fit over all your layers without restricting movement.
Mistake 3: Using Cotton Anywhere
We mentioned this before, but it bears repeating because riders still make this error. Cotton t-shirts, cotton underwear, cotton sweatpants, cotton hoodies, cotton socks, cotton beanies. Every single cotton item on your body becomes a cold, wet sponge when you sweat. Replace every cotton item with synthetic or wool alternatives. This single change improves comfort more than any expensive jacket purchase.
Mistake 4: Forgetting About Venting
Many jackets come with underarm vents, mesh-lined pockets, and back vents that riders never use. These ventilation features are designed to dump excess heat without removing layers. Learning to unzip your pit zips during a long chairlift ride or open your jacket’s main zipper slightly during a hike up a feature prevents the overheating-sweating-freezing cycle that ruins so many days.
Mistake 5: Wearing the Wrong Socks
Cotton socks, multiple sock layers, dress socks, hiking socks that are too thick. All of these create pressure points inside your snowboard boots, reduce blood flow to your toes, and cause cold feet. A single pair of midweight, moisture-wicking snowboard-specific socks is all you need. The fit should be snug but not tight, with no wrinkles or bunching anywhere.
Mistake 6: Not Adapting to Changing Conditions
Mountain weather changes throughout the day. Morning temperatures can be 20 degrees colder than afternoon. If you layer for the morning chill, you will be miserable by lunch. Conversely, if you layer for afternoon warmth, you will freeze on the first few runs. Pack one adjustable layer like a lightweight vest or packable down jacket that you can add or remove as conditions change.
Mistake 7: Choosing Style Over Function
Fashion-forward snowboard gear looks great in photos but sometimes sacrifices function for form. Extremely baggy pants can catch on features and cause falls. Extremely tight base layers restrict movement and circulation. Prioritize fit and function over trends. The best-looking gear is the gear that keeps you comfortable from first chair to last call.
You should feel slightly cool when you first step outside at the start of the day. If you feel perfectly comfortable standing still, you are overdressed and will overheat within 30 minutes of riding. This intentional under-dressing at the start prevents the sweating and subsequent chilling that ruins most riders’ days.
Gear Care and Maintenance: Making Your Layers Last
Proper care extends the life and performance of your layering gear significantly. Technical fabrics lose their moisture-wicking and waterproofing abilities without regular maintenance. Here is how to keep every piece of your layering system performing at its best.
Washing Base Layers
Merino wool base layers require gentle handling. Wash in cold water on a delicate cycle with a wool-safe detergent. Never use fabric softener; it coats the fibers and eliminates merino’s natural odor resistance. Tumble dry on low heat or lay flat to dry. Merino can be machine washed, but avoid hot water and harsh detergents that damage the natural fibers.
Synthetic base layers are more durable but still need proper care. Wash in cold or warm water with a sport-specific detergent designed to remove body oils and bacteria. These detergents restore the wicking properties that degrade with regular soap. Synthetic layers can handle machine drying on low heat, but avoid high heat that can melt or damage the fibers.
Re-Waterproofing Outer Layers
DWR (Durable Water Repellent) coating on your jacket and pants degrades over time with use and washing. When water stops beading on the fabric surface and instead “wets out” (soaks in), it is time to re-waterproof. Wash your outer layers with a tech wash specifically designed to clean without leaving residue, then apply a DWR spray or wash-in treatment.
Gore-Tex and similar membranes are waterproof by construction, not by surface coating. However, the outer fabric still needs DWR to prevent wetting out, which blocks the membrane’s breathability. Regular DWR maintenance keeps your jacket performing at its rated waterproof-breathable specifications.
Storing Your Layers
Proper storage prevents damage during the off-season. Never store down jackets compressed in their stuff sack for months; this damages the loft and reduces insulation performance. Store down in a large, breathable cotton bag or hang it in your closet. Synthetic insulation is more forgiving but still benefits from loose storage.
Base layers should be clean and completely dry before storage. Merino wool can attract moths, so store in a sealed bag with cedar blocks or lavender sachets as a natural deterrent. Synthetic layers can be stored in drawers or shelves without special precautions, as long as they are clean and dry.
Repairing Minor Damage
Tears, seam failures, and delamination are common with regular use. Most manufacturers offer repair services, but minor damage can be fixed at home. Seam sealer tape can be reapplied to leaking seams with an iron. Small tears in shell fabric can be patched with repair tape designed for outdoor gear. Base layer holes can be sewn closed with a needle and thread, though the repair may be visible.
Layering by Activity Level: From Chairlift Laps to Backcountry Hikes
Your activity level throughout the day directly determines how much insulation you need. Understanding the relationship between exertion and heat generation helps you choose the right layers for your planned activities.
Low-Activity Riding: Chairlift Cruising
If you plan to ride groomed runs with minimal hiking or walking, your activity level is relatively low. Chairlift sits are passive periods where your body generates minimal heat. For this activity level, prioritize insulation over breathability. A midweight base layer, insulating mid layer (fleece or light puffy), and standard shell provides adequate warmth for lift-access riding in most winter conditions.
Moderate-Activity Riding: Resort Exploration
Exploring a resort involves some hiking between lifts, walking through base areas, and variable riding intensity. This moderate activity level generates more heat than pure chairlift riding but less than aggressive park or backcountry sessions. A lightweight to midweight base layer with a breathable mid layer handles this activity range well. Choose a mid layer that you can easily remove during active periods.
High-Activity Riding: Park and Groomer Speed Runs
Park riders who hike features and aggressive groomer riders who charge at high speed generate significant body heat. Breathability becomes the priority over insulation. A lightweight base layer with excellent moisture management, no mid layer or a highly breathable fleece vest, and a shell with effective venting handles high activity levels. Venting features on your jacket become essential, not optional.
Extreme-Activity Riding: Backcountry Touring
Backcountry touring involves sustained aerobic effort during the uphill climb. Heart rates routinely exceed 140 BPM for extended periods. This extreme activity level generates so much heat that many riders start the climb with just a base layer and shell, adding insulation only during transitions or at the summit. Breathability is the single most important attribute for backcountry layering. A jacket that cannot dump heat will cause dangerous levels of sweating, leading to rapid cooling during the descent.
| Activity Level | Base Layer | Mid Layer | Outer Layer |
|---|---|---|---|
| Low (Cruising) | Midweight | Fleece or Puffy | Insulated or Standard Shell |
| Moderate (Resort) | Light to Midweight | Breathable Fleece | Standard Shell with Vents |
| High (Park/Speed) | Lightweight | Vest or None | Venting Shell |
| Extreme (Backcountry) | Lightweight | Packable Down (carried) | Breathable Shell |
Budget Layering Guide: Stay Warm Without Breaking the Bank
Snowboarding is an expensive sport, and quality layering gear can carry a premium price tag. However, you do not need to spend hundreds of dollars on every piece to stay warm and dry. Smart shopping and understanding where to invest versus where to save makes a significant difference in your budget.
Where to Invest: Base Layers
Your base layer is the piece you wear the most and the one that affects comfort most directly. A quality merino wool base layer top costs more upfront but lasts years, resists odors naturally, and performs in a wider temperature range. This is where your money is best spent. A good merino base layer set (top and bottom) runs $100-$150 but pays for itself over multiple seasons.
Where to Save: Mid Layers
Mid layers are where you can save significant money without sacrificing performance. A basic fleece pullover from an outdoor brand performs nearly identically to premium options. The difference between a $30 fleece and a $150 fleece is marginal in real-world performance. Save your money here and invest the savings in better base layers or a quality shell.
Where to Invest: Shell Jacket
Your outer shell is your first line of defense against the elements. A quality waterproof-breathable shell with sealed seams lasts multiple seasons and keeps you dry in the worst conditions. Cheap shells with poor waterproofing leave you wet and miserable. Invest in a reputable brand with proven waterproofing technology. You do not need the most expensive model, but avoid bottom-tier options that compromise on waterproofing.
Where to Save: Pants and Accessories
Snowboard pants do not need to be as technically advanced as your jacket. Many mid-range pants provide adequate waterproofing and durability at a lower price. Accessories like neck gaiters, liner gloves, and helmet liners can be purchased inexpensively without significant performance loss. Save your budget for the pieces that matter most: base layers and shell.
Off-Season Shopping Strategies
Buying gear at the end of the season (March-April) or during summer sales can save 30-50% on retail prices. Many retailers clearance previous-season gear to make room for new inventory. The previous season’s jacket performs identically to the current model but costs significantly less. Online retailers also offer competitive pricing, especially during Black Friday and holiday sales.
Used Gear Considerations
Used snowboard gear is a viable option for budget-conscious riders. Base layers lose their wicking performance over time and should be purchased new. However, shells, pants, and mid layers can be purchased used with careful inspection. Check seams for damage, verify zippers function properly, and inspect waterproofing by sprinkling water on the fabric to confirm it beads rather than absorbs.
Spend your money in this order: 1) Quality base layer set, 2) Waterproof shell jacket, 3) Reliable mid layer, 4) Snowboard pants, 5) Accessories. This prioritization ensures your most critical pieces are high quality while allowing you to save on less critical items.
Kids Snowboard Layering: Keeping Young Riders Warm and Happy
Children lose heat faster than adults due to their higher surface-area-to-mass ratio. A kid who is cold will not want to ride, no matter how excited they were at breakfast. Proper layering for kids requires extra attention to fit, durability, and ease of use.
Kids Layering Fundamentals
The same three-layer system applies to kids, with a few modifications. Children need slightly more insulation than adults in the same conditions because they generate less body heat during rest periods and lose heat faster overall. A midweight base layer is appropriate for most conditions, with a heavyweight option reserved for extreme cold.
Mid layers for kids should be easy to put on and take off independently. Zip-ups outperform pullovers for young riders who need to manage their own layers on the chairlift. Velcro closures and large zippers with pull tabs make layering adjustments easier for small hands.
Kids Outer Layer Features
Snowboard jackets and pants for kids need reinforced knees and seat areas because young riders fall frequently. Waterproofing is essential because kids play in the snow between runs and often sit directly in snow. Bib-style pants are strongly recommended for kids because they stay up better than waistband pants and prevent snow from entering during falls.
Growth room is important when buying kids gear. A jacket that is one size too large allows room for layering underneath and extends the useful life of the garment. Pants with adjustable waistbands and boot gaiters accommodate growth spurts without requiring immediate replacement.
Kids Socks and Accessories
Kids socks should be snowboard-specific, just like adult socks. Cotton socks are the fastest way to get a cold, crying child off the mountain. Two pairs of thin socks are worse than one pair of quality midweight socks. Make sure kids socks fit properly without bunching inside boots, as this is the primary cause of cold toes in young riders.
Gloves versus mittens is an easy choice for kids: mittens are always warmer and easier to put on. Look for mittens with long cuffs that extend past the wrist to prevent snow entry. A tether connecting the mitten to the jacket sleeve prevents the “lost mitten” problem that plagues every parent on the mountain.
Teaching Kids to Layer
Young riders benefit from learning basic layering principles early. Teaching a child to unzip their jacket when they feel warm and zip up when they feel cold builds lifelong skills. Make layering simple by limiting each child to three identifiable pieces: a “thin shirt” (base layer), a “warm layer” (mid layer), and a “raincoat” (shell). Simple language helps kids manage their own temperature with minimal adult intervention.
Layering for Variable Weather: When Conditions Change by the Hour
Mountain weather is notoriously unpredictable. A sunny morning can transform into a snowstorm by afternoon, and temperatures can swing 30 degrees in a single day. Layering for variable conditions requires preparation, flexibility, and the right gear choices.
Reading Weather Before You Ride
Check the mountain forecast before you leave home, but understand that conditions at the summit differ significantly from the base. Temperatures drop roughly 3-5°F per 1,000 feet of elevation gain. Wind speeds increase dramatically on exposed ridges. Cloud cover can roll in within minutes, dropping visibility and temperature simultaneously.
The Layering Buffet Approach
Think of your layering system as a buffet: bring multiple options and eat what you need. Pack your backpack with a lightweight down jacket, an extra base layer top, and a neck gaiter. On sunny, warm mornings, you might ride with just your base layer and shell. When clouds roll in or temperature drops, adding the down jacket instantly restores warmth. This “buffet” approach means you are never caught underprepared.
Managing Rain-to-Snow Transitions
Freezing rain and rain-to-snow transitions are the most challenging conditions for layering. Wet snow and rain compromise even the best waterproofing if exposure is prolonged. During these conditions, minimize time standing still. Keep moving to generate body heat and reduce moisture exposure time. Ensure your shell has fully sealed seams and storm flaps over zippers to prevent water entry at every opening.
Dealing with Wind Events
High winds dramatically increase heat loss through wind chill. A 20 mph wind at 20°F feels like -5°F. During wind events, windproofing becomes the priority over breathability. Switch to your most wind-resistant shell, close all vents, and add a windproof mid layer. Balaclavas become essential for face protection during sustained wind exposure.
Sunny cold days present their own challenge. Direct sunlight feels warm on your face and body, but the ambient temperature is still cold. This creates a deceptive sensation where you feel warm but are actually losing heat rapidly. Layer for the ambient temperature, not the sunlight. Remove layers gradually as you warm up rather than stripping everything off when the sun feels hot.
Heated Gear Options: When Layers Are Not Enough
For riders who struggle with cold despite proper layering, heated gear provides supplemental warmth powered by rechargeable batteries. While not a replacement for good layering principles, heated accessories can be the difference between comfort and misery during extreme conditions.
Heated Gloves and Mittens
Heated gloves contain thin heating elements powered by small rechargeable battery packs, typically located in the cuff. Most offer three heat settings controlled by a button on the glove. The heating elements target the back of the hand and fingers, areas most susceptible to cold. Battery life varies from 2-6 hours depending on the heat setting and ambient temperature.
Heated Insoles and Socks
Cold feet are the most common complaint among snowboarders, and heated insoles directly address this problem. Thin heating elements under the sole and across the toes provide consistent warmth. Unlike heated socks, insoles work with your existing socks and boots, making them more versatile. Battery packs are typically housed in a small compartment at the ankle or calf.
Heated Vest and Jacket Inserts
Heated vests contain carbon fiber heating elements powered by battery packs in the pocket. They provide core warmth without adding bulk under your jacket. Some manufacturers offer heated jacket liners that replace your traditional mid layer with an active heating system. These systems provide more targeted warmth than passive insulation and can be adjusted to match your activity level.
Limitations of Heated Gear
Heated gear has significant limitations that riders should understand. Battery life decreases dramatically in cold temperatures, sometimes by 50% or more. The heating elements warm the fabric surface but do not address the fundamental issue of moisture management. If you are sweating, heated gear warms the moisture against your skin, potentially making the problem worse. Always pair heated gear with proper base layers that wick moisture away from your skin.
Heated gear is best used as a supplement to proper layering, not a replacement. Riders who rely on heated gear while wearing cotton base layers or insufficient insulation will still be uncomfortable. Address your layering fundamentals first, then add heated accessories for extra warmth during extreme conditions.
The Science of Insulation: Understanding How Your Layers Keep You Warm
Understanding the physics behind insulation helps you make informed layering decisions. Heat transfer occurs through conduction, convection, radiation, and evaporation. Your layering system addresses each of these mechanisms to maintain comfortable body temperature.
Trapped Air: The Real Insulator
No fabric actually “insulates” in the traditional sense. The insulation comes from dead air space trapped within and between fabric layers. Your body heats this trapped air, and the still air acts as an insulator by preventing convective heat loss. This is why loft (the thickness and puffiness of a fabric) matters more than material type for insulation. A thick fleece traps more air than a thin merino layer, regardless of material.
Moisture and the Evaporative Cooling Problem
When sweat evaporates from your skin, it absorbs heat energy, cooling you down. This evaporative cooling is beneficial during exercise but problematic when it continues after you stop moving. Your base layer’s job is to move sweat away from your skin surface before it evaporates, directing it to outer layers where it can evaporate without cooling your core. This is why moisture-wicking is the most critical function of your base layer.
Wind Penetration and Convective Heat Loss
Wind accelerates heat loss by replacing the warm air near your body with cold ambient air. This convective heat loss is why windproof outer layers are essential even when temperatures are moderate. A windproof shell prevents wind from penetrating through your layers and displacing the warm air your body has generated. Without wind protection, even the best insulation loses effectiveness.
Conductive Heat Loss Through Contact
Heat transfers directly through contact with cold surfaces. Sitting on a cold chairlift seat, pressing against cold snow during a fall, or resting your hand on a cold railing all cause conductive heat loss. Your mid layer and shell provide barriers against conductive transfer. This is why sitting on a foam pad during chairlift rides makes a noticeable difference in comfort, especially during long rides in cold conditions.
The Role of Vapor Transmission
Your outer shell must balance two competing demands: blocking liquid water from entering while allowing water vapor (sweat) to escape. This vapor transmission rate determines how effectively your layers prevent internal moisture buildup. High-vapor-transmission shells like Gore-Tex allow sweat to escape during activity while maintaining waterproof protection. Low-vapor-transmission shells trap moisture inside, leading to the “inside-out wetting” problem that defeats even the best base layers.
Backcountry Snowboard Layering: Performance Under Your Own Power
Backcountry snowboarding combines sustained aerobic exertion during the ascent with high-speed descent, creating extreme temperature swings that demand a specialized approach to layering. The backcountry rider cannot simply duck into the lodge when conditions change; self-sufficiency is mandatory.
The Ascent Layering Strategy
During the skin or hike up, you generate enormous body heat. Most backcountry riders begin the ascent with just a base layer and shell, stowing insulation in their pack. The shell provides wind and weather protection while the base layer manages moisture. Overheating during the ascent leads to excessive sweating, which becomes dangerous during the descent when sweat freezes against cold skin.
Regulating temperature on the uphill requires constant attention. Stop to vent your jacket when you feel warm, before you start sweating heavily. Open pit zips and back vents during sustained climbing. If you are sweating heavily, you have already over-dressed. The goal is to maintain a slight chill during the ascent, knowing that adding insulation at the summit restores comfort quickly.
The Summit Transition
Transitions at the summit are where backcountry layering skills are tested most. You go from maximum exertion to complete stillness in minutes. Adding a puffy jacket or down vest immediately upon stopping prevents rapid cooling. Keep your insulation accessible at the top of your pack for quick access. Some riders wear their insulation layer during the final approach to the summit, adding it before stopping to prevent the initial temperature drop.
The Descent Layering Strategy
For the descent, wind protection and waterproofing become paramount. Speed creates its own wind chill, and deep snow contact requires full waterproofing. Your shell provides this protection, but the breathability rating matters less during the descent since you are not generating significant sweat during a downhill run. Ensure all zippers are closed, pit zips sealed, and powder skirt engaged before dropping in.
Backcountry Pack Essentials
Your backcountry pack should contain at minimum: one lightweight insulation layer (down or synthetic), an extra base layer top, a spare pair of dry socks, extra gloves or mittens, a balaclava, and hand warmers. These backup layers provide insurance against unexpected weather changes or emergency bivouac situations. Weight is a consideration, so prioritize versatile, lightweight pieces that cover multiple scenarios.
“Start cold, add layers as needed, never let yourself sweat through your base layer.” This simple rule prevents the moisture-management cascade that leads to hypothermia in the backcountry. If you feel warm before you start climbing, remove a layer before you begin.
Resort Riding Layering: Optimized for Lift-Access Snowboarding
Resort snowboarding with lift access creates a unique layering challenge: periods of passive chairlift sitting interspersed with active riding. This stop-and-go pattern requires layers that handle both scenarios effectively.
The Chairlift Challenge
Chairlift rides are the coldest part of resort snowboarding. You sit still, often at elevation with wind exposure, for 5-15 minutes at a time. During this passive period, your body generates minimal heat and your layers must provide all the insulation. This is where your mid layer earns its keep. A quality fleece or light puffy jacket maintains core warmth during chairlift rides without being too warm during active riding.
Between-Run Adjustments
The transition from chairlift to riding creates a temperature shift. You go from cold and still to warm and active in seconds. Experienced resort riders learn to manage this transition by unzipping their jacket during the first run after sitting on the chair. This preemptive venting prevents the rapid overheating that leads to sweat accumulation. As you warm up, re-zip to your comfortable setting.
All-Day Resort Layering Strategy
A full day at the resort spans changing conditions. Morning temperatures may be 15°F colder than afternoon. Plan your layers to accommodate this range. Start with a midweight base layer, breathable mid layer, and standard shell. Pack a lightweight vest or puffy jacket in your backpack for adding warmth during frigid morning runs or unexpected weather changes. Remove the mid layer if afternoon temperatures climb above your comfort threshold.
Resort-Specific Gear Features
Resort riding benefits from specific gear features. Jacket powder skirts prevent snow entry during chairlift sits after snowfall. Lift pass pockets eliminate fumbling with passes. Goggle pockets with fleece lining keep lenses from scratching. Hand warmer pockets positioned above the waist allow warming without removing gloves. These small features accumulate into significantly better comfort over a full day of riding.
Bibs versus pants is particularly relevant for resort riders. Bibs provide superior warmth and snow protection but are harder to use for bathroom breaks. For resort riders who spend full days on the mountain, the warmth and protection of bibs often outweighs the inconvenience. Pants offer easier bathroom access and are preferred by riders who take frequent lodge breaks.
Park and Freestyle Layering: Maximum Mobility, Minimum Bulk
Park riding demands freedom of movement above all else. Grabs, spins, presses, and jibbing all require unrestricted mobility that bulky layers restrict. Park layering prioritizes lightweight, breathable pieces that stay out of your way while providing adequate warmth during rest periods.
The Park Rider’s Base Layer
A lightweight base layer is standard for park riders. Heavy base layers restrict movement and cause overheating during repeated features and hikes. Lightweight synthetic base layers with four-way stretch provide maximum mobility while managing moisture. Many park riders prefer a tight-fitting base layer top that stays in place during inversions and complex rotations.
Skip the Mid Layer
Most park riders skip the traditional mid layer entirely. The constant movement generates enough heat that additional insulation is unnecessary during active riding. For chairlift warmth, many park riders wear a hoodie or light flannel as their mid layer, adding style points while providing minimal insulation. The hoodie can be removed and stashed during active sessions.
Park-Optimized Outer Layers
Park-specific jackets and pants are designed with mobility as the primary consideration. Articulated elbows and knees, stretch fabric panels, and relaxed fits allow full range of motion. Many park riders prefer bibs over pants because bibs stay in place during inverted maneuvers and prevent snow entry during falls on rails and boxes.
Color and style matter more in park riding than any other discipline. Park riders often choose outer layers that express personal style, with bold colors, patterns, and graphics. While style is subjective, ensure that style choices do not compromise function. A jacket that looks great but lacks proper waterproofing will leave you wet and miserable during spring slush sessions.
Park Layering for Different Seasons
Spring park sessions require different layering than winter park days. Warmer temperatures mean lighter base layers, no mid layer, and vented shells. Some spring park riders wear just a base layer and shell, or even a base layer and lightweight hoodie without a shell. Winter park sessions may require a light fleece mid layer for chairlift warmth, but the active nature of park riding still favors breathability over insulation.
Solving Cold Feet: The Complete Guide to Warm Snowboard Feet
Cold feet are the number one comfort complaint among snowboarders of all skill levels. Your feet are the furthest extremity from your heart, enclosed in rigid boots that restrict circulation. Understanding why feet get cold and how to prevent it transforms your riding experience.
Why Snowboard Boots Make Feet Cold
Snowboard boots are designed for performance, not comfort. The rigid shell that transfers energy from your legs to the board also compresses your feet, restricting blood flow. Tight boots cause more cold feet than loose boots because the compression limits circulation. Finding the right balance between performance fit and comfort is essential for warm feet.
The Sock Solution
Your sock choice is the single biggest factor in foot temperature. Snowboard-specific socks are thinner than regular socks because thick socks create pressure points that restrict circulation. A single pair of midweight, moisture-wicking snowboard socks provides optimal warmth without compromising circulation. Never wear multiple sock layers; this creates bunching and pressure points that make feet colder, not warmer.
Boot Fit Optimization
Proper boot fit is critical for warm feet. Boots that are too tight compress your feet and restrict blood flow. Boots that are too loose allow your foot to move around, creating friction and cold spots. A professional boot fitting at a reputable shop ensures optimal fit for your foot shape. Custom insoles that support your arch improve circulation and reduce pressure points throughout your foot.
Heated Insoles and Socks
For riders who struggle with cold feet despite proper socks and boot fit, heated insoles provide supplemental warmth. Thin heating elements under the sole and across the toes deliver consistent warmth. Battery-powered heated insoles are removable and work with any boot. Heated socks provide similar warmth but are less versatile since they replace your existing socks.
Pre-Ride Foot Preparation
Your feet temperature before you put on your boots determines their temperature for the first few runs. Cold feet put into cold boots take a long time to warm up. Put on your boots at home after warming your feet, or stand near a heat source at the lodge before suiting up. Toe warmers inserted into boots before putting them on provide immediate warmth that lasts for several hours.
Circulation Techniques
Keeping blood flowing to your feet requires attention throughout the day. Wiggle your toes frequently while riding to maintain circulation. During chairlift rides, flex your feet up and down to promote blood flow. Stand up and walk around at the lodge between runs rather than sitting still. These small movements keep warm blood reaching your extremities.
- Midweight snowboard-specific socks (one pair only)
- Properly fitted boots with custom insoles
- Toe warmers for extreme cold
- Pre-warmed feet before putting on boots
- Regular toe wiggling throughout the day
- Proper boot buckle tightness (snug, not crushing)
Frequently Asked Questions
Technically yes, but it is not recommended. Cotton sweatpants will get wet from sweat or snow and become heavy, cold, and uncomfortable. Use proper synthetic long underwear instead.
No! Never tuck anything into your snowboard boots except your socks. Tucking leggings into boots creates pressure points that can cut off circulation, causing cold feet and pain.
Start with three: a base layer, a mid-layer, and a shell. This gives you the flexibility to remove the mid-layer if you get too hot. It is always better to be slightly overdressed and shed a layer than to be freezing with no options.
A shell has no internal padding/insulation; it only blocks wind and water. An insulated jacket has built-in synthetic or down filling. Shells are more versatile because you can customize the warmth underneath.
Synthetic insulation is generally better for active riding because it continues to insulate even if it gets wet from sweat or snow. Down loses its warmth when wet, though treated hydrophobic down is improving.
You need base layers for any temperature below about 40°F (4°C). Even on warmer spring days, a lightweight base layer provides moisture management that cotton t-shirts cannot match. The weight of the base layer (lightweight, midweight, or heavyweight) should match the expected temperature range.
Synthetic leggings or yoga pants can work as a temporary base layer, but they are not ideal. Snowboard-specific base layers are designed with moisture-wicking technology that standard leggings lack. If you must use leggings, choose synthetic or polyester options, never cotton.
Warm feet start with proper socks: one pair of midweight snowboard-specific socks, never multiple layers. Ensure your boots fit properly (not too tight), use custom insoles for arch support, and wiggle your toes frequently to maintain circulation. Heated insoles provide extra warmth for chronically cold feet.
A synthetic or DWR-treated hoodie works as a mid layer, but a cotton hoodie is a mistake. Cotton absorbs sweat and becomes cold and heavy. If you wear a hoodie, ensure it is made from polyester or a technical fabric that wicks moisture.
Merino wool is the premium choice for its natural temperature regulation, odor resistance, and comfort. Synthetic materials (polyester, nylon) wick faster and cost less but retain odors. A 50/50 merino-synthetic blend offers the best balance of performance and value.
Base layers should be snug against your skin without being restrictive. They need to touch your skin to wick moisture effectively, but should not compress or limit movement. Think “athletic fit” rather than “compression fit.” You should be able to pinch about an inch of fabric at your sides.
The layering principles are identical for both sports. Both involve cold-weather outdoor activity with varying intensity levels. However, snowboarders tend to sit more (strapping in, waiting for friends), so a slightly warmer mid layer may be beneficial compared to skiers who are constantly in motion.
Wash base layers after every 1-2 uses to maintain their wicking properties and prevent odor buildup. Merino wool can go longer between washes (3-4 wears) due to its natural antimicrobial properties. Always follow the care label and use sport-specific detergent for best results.
For your first time, focus on the essentials: moisture-wicking base layer top and bottom, a fleece mid layer, a waterproof shell jacket and pants, snowboard-specific socks, and warm gloves or mittens. You can rent outer layers to test fits before buying. Avoid cotton entirely and prioritize comfort over style.
Spring riding means warmer temperatures and variable conditions. Start with a lightweight synthetic base layer, skip the mid layer or wear a light hoodie, and use a shell jacket with pit zips for venting. Pack a light layer for shade runs and afternoon cooling. Sunglasses and sunscreen become essential accessories.
Final Thoughts: Master Your Layering, Master the Mountain
Layering for snowboarding is not about owning the most expensive gear or following rigid rules. It is about understanding how your body manages heat and moisture, and choosing layers that work together as a system. The three-layer foundation gives you a framework, but your specific needs depend on your riding style, the conditions, and your personal cold tolerance.
Start with the fundamentals: a quality base layer that wicks moisture, a mid layer that traps heat, and a shell that blocks the elements. Master the art of adding and removing layers throughout the day. Pay attention to your extremities with proper socks, gloves, and headwear. And always, always avoid cotton.
Whether you are a beginner heading out for the first time or an experienced rider looking to optimize your system, the principles in this guide apply. Temperature regulation is a skill, just like carving turns or hitting jumps. The more you ride and pay attention to how your layers perform, the better you will become at staying comfortable in any condition.
Remember: the best layering system is the one that keeps you riding from first chair to last call. Invest in the right pieces, care for them properly, and they will serve you for seasons to come. See you on the mountain.


