
8 Best Wrist Guards for Snowboarding: The Ultimate Safety & Impact Guide
Key Highlights
- Injury Reduction: Wrist guards can reduce the risk of fractures by up to 50% for beginners.
- The FOOSH Rule: Most breaks happen due to “Fall On Outstretched Hand” – learning to roll is as vital as gear.
- Integrated Tech: 2026 gear focuses on BioMex and D3O tech built directly into mittens.
- Sizing Matters: Standalone guards often require sizing up your gloves by one full size.
Best Overall (Stealth): Burton Impact Wrist Guard – Fits seamlessly under most gloves and offers flexible protection.
Best Heavy-Duty: Demon Flexmeter Double Sided – Medical-grade protection with D3O foam for high-impact falls.
Best Integrated: Level Fly Mitts – The BioMex system is built directly into the glove for zero bulk issues.
Why You Need Wrist Guards: The Anatomy of an Impact
The Colles’ Fracture
A typical wrist guard functions like a splint. When you fall, the energy is transferred from your palm up your forearm, bypassing the delicate carpal bones and the distal radius. Without a guard, that energy snaps the radius bone backward—a classic Colles’ fracture that can end your season instantly.
The science of snowboarding falls is rooted in torque and leverage. When your edge catches, your board stops, but your center of mass continues forward at 15-25 mph. Your brain triggers a reflexive survival response: extend the arms. When your palm hits the hardpack, it creates a point of impact that travels through the scaphoid and lunate bones. Without a guard to bridge the gap between the palm and the forearm, the wrist joint takes 100% of the force. A high-quality guard acts as a bridge, distributing that energy across the larger, stronger radius and ulna bones of the forearm.
Furthermore, modern protection isn’t just about hard plastic. We now see the use of “non-Newtonian” materials like D3O. These materials are soft and pliable during normal movement but molecules lock together instantly upon impact to absorb energy. This is a game-changer for riders who previously hated the “robotic” feel of old-school guards. Wearing protection doesn’t make you a beginner; it makes you smart. It allows you to ride with confidence, knowing that a simple slip won’t result in surgery. Just like wearing impact shorts for your tailbone or a helmet for your head, wrist guards are essential PPE.
Understanding Wrist Guard Technology: Materials Matter
D3O
Impact Absorption: 95%
Flexibility: Excellent
Best For: Park riders, freestyle
Hard Plastic
Impact Absorption: 90%
Flexibility: Poor
Best For: Beginners, high-speed carving
Foam/Gel
Impact Absorption: 70%
Flexibility: Very Good
Best For: Light protection, park laps
Wrist Guard Anatomy: What Makes a Great Guard?
A high-quality wrist guard consists of several key components working in harmony:
- The Dorsal Splint: The rigid piece running along the back of your hand and forearm. This prevents hyperextension and distributes impact force.
- The Palmar Support: Some guards include a palm plate to prevent the hand from bending backward and to provide a sliding surface.
- Compression Sleeve: The fabric that holds everything in place. Look for moisture-wicking materials to prevent sweat buildup.
- Adjustable Straps: Critical for achieving the perfect fit without cutting off circulation.
- Impact Foam: Layers of energy-absorbing material that cushion the blow before it reaches your bones.
Pro Tip: The Two-Finger Rule
When adjusting your wrist guards, you should be able to slide two fingers comfortably between the strap and your skin. Any tighter and you risk circulation issues; any looser and the guard won’t provide proper protection during a fall.
The Top 8 Wrist Guards for 2025/2026

1. Burton Impact Wrist Guard
The Upside: The absolute king of low-profile protection. It uses a tapered top splint that allows for enough flex to grab your board or adjust bindings without feeling restricted. Because they are so thin, they fit under 90% of standard gloves without needing to buy a new pair.
The Downside: The protection is “light.” If you are a park rider hitting massive booters, the thin splint may not prevent a fracture during a high-velocity landing.
Weight: 4.2 oz
Material: Flexible nylon splint
Certification: CE Level 1
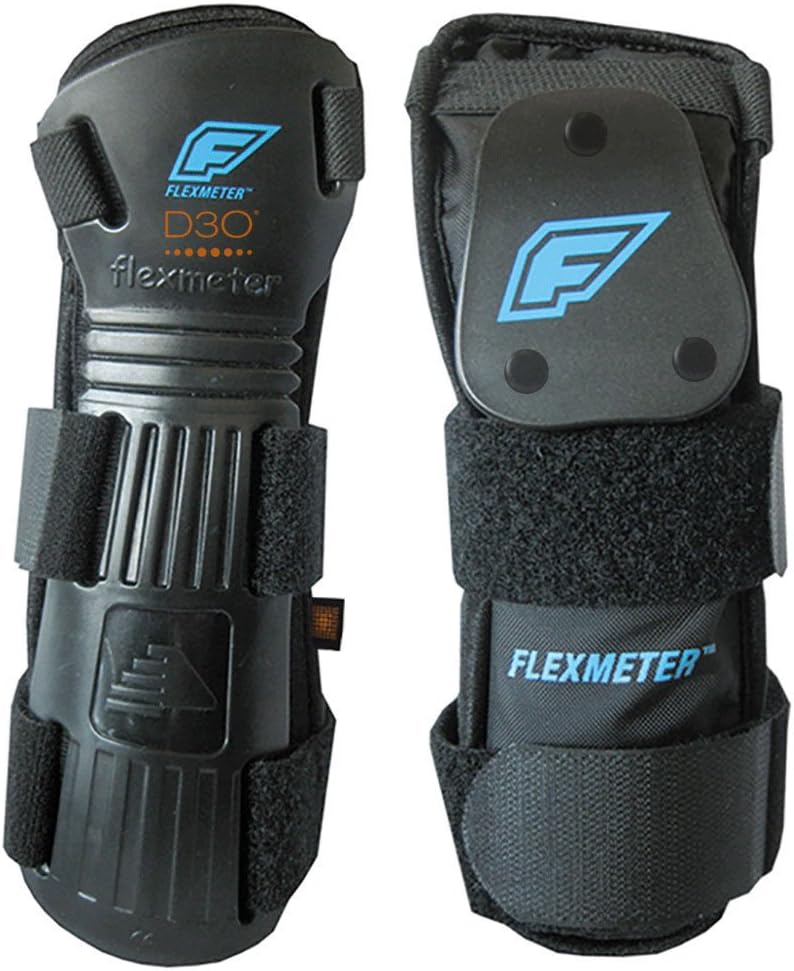
2. Demon Flexmeter Double Sided
The Upside: This is essentially a medical brace disguised as snowboard gear. Developed by orthopedic surgeons, it uses a flexible hinge that allows the wrist to function normally until it hits a dangerous angle, at which point the “Flexmeter” locks out to prevent hyperextension.
The Downside: It is massive. You will almost certainly need to buy gloves one size larger or wear these over your glove cuffs, which can look a bit bulky.
Weight: 7.8 oz
Material: Medical-grade polymer
Certification: CE Level 2

3. Dakine Wristguard Glove
The Upside: Zero hassle. You don’t have to worry about fitting a guard inside a glove because it IS the glove. The rigid nylon support is stitched into the chassis, providing a sleek look with beginner-friendly protection.
The Downside: If you tear the glove shell on a sharp edge, your protection goes with it. You also can’t remove the guard for “lazy” spring riding days.
Weight: 6.5 oz
Material: Nylon/reinforced fabric
Waterproof: Yes, with Gore-Tex liner

4. Level Fly Mitts (BioMex)
The Upside: Level uses the BioMex system, which is widely considered the gold standard for integrated protection. It keeps the wrist in an anatomically strong position. Plus, mittens are inherently warmer for those mittens vs gloves debates.
The Downside: High price point. These are an investment in your safety, but they are among the most expensive hand protection on the market.
Weight: 8.2 oz
Material: Leather/synthetic blend
Temperature Rating: -20°F to 20°F

5. Hillbilly Wrist Guard Gloves
The Upside: Built from heavy-duty goat leather. These are bulletproof. The half-finger design is perfect for those who want tactile feel or for spring conditions where you need a “work glove” vibe with extreme durability.
The Downside: Not waterproof. If you are riding in wet PNW snow, these will soak through quickly and become heavy.
Weight: 5.8 oz
Material: Goat leather
Breathability: Excellent

6. Triple Eight Undercover
The Upside: Extremely affordable. This is a classic “skate style” guard adapted for snowboarding. It uses a high-density, impact-resistant splint and a neoprene body that provides decent wrist support for under $30.
The Downside: Neoprene doesn’t breathe well. Your hands will likely be quite sweaty by lunch, and the Velcro straps can be itchy if not positioned perfectly.
Weight: 3.9 oz
Material: Neoprene/plastic
Price: $24.99

7. Seirus Jam Master Exo
The Upside: Uses a mesh exoskeleton design. This is the coolest (temperature-wise) guard on the list. It’s ideal for people who ride in warmer climates or those whose hands overheat easily.
The Downside: The mesh is more prone to tearing than leather or heavy nylon. It provides good support but lower abrasion resistance.
Weight: 4.1 oz
Material: Mesh/nylon
Ventilation: Excellent
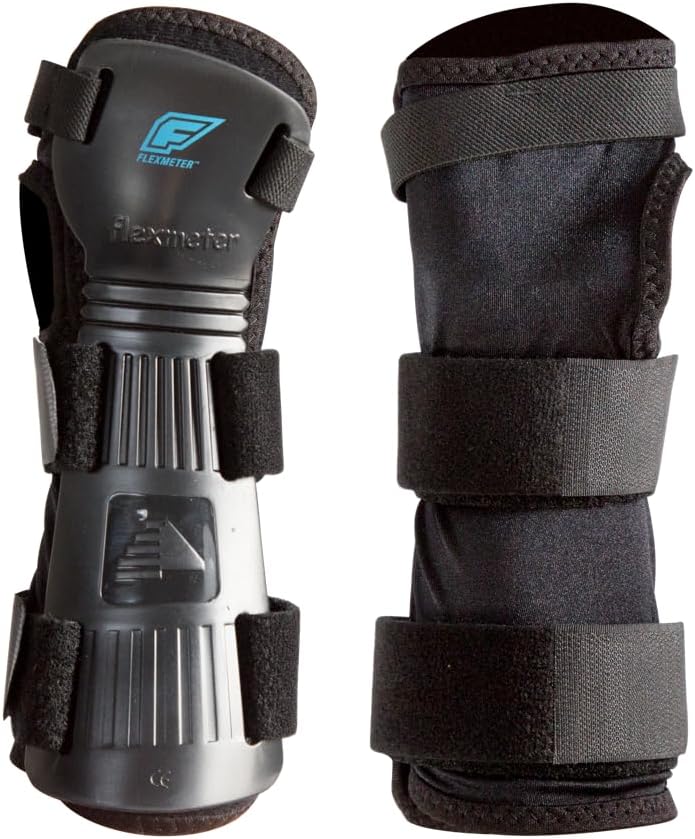
8. Demon Flexmeter Single Sided
The Upside: All the tech of the Demon Double-Sided but only on the dorsal (back) of the hand. This allows your palm to remain flat and unrestricted, making it much easier to grab your board during tricks.
The Downside: You lose the “skid plate” protection on the palm. If you land palm-down on ice, you will feel the impact much more than with a double-sided guard.
Weight: 6.2 oz
Material: Medical-grade polymer
Range of Motion: 90% unrestricted
Quick Comparison: Top Picks at a Glance
| Product | Best For | Weight | Material | Price Range |
|---|---|---|---|---|
| Burton Impact | Stealth/Everyday | 4.2 oz | Nylon | $$ |
| Demon Double | Maximum Protection | 7.8 oz | Polymer | $$$ |
| Dakine Glove | Integrated Convenience | 6.5 oz | Nylon/Fabric | $$ |
| Level Fly | Integrated Mitten | 8.2 oz | Leather | $$$$ |
| Triple Eight | Budget | 3.9 oz | Neoprene | $ |
Buying Guide: Engineering the Perfect Fit
Choosing a wrist guard involves understanding the trade-off between immobilization and dexterity. If you are learning how to carve or spending your first few days on the bunny hill, you want maximum immobilization. Your goal is to prevent the wrist from moving into a range of motion where it can snap. A rigid, double-sided guard like the Demon Flexmeter is best here.
Winter (Deep Snow)
Prioritize waterproofing and insulation. Integrated guards like Level Fly or Dakine keep the elements out while protecting you.
Spring (Slush)
Breathability is key. The Seirus Jam Master or Burton Impact with vented gloves work best.
Summer (Glacier)
Lightweight guards like Triple Eight with fingerless gloves keep you cool while protecting against hard summer snow.
Early Season
Variable conditions call for versatile guards like Demon Flexmeter that work with multiple glove options.
For park riders or advanced carvers, dexterity is more important. You need to be able to reach down and grab your board without fighting a plastic plate. In this scenario, look for guards that use D3O foam or flexible nylon splints like the Burton Impact. These allow for “natural” movement but stiffen up when an impact force is applied. Another crucial factor is Forearm Length. A guard that is too short will concentrate the force at the end of the splint, potentially causing a break higher up the arm. Look for guards that extend at least 2-3 inches past your wrist crease.
Lastly, consider the Glove Synergy. If you buy a standalone guard, take your current gloves to the shop (or order with a return policy). If the guard is too tight, it will restrict blood flow, and your fingers will freeze. Integrated systems like Level or Dakine are engineered to solve this, but they lack the modularity of separate pieces. If you’re a serious rider, having a separate guard allows you to swap between your light spring gloves and your heavy-duty winter mittens depending on the weather.
Sizing Guide: Get It Right the First Time
Measure your wrist circumference: Use a flexible tape measure around the smallest part of your wrist, just below the bone.
Small: 5.5″ – 6.5″
Medium: 6.5″ – 7.5″
Large: 7.5″ – 8.5″
X-Large: 8.5″+
Remember: When wearing under gloves, size your gloves UP by one full size to accommodate the guard.
Real Rider Experiences
“After breaking my wrist on my third day snowboarding, I was terrified to get back on the mountain. The Demon Flexmeter Double Sided gave me the confidence to progress. I’ve taken some hard falls since, and my wrists have never felt a thing. Worth every penny.”
“I’ve been teaching snowboarding for 12 years, and I require all my beginner students to wear wrist guards. The Burton Impacts are my top recommendation because they fit under gloves without changing the feel. I’ve seen hundreds of falls that would have been ER visits turn into ‘shake it off and try again’ moments.”
“As a park rat, I need dexterity for grabs but protection for when I case a jump. The Demon Single Sided gives me the best of both worlds. I can feel my board edge through my gloves, but I know I’m protected when I need it.”
Maintenance and Care: Extend the Life of Your Guards
Proper maintenance can double the lifespan of your wrist guards. Here’s how to keep them in top condition:
After Each Session:
- Remove guards from gloves to air dry completely
- Wipe down plastic components with a dry cloth
- Check straps for wear or loosening
Weekly Maintenance:
- Hand wash fabric components with mild soap and cool water
- Inspect splints for stress cracks or deformation
- Test strap tension and replace worn velcro
When to Replace:
- After a major impact that caused visible damage
- Every 2-3 seasons with regular use
- When straps no longer hold securely
- If you notice any cracks in plastic components
Advanced Techniques: Learning to Fall Properly
While wrist guards are essential, learning proper falling technique is equally important. Here’s how to minimize injury even with protection:
The Tuck and Roll
Instead of reaching out with straight arms, practice tucking your arms and rolling across your shoulder. This distributes impact across your entire upper body rather than concentrating it on your wrists.
The Slap Down
If you must fall forward, try to slap the snow with your forearms rather than your hands. This uses the larger, stronger muscles of your arms to absorb impact.
The Knee Drop
When falling backward, drop to your knees first. This reduces the distance your hands have to travel to the snow and gives you more control over the fall.
Frequently Asked Questions (FAQ)
This is a common myth. While a “radius break” can occur at the top of a guard, this is statistically much rarer than a wrist fracture. Furthermore, a clean break in the middle of the forearm bone is much easier for doctors to fix and heals much faster than a complex, multi-bone wrist joint injury. Studies show that wrist guards reduce overall injury risk by 50% without increasing forearm fracture rates.
90% of snowboard-specific guards are designed to be worn under the glove. This protects the guard from the snow and keeps the aesthetic clean. Only specialized “Exo” guards or heavy-duty skate guards should be worn over the top. If wearing under gloves, ensure your gloves are sized up appropriately to prevent circulation issues.
You can, but skate guards have a hard plastic “skid plate” on the palm designed to slide on asphalt. On icy snow, this plate can make your hands slide away from you too fast, potentially causing a shoulder dislocation. Snow-specific guards often use rubberized or foam palm pads for “grip-stop” action. If you must use skate guards, be aware of this difference and consider the increased risk.
If you feel tingling or “pins and needles” in your fingertips after 10 minutes of wearing them, they are too tight. This will lead to frostbite in cold conditions. You should be able to fit one finger between the strap and your arm. Also, your fingers should remain warm and maintain normal color throughout your riding session.
Integrated guards (built-in) are more comfortable because they are engineered as a single unit. However, standalone guards are better if you want to use different gloves for different weather conditions. Integrated guards typically cost more but offer a seamless experience, while standalone guards provide flexibility at a lower price point.
Absolutely not. If anything, the added confidence allows beginners to progress faster because they aren’t as terrified of the consequences of a fall. Advanced riders can push their limits knowing they have protection. No professional coach has ever reported guards hindering skill development.
Most plastic splints will last 2-3 seasons. However, if you have a massive “bell-ringer” crash where you land hard on the guards, inspect them for white “stress marks” or cracks. If they are cracked, replace them immediately. Fabric components typically wear out faster than plastic, so check straps and seams regularly.
Many do, especially those recovering from injury or those hitting the biggest jumps in the world. Many “Stealth” guards are hidden under gloves so you can’t see them on TV. Red Gerard, Olympic gold medalist, has been known to wear wrist guards during practice sessions.
Most under-glove guards can be washed in a mesh bag on a cold cycle. Always air dry them; the heat of a dryer can warp the plastic splints. Remove any removable splints before washing. For integrated glove guards, follow the manufacturer’s care instructions specifically.
While not legally mandatory, most instructors highly recommend them for children, as kids’ bones are still developing and their reflexes aren’t as fast to “tuck and roll.” Children’s wrist guards are specifically designed for smaller wrists and provide age-appropriate protection. Many ski schools now require them for youth programs.
Yes, but positioning is key. Most guards can be adjusted to sit above or below your watch. Some riders prefer wearing their watch on the outside of the guard for easy access, though this may affect heart rate monitoring accuracy. Consider a sports band that can accommodate the extra bulk.
Women’s specific guards typically have narrower wrist openings and shorter forearm lengths to accommodate different anatomy. However, many unisex options work well for both. The key is proper fit rather than gender designation. Always try before buying or check return policies.
Beyond the Wrists: Full Upper Body Protection
While this guide focuses on wrist protection, a comprehensive safety approach includes protecting your entire upper body:
- Elbow Guards: Essential for park riders and those prone to sliding on ice
- Shoulder Pads: Often integrated into impact vests, protect against collarbone fractures
- Back Protectors: Critical for high-speed carving and tree runs
- Chest Protection: Increasingly popular among advanced riders for rail and jump protection
Remember: Your body is your most important piece of equipment. Investing in protection is investing in your ability to ride another day.
Understanding Wrist Guard Types: Bilateral vs Unilateral Protection
When shopping for wrist guards, you’ll encounter two fundamental design philosophies: bilateral protection (covering both the palm and back of the wrist) and unilateral protection (covering only one side). Understanding the difference is crucial for selecting the right guard for your riding style and risk tolerance.
Bilateral (Double-Sided) Guards
Bilateral guards like the Demon Flexmeter Double Sided feature protective plates on both the palmar (palm) and dorsal (back) sides of the wrist. This design provides 360-degree protection against hyperextension and hyperflexion—the two most common mechanisms of wrist injury in snowboarding.
How bilateral protection works: When you fall forward and extend your arms (the classic FOOSH position), the palmar plate prevents your hand from bending backward beyond its natural range. Simultaneously, the dorsal splint prevents the wrist from collapsing inward. This “sandwich” effect distributes impact force across both sides of the wrist joint, dramatically reducing peak stress on any single bone or ligament.
When to choose bilateral protection:
- You’re a beginner learning to stop and turn
- You ride primarily on groomed runs at moderate speeds
- You have a history of wrist injuries
- You’re recovering from a previous fracture
- You ride with children and need maximum confidence
Potential drawbacks of bilateral guards:
- Reduced dexterity for grabbing your board
- Increased bulk that may require glove sizing adjustments
- The palmar plate can create a “sliding” effect on hard snow, potentially causing loss of control
- More restrictive feel that some riders find uncomfortable
Unilateral (Single-Sided) Guards
Unilateral guards like the Demon Flexmeter Single Sided and Burton Impact protect only one side of the wrist—typically the dorsal (back) side. These guards are designed to prevent hyperextension while allowing full palm mobility.
How unilateral protection works: The rigid dorsal splint runs along the back of your hand and forearm, preventing the wrist from bending backward. The palm remains free, allowing you to grip your board, adjust bindings, and perform tricks without fighting against a plastic plate.
When to choose unilateral protection:
- You’re an intermediate to advanced rider
- You ride park and need board feel for grabs
- You prefer minimal bulk under gloves
- You want protection without sacrificing dexterity
- You ride in variable conditions and need versatile gear
Important consideration: Unilateral guards do NOT protect against palm-side impacts. If you fall with your palm hitting a rock or hard ice, you’ll feel the full force. Some riders mitigate this by wearing padded gloves with additional palm reinforcement.
Pro Tip: The Hybrid Approach
Many experienced riders use a bilateral guard for early season (when snow is hard and icy) and switch to a unilateral guard for spring riding (when snow is softer and falls are less impactful). Having both types in your gear bag gives you the flexibility to adapt to conditions.
CE Certification Explained: What the Ratings Actually Mean
You’ll notice our top picks list CE Level 1 or CE Level 2 ratings. These aren’t just marketing numbers—they represent rigorous European safety testing standards that measure actual impact protection.
CE Level 1 Testing
CE Level 1 certification requires the guard to absorb a minimum amount of energy during a controlled drop test. The test simulates a fall from approximately 1 meter (3.3 feet) onto a flat surface. To pass, the transmitted force must not exceed 9 kN (kilonewtons)—roughly equivalent to the force of a 200-pound person falling from waist height onto an outstretched hand.
What CE Level 1 means in practice:
- Adequate protection for most recreational riding
- Reduces fracture risk by approximately 40-50%
- Lighter weight and more flexible than Level 2
- Suitable for riders under 180 lbs riding at moderate speeds
CE Level 2 Testing
CE Level 2 certification is significantly more stringent. The transmitted force must not exceed 5 kN—a 44% improvement over Level 1. This represents medical-grade protection suitable for high-impact scenarios.
What CE Level 2 means in practice:
- Maximum protection against fractures
- Recommended for beginners, heavy riders, and those with injury history
- Typically heavier and bulkier than Level 1
- Often developed with input from orthopedic surgeons
| Specification | CE Level 1 | CE Level 2 |
|---|---|---|
| Max Transmitted Force | 9 kN | 5 kN |
| Test Drop Height | 1 meter | 1 meter |
| Typical Weight | 3-5 oz | 6-9 oz |
| Best For | Recreational riders | Beginners/high-risk |
| Price Range | $20-40 | $40-80 |
EN 14120: The European Wrist Guard Standard
Beyond general CE certification, the EN 14120 standard specifically addresses wrist protectors for roller sports (which includes snowboarding). This standard tests for:
- Abrasion resistance: The ability to withstand sliding on rough surfaces without tearing
- Impact attenuation: Energy absorption during direct hits
- Restriction of movement: Limiting dangerous ranges of motion
- Dimensional requirements: Minimum coverage area to ensure adequate protection
When evaluating wrist guards, look for both CE marking and specific EN 14120 compliance. Products meeting both standards offer the highest level of verified protection.
Riding Style-Specific Wrist Guard Recommendations
Your ideal wrist guard depends heavily on how you ride. Here’s a detailed breakdown by discipline:
Freestyle and Park Riders
Park riders face a unique challenge: they need dexterity for grabs, spins, and rail tricks, but they also face high-impact falls from jumps and features.
Recommended guards:
- Demon Flexmeter Single Sided: Maximum protection with full palm mobility
- Burton Impact: Ultra-low profile that won’t interfere with board feel
- Level Fly Mitts with BioMex: Integrated solution for those who ride parks in cold conditions
Key considerations for park riders:
- Prioritize dorsal (back) protection over palm protection—most park falls involve backward or sideways impacts
- Choose guards that don’t extend too far past the wrist crease to avoid interfering with board grabs
- Test grabs with the guard to ensure full range of motion before committing to a run
- Consider removable splints for easy transitions between park laps and groomer runs
- Think about impact frequency—you may fall 10-20 times per session in the park, so comfort matters enormously
All-Mountain and Freeride Riders
All-mountain riders encounter everything: powder, groomers, trees, and occasional park laps. They need versatile protection that works across conditions.
Recommended guards:
- Burton Impact: Works under any glove, suitable for all conditions
- Dakine Wristguard Glove: All-in-one solution for convenience across terrain types
- Demon Flexmeter Double Sided: Maximum protection for variable terrain and unexpected obstacles
Key considerations for all-mountain riders:
- Waterproofing becomes important when riding through wet snow or in coastal resorts
- Warmth matters for early morning and late afternoon laps when temperatures drop
- Versatility allows you to adapt to rapidly changing mountain conditions
- Consider guards that work well with multiple glove weights (spring liners vs. winter mitts)
Carving and Groomer Specialists
Carving riders experience high-speed falls where impact forces are significantly greater. At 30+ mph, a fall generates roughly four times the force of a fall at walking speed.
Recommended guards:
- Demon Flexmeter Double Sided (CE Level 2): Medical-grade protection for high-speed impacts
- Hillbilly Wrist Guard Gloves: Heavy-duty leather withstands abrasion at speed
- Triple Eight Undercover: Budget option for experienced carvers who rarely fall
Key considerations for carving riders:
- CE Level 2 protection is strongly recommended due to higher impact forces
- Palm protection becomes critical because high-speed slides often involve forward falls
- Abrasion resistance matters more than flexibility—you won’t be grabbing your board mid-carve
- Consider pairing with elbow guards and back protectors for a complete safety system
Powder and Backcountry Riders
Powder riders face different risks: hidden obstacles, tree wells, and long falls through deep snow. While powder itself cushions falls, hidden rocks and tree stumps create significant impact forces.
Recommended guards:
- Level Fly Mitts: Maximum warmth plus integrated protection for long backcountry days
- Burton Impact: Lightweight protection that doesn’t add bulk under touring gloves
- Dakine Wristguard Glove: Waterproof protection for wet powder conditions
Key considerations for powder and backcountry riders:
- Warmth becomes a primary concern for multi-hour backcountry tours
- Waterproofing is essential for wet snow common in coastal mountain ranges
- Integrated solutions reduce the chance of forgetting protection when you’re rushing out the door
- Consider mittens over gloves for maximum warmth—most BioMex-style protection works well with mittens
- Remember that tree wells and hidden obstacles can cause severe wrist injuries even at low speeds
Beginner and Casual Riders
Beginners experience the most falls—often 20-50 per day—and need maximum protection with minimal complexity. Learning is hard enough without adding injury anxiety to every turn attempt.
Recommended guards:
- Demon Flexmeter Double Sided: Medical-grade protection builds confidence during the learning phase
- Triple Eight Undercover: Affordable option for occasional riders who hit the slopes a few times per year
- Dakine Wristguard Glove: Simple all-in-one solution that eliminates the “did I put them on correctly?” question
Key considerations for beginners:
- Don’t skimp on protection—it’s an investment in your learning journey and long-term enjoyment of the sport
- Comfort matters—you’ll be wearing these for an entire day of instruction, often 4-6 hours
- Consider taking a lesson to learn proper falling technique alongside gear selection
- Remember: wrist guards won’t prevent all injuries, but they significantly reduce the most common one
- Budget at least $40-60 for your first pair—the ER copay alone will cost more
The 80/20 Rule for Wrist Guard Selection
Spend 80% of your time analyzing how you ride most often, and 20% considering your occasional adventures. If you spend 80% of your days carving groomers and 20% in the park, prioritize carving protection but ensure you have enough dexterity for the occasional park lap. Your gear should match your reality, not your aspirations.
How Your Bindings and Stance Affect Fall Patterns
Most riders don’t realize that their binding setup directly influences how and where they fall. Understanding this connection can help you choose the right protection and potentially avoid injuries altogether.
Stance Width and Center of Gravity
A wider stance lowers your center of gravity and provides more stability on flat terrain. However, it also creates more rotational force when you catch an edge. Riders with very wide stances (beyond shoulder width) tend to fall with more rotational energy, which can cause the arms to twist during impact—increasing the risk of complex wrist injuries that involve both the bones and ligaments.
Recommendation: If you ride with a wide stance, prioritize bilateral protection (like the Demon Double Sided) to guard against both hyperextension and rotational injuries. The extra bulk is worth the additional protection against twisting forces.
Forward Lean and Response
High forward lean on your bindings forces you to ride with bent knees and a more aggressive posture. This increases the likelihood of catching your downhill edge and falling forward—the classic FOOSH position. Low forward lean allows a more relaxed stance but can result in being “backseat” and falling backward onto your hands.
Forward lean high: Expect more forward falls—prioritize palm protection and bilateral guards
Forward lean low: Expect more backward falls—consider back protectors in addition to wrist guards
Binding Angle (Duck vs Forward)
A “duck stance” (both feet angled outward equally, like +15/-15) is common for park riders and promotes a centered, balanced stance. This tends to result in more lateral falls (to the side) rather than forward or backward. Forward-facing angles (like +15/-5) promote more forward falls, especially when learning to carve or when riding switch.
Duck stance riders: Consider guards with lateral protection or wear knee pads to complement wrist guards
Forward-angled riders: Prioritize palm and wrist protection for forward falls—bilateral guards are ideal
Highback Position and Adjustment
The highback of your binding supports your calves and transfers energy to your heel edge. If your highbacks are too loose, angled incorrectly, or unevenly adjusted, you may not be able to engage your heel edge effectively, leading to unexpected catches and falls. Before blaming your wrist guards for falls, ensure your highbacks are properly adjusted for your boot size and riding style.
Quick highback check: Sit in your bindings on flat ground. Your highbacks should contact your calves evenly. If one side touches before the other, adjust the rotation. Proper highback adjustment can prevent 10-15% of edge-catching falls.
The Complete Physics of Snowboard Falls
To truly understand why wrist guards work and how they protect you, let’s examine the physics of a snowboard fall in comprehensive detail.
Impact Force Calculation
The force generated during a fall depends on three primary factors:
- Mass: Your body weight (plus gear, helmet, boots, and board)
- Velocity: How fast you’re moving at the moment of impact (both horizontal speed and rotational speed)
- Deceleration distance: How far you travel before coming to a complete stop
The formula is: Force = (Mass x Velocity squared) / (2 x Deceleration Distance)
Real-world example calculation:
A 180 lb (81.6 kg) rider falling from standing height (1 meter) at 10 mph (4.5 m/s) onto an outstretched hand with only 2 cm of deceleration distance generates approximately 4,600 Newtons of force—very close to the CE Level 2 limit of 5,000 N.
Now consider that same rider falling at 20 mph: the force jumps to approximately 18,400 N—nearly four times the CE Level 2 limit. This is why high-speed falls are so dangerous and why no wrist guard can guarantee protection at extreme speeds.
Wrist guards increase the deceleration distance by 1-3 cm through energy-absorbing foam, which can reduce peak force by 30-50%. Additionally, they distribute the force across a larger surface area, reducing localized pressure on vulnerable bones.
Energy Absorption Mechanisms in Detail
Modern wrist guards use three primary mechanisms to reduce impact forces, and many combine all three for maximum effectiveness:
1. Plastic Deformation: Hard plastic splints bend or crush during impact, permanently absorbing energy. This is a one-time protection mechanism—the splint must be replaced after any significant deformation. This is why you should always inspect your guards after a major crash.
2. Foam Compression: Foam layers (EVA, polyurethane, or specialized compounds) compress during impact, spreading the force over a longer time period and larger area. This is the most common mechanism and provides reliable, repeatable protection until the foam degrades from repeated compression cycles.
3. Non-Newtonian Response: Materials like D3O change their molecular structure during impact. Under normal conditions, the molecules flow freely, making the material soft and flexible. Upon sudden impact, the molecules lock together in a rigid formation, absorbing enormous amounts of energy. After the impact, the molecules return to their fluid state, and the material is ready to protect again. This allows the guard to be reused indefinitely (until the material gradually degrades over years of use).
Force Distribution: The Surface Area Effect
A well-designed wrist guard distributes force across a larger area, dramatically reducing the pressure (force per unit area) on any single point.
Without protection, a fall concentrates force on the small carpal bones of the wrist. Each carpal bone has a contact area of roughly 1-2 cm squared. With a guard, force is distributed across the radius and ulna of the forearm, which have a combined surface area of approximately 50 cm squared.
Pressure reduction example: If a 4,600 N impact is distributed across 2 cm squared of carpal bone, the pressure is 2,300 N/cm squared. With a guard distributing that same force across 50 cm squared of forearm, pressure drops to just 92 N/cm squared—a 96% reduction in localized pressure. This is the fundamental reason why wrist guards are so effective: they transform a concentrated, bone-breaking force into a distributed, manageable load.
Children’s Wrist Protection: A Parent’s Complete Guide
Children’s wrist guards require special attention due to developing bones, different body proportions, shorter arms, and unique behavioral patterns that affect both injury risk and gear compliance.
Anatomical Differences in Children
Children’s bones are still growing and haven’t fully ossified (hardened into dense adult bone). This means:
- Growth plates at the ends of long bones are vulnerable to injury that can affect future bone development
- Bones may fracture differently than adult bones—sometimes bending rather than breaking cleanly
- Smaller joints require properly sized protection that matches their proportions
- Children have less muscle mass to absorb impact naturally, making gear even more important
- Higher center of gravity (relative to body size) increases fall frequency
Age-Specific Protection Recommendations
Ages 3-6 (First Tracks):
- Soft foam guards with minimal rigid components—comfort is paramount for compliance
- Integrated glove/guard combinations work best (one less thing to put on separately)
- Consider wrist guards as part of a full protection set (helmet, knee pads, elbow pads, wrist guards)
- Short sessions (1-2 hours) with frequent breaks—tired kids fall more often
- Focus on fun over skill development at this age
Ages 7-12 (Skill Building):
- Transitional guards with moderate rigid components for growing wrists
- CE Level 1 protection is appropriate for most children in this age range
- Adjustable straps accommodate rapid growth during these years
- Involve children in the selection process—let them choose colors or designs they like
- Teach basic falling technique (tuck and roll) alongside gear use
Ages 13+ (Young Adults):
- Adult-sized guards may fit depending on individual wrist size—measure first
- Consider youth-specific models from major brands (Burton, Dakine) for better proportioning
- Treat them as responsible for their own gear (inspection, care, remembering to put them on)
- Peer influence matters—emphasize that even Olympic riders wear protection
The Compliance Challenge: Getting Kids to Actually Wear Them
The biggest challenge with children isn’t finding the right protection—it’s getting them to consistently wear it. Research shows that gear that sits unused in a gear bag provides exactly zero protection.
Proven strategies for increasing compliance:
- Let them choose colors, designs, or character-themed options they genuinely like
- Explain the “why” in age-appropriate terms: “This keeps your wrists safe so you can keep having fun”
- Make it part of the non-negotiable routine: helmet, goggles, wrist guards—every single time, no exceptions
- Lead by example: wear your own protection and let them see you doing it
- Reward consistent use with small incentives (hot chocolate at the lodge, choosing dinner)
- Never use protection as punishment (“If you don’t wear them, you can’t ride”)
- Consider buddy systems—pair them with a friend who also wears protection
Women’s Wrist Guards: Anatomy, Fit, and Selection
Women typically have smaller wrists and different proportional relationships than men, which affects wrist guard fit, comfort, and ultimately effectiveness.
Key Anatomical Differences
- Wrist circumference: Women average 5.5″-6.5″ compared to men’s 6.5″-8″ (significant overlap exists)
- Forearm length: Women typically have shorter forearms by 1-2 inches, requiring shorter splints for proper positioning
- Hand size: Women’s hands are generally smaller, affecting palm coverage area
- Grip strength: Lower average grip strength means guards should be easier to put on, adjust, and remove with cold or fatigued hands
- Wrist flexibility: Women often have greater natural wrist flexibility, which can affect how guards restrict movement
Women-Specific Options Now Available
Several brands now offer women-specific wrist guards designed with female anatomy in mind:
- Burton: Women’s specific sizing in their Impact line with narrower wrist openings
- Dakine: Women’s Wristguard Glove with narrower fit and shorter forearm coverage
- Level: Women’s Fly Mitts with scaled-down BioMex system for smaller wrists
- Roxy: Women-specific designs that combine protection with feminine aesthetics
Important note: Many unisex guards work perfectly well for women with smaller wrists. The key is proper fit rather than gender designation. Always check the sizing chart, measure your wrist circumference, and don’t hesitate to try multiple sizes before purchasing. When in doubt, size down for women—oversized guards shift during falls and provide reduced protection.
Common Wrist Guard Mistakes and How to Avoid Them
Even with the best wrist guards, improper use can dramatically reduce their effectiveness. Here are the most common mistakes riders make, along with practical solutions:
Mistake #1: Wearing Guards Too Loose
If your guards slide around during normal movement, they won’t stay in place during a fall. A guard that shifts 2 cm before impact effectively reduces your protection zone by 2 cm—and that can be the difference between a protected and unprotected bone. Ensure straps are snug enough to prevent movement but not so tight they cut off circulation.
Mistake #2: Wearing Guards Too Tight
Overly tight guards restrict blood flow to your fingers, leading to cold hands, reduced dexterity, and in extreme cases, contributing to frostbite risk in frigid conditions. Use the “two-finger test”: you should be able to comfortably slide two fingers between the strap and your skin. Your fingers should remain warm and pink throughout your session.
Mistake #3: Ignoring Glove Compatibility
A guard that’s too large for your glove will bunch up and create painful pressure points. A guard that’s too small may not provide adequate coverage for your wrist. Always test guard-glove combinations before your first day on the mountain. Many shops will let you try different combinations before purchasing.
Mistake #4: Using Damaged Guards
After any significant impact, inspect your guards for cracks, deformation, or stress marks (white lines in plastic). A compromised guard may fail completely during the next impact. Replace after any major crash, even if damage isn’t immediately visible—internal structure can be compromised without external signs.
Mistake #5: Wearing Only One Guard
Some riders wear a guard only on their dominant hand, assuming they’ll naturally fall on that side. Falls are completely unpredictable—you’re statistically just as likely to fall on your “other” side. Always wear protection on both wrists. A $40 investment in a second guard is much cheaper than a second ER visit.
Mistake #6: Choosing Style Over Substance
While aesthetics matter (you’re more likely to wear protection you think looks good), prioritizing looks over actual protection can be a costly mistake. A guard that looks cool but provides inadequate protection can give false confidence, which is arguably worse than no guard at all.
Mistake #7: Not Adjusting for Conditions
Your protection needs change dramatically with conditions. Icy mornings require maximum protection; soft afternoon slush allows for more flexibility and breathability. Don’t wear the identical setup for every condition—be prepared to swap gear as the day progresses.
Mistake #8: Forgetting to Remove and Dry Guards After Riding
Leaving guards on for hours after riding causes moisture buildup, skin irritation, and accelerated material degradation. Remove and air dry guards as soon as you’re done for the day. This simple habit can extend guard life by 30-50%.
Budget Breakdown: Finding the Right Guard for Your Wallet
Wrist guard prices range from under $20 to over $100. Here’s a comprehensive breakdown of what you get at each price point and whether it’s worth the investment for your specific needs:
Budget Tier: $15-30
Examples: Triple Eight Undercover, generic foam guards, off-brand options
What you get:
- Basic impact protection suitable for occasional use
- Simple design with minimal adjustment options
- Adequate for 5-10 riding days per season
- Limited durability—expect 1-2 seasons before replacement
What you sacrifice:
- Advanced materials (D3O, non-Newtonian compounds)
- CE safety certification (these are untested)
- Comfort features (moisture-wicking, ventilation channels)
- Adjustability and fine-tuning options for optimal fit
Best for: First-timers testing the sport, rental shop supplements, backup pairs
Mid-Range Tier: $30-60
Examples: Burton Impact, Dakine Wristguard Glove, Seirus Jam Master
What you get:
- CE Level 1 certification—tested and verified protection
- Significantly better materials and construction quality
- Improved comfort features (moisture-wicking, better padding)
- 2-3 season durability with regular maintenance
What you sacrifice:
- CE Level 2 maximum protection rating
- Premium materials like D3O or medical-grade polymers
- Integrated glove/mitten solutions
Best for: Regular recreational riders (10-30 days/season), improving intermediates
Premium Tier: $60-100+
Examples: Demon Flexmeter Double Sided, Level Fly Mitts with BioMex
What you get:
- CE Level 2 certification—medical-grade maximum protection
- Advanced materials and engineering (D3O, BioMex, Flexmeter)
- Integrated solutions combining protection with gloves or mittens
- 3+ season durability even with heavy use
- Designed in collaboration with orthopedic surgeons and biomechanics experts
Is premium worth it?
- For beginners: Absolutely—the protection justifies the cost many times over
- For frequent riders (30+ days/season): Yes—per-day cost is remarkably low
- For injury-prone riders: Non-negotiable—invest in the best protection available
- For occasional riders (under 10 days/season): Consider mid-range, but don’t compromise on safety fundamentals
Cost-Per-Use Analysis: The Real Math
Let’s break down the actual cost of protection in terms you can relate to:
- $20 budget guard: $0.67 per riding day over 30 days across 3 seasons
- $50 mid-range guard: $1.11 per riding day over 45 days across 3 seasons
- $80 premium guard: $1.33 per riding day over 60 days across 4 seasons
Now compare this to the $5,000+ average cost of wrist surgery (including surgeon fees, anesthesia, facility costs, and follow-up visits), plus the 6-8 weeks of recovery time (including lost wages, missed riding days, and physical therapy costs). Add the emotional toll of missing an entire season, and the investment in wrist guards becomes one of the best values in all of snowboarding safety gear.
Consider this: A single day of skiing or snowboarding at a major resort costs $150-250 for lift tickets alone. Wearing $40-80 of wrist protection that might save you from a season-ending injury is less than one lunch at the lodge.
Deep-Dive into Wrist Guard Materials
Understanding the specific materials in your wrist guard helps you make an informed choice based on your priorities: protection level, weight, comfort, durability, and cost.
Polycarbonate: The Workhorse
The most common rigid material in wrist guards across all price ranges. Polycarbonate is a thermoplastic polymer that’s lightweight, impact-resistant, and relatively inexpensive to manufacture. It deforms slightly during impact (absorbing energy through plastic deformation) without shattering like cheaper plastics.
Pros: Lightweight, durable, good energy absorption per dollar, widely available
Cons: Can become brittle in extreme cold (below -20°F), may permanently deform after major impact requiring replacement
Lifespan: 2-3 seasons with regular use; replace after any significant impact
Reinforced Nylon: The Flexible Alternative
Many “flexible” guards use glass-fiber-reinforced nylon rather than rigid polycarbonate. This material provides structural support while allowing significantly more movement than hard plastic, making it popular with park riders and those who prioritize comfort.
Pros: More flexible and comfortable, lighter weight, better range of motion, doesn’t become brittle in cold
Cons: Lower peak impact protection than rigid materials, may flex too much under extreme force
Lifespan: 2-4 seasons; more durable than polycarbonate due to flexibility
D3O: The Premium Protector
D3O represents the cutting edge of impact protection technology. Originally developed for military applications, this non-Newtonian material consists of intelligent molecules that flow freely during normal movement but lock together instantly upon impact, becoming rigid and absorbing enormous amounts of energy.
Pros: Exceptional protection-to-weight ratio, reusable after impact (no permanent deformation), temperature-stable, comfortable during normal use
Cons: Expensive (adds $20-40 to guard price), slightly heavier than foam alternatives, may degrade after 4-5 years of regular use
Lifespan: 3-5 seasons; molecular degradation occurs very slowly
EVA Foam: The Budget Cushion
EVA (ethylene-vinyl acetate) is the most common padding material in budget and mid-range guards. It provides basic cushioning and is extremely lightweight and inexpensive.
Pros: Extremely lightweight, inexpensive, comfortable, good initial cushioning
Cons: Compresses permanently over time (loses 30-50% effectiveness after one season), limited peak impact protection, not reusable after major impact
Lifespan: 1-2 seasons; foam degradation is the primary limiting factor
Neoprene: The Comfort Layer
Used for the body, straps, and sleeves of many guards. Neoprene provides compression, warmth, and a comfortable interface between your skin and the rigid protective components.
Pros: Comfortable against skin, flexible, provides warmth, excellent compression
Cons: Doesn’t breathe well (causes sweating), can cause skin irritation with prolonged use, degrades with UV exposure
Lifespan: 1-3 seasons; strap Velcro usually fails before the neoprene itself
Wrist Guard Care Products and Accessories
Proper care and maintenance can double the effective lifespan of your wrist guards. Here are the products and accessories worth investing in:
Cleaning Essentials
- Mild soap (Dawn or similar): Safe for all materials; mix with cool water for hand-washing fabric components
- Antibacterial spray: Prevents odor-causing bacteria buildup (especially critical for neoprene that absorbs sweat)
- Microfiber cloths: For wiping down plastic components without scratching
- Mesh laundry bags: Protect guards during machine washing (cold gentle cycle only)
- Isopropyl alcohol: For removing stubborn grime from plastic splints
Maintenance Accessories
- Replacement Velcro straps: Most brands sell replacements; Velcro is typically the first component to fail
- Velcro cleaner comb: Removes lint, hair, and debris that reduce strap grip strength
- Silicone spray (dry type): Keeps hinges and moving parts functioning smoothly without attracting dirt
- UV protectant spray: Prevents material degradation from sun exposure during spring and summer riding
Storage Solutions for Every Situation
During the season (daily storage):
- Store in a cool, dry place away from direct sunlight (car dashboards destroy gear)
- Keep straps fastened loosely to maintain their shape without stretching
- Separate from sharp objects that could scratch or puncture materials
- Hang to dry completely before storing—never put damp guards in your gear bag
Off-season storage (spring through fall):
- Clean thoroughly before storage—dried sweat and salt cause material degradation
- Ensure complete dryness to prevent mold, mildew, and bacterial growth
- Store in breathable cotton bag (not sealed plastic, which traps moisture)
- Keep away from extreme temperatures (garages and attics are poor choices)
- Inspect carefully before first use of new season—check for cracks, deformation, or strap weakness
Alternative Protection Methods: Beyond Traditional Wrist Guards
While dedicated wrist guards are the most effective protection, several alternative methods can supplement or complement them depending on your needs and preferences:
Padded Gloves as Supplementary Protection
Some snowboard gloves feature built-in padding on the palm and back of the hand. While not as protective as dedicated wrist guards, they provide a baseline level of protection without any additional gear.
Pros: No additional gear to manage, seamless integration with existing setup, always with you (you’ll never forget gloves)
Cons: Significantly less protection than dedicated guards, padding compresses and degrades over one season, no CE certification or testing
Best use: Supplement to wrist guards for advanced riders, or standalone for very experienced riders on soft snow days
Athletic Taping and Bracing
Athletic tape or pre-cut wrist braces (commonly used for carpal tunnel syndrome) can provide moderate support for riders recovering from previous injuries. These are not substitutes for wrist guards but can be used in conjunction with them for added stability.
Pros: Customizable tension and support level, inexpensive, widely available at pharmacies, easy to apply
Cons: Not impact-rated for snowboarding forces, can restrict circulation if applied too tightly, needs daily replacement (tape loses adhesion), requires skill to apply correctly
Best use: Supplemental support for riders with previous injuries, temporary solution while waiting for proper guards
Fall Technique Training: The Most Effective Protection
Learning proper falling technique is arguably the most effective form of injury prevention, because it addresses the root cause (the fall itself) rather than just the consequence (impact force).
Core falling techniques every rider should practice:
- The Tuck and Roll: Instead of extending arms, tuck them across your chest and roll across your shoulder and back
- The Forearm Slide: When falling forward, contact the snow with your forearms (protected by guards) rather than palms
- The Butt Check: For backward falls, drop your hips low and land on your padded backside
- The Knee Slide: For forward falls, drop to knees first and slide rather than impact
Resources for fall technique training:
- Snowboard school lessons (most beginner lessons include falling technique)
- Martial arts training (judo and aikido specialize in safe falling—called “ukemi”)
- Trampoline practice (develops body awareness and空中 awareness)
- YouTube tutorials (supplement to in-person instruction, not replacement)
- Gymnastics tumbling classes (builds core strength and fall awareness)
Physical Therapy and Injury Recovery: Getting Back on the Mountain Safely
If you do suffer a wrist injury despite wearing protection, proper rehabilitation is absolutely crucial for returning to snowboarding safely and confidently.
Most Common Wrist Injuries in Snowboarding
- Distal radius fracture (Colles’ fracture): The most common snowboarding wrist injury, accounting for approximately 30% of all snowboard fractures. The radius bone breaks near the wrist joint, often requiring a cast for 6-8 weeks.
- Scaphoid fracture: A break in the small bone at the base of the thumb, notoriously difficult to detect on initial X-rays. May not show up for 2-3 weeks after injury. Requires 6-12 weeks in a cast.
- Ligament sprains: Stretched or torn ligaments that connect the carpal bones. May require 2-6 weeks of bracing and physical therapy depending on severity.
- Triangular fibrocartilage complex (TFCC) tears: Damage to the cartilage cushion on the pinky side of the wrist. May require arthroscopic surgery and 3-6 months of rehabilitation.
- Hook of hamate fracture: A less common but serious injury from falling onto the handle of the board. Often requires surgical removal of the fractured bone fragment.
Recovery Timeline by Injury Severity
Minor sprains (Grade I): 2-4 weeks with RICE protocol (Rest, Ice, Compression, Elevation) and gentle range-of-motion exercises
Moderate sprains (Grade II): 4-6 weeks with wrist splinting, progressive physical therapy, and gradual return to activity
Simple fractures (non-displaced): 6-8 weeks in cast, followed by 4-6 weeks of rehabilitation with progressive strengthening
Displaced fractures (requiring reduction): 8-12 weeks total, including cast time and extensive rehabilitation
Surgical cases (ORIF – Open Reduction Internal Fixation): 3-6 months total recovery including surgery, immobilization, and comprehensive rehabilitation
Rehabilitation Exercise Progression
Phase 1 – Early Recovery (0-2 weeks post-injury/surgery):
- Finger range of motion: make a fist, spread fingers wide, touch each fingertip to thumb
- Gentle wrist flexion and extension within pain limits (pain should never exceed 3/10)
- Grip strengthening with soft therapy putty
- Shoulder and elbow mobility to prevent stiffness from disuse
Phase 2 – Progressive Loading (2-6 weeks):
- Resistance band exercises (theraband) in all directions
- Weight-bearing exercises (wall push-ups, table push-ups)
- Proprioception training (balance board, wobble board while protecting the healing wrist)
- Forearm strengthening with light dumbbells (1-3 lbs)
Phase 3 – Sport-Specific Return (6+ weeks):
- Snowboard-specific movements (carving simulation on a balance board)
- Plyometric exercises (clapping push-ups, medicine ball catches)
- Functional grip training (carrying grocery bags, opening jars)
- Return to snow with wrist guards for confidence and re-injury prevention
Important: When to Return to Snowboarding After Injury
Never return to snowboarding before being cleared by your doctor or physical therapist. Wrist injuries are notorious for slow healing and high re-injury rates. When you do receive clearance, start with easy, groomed runs and gradually increase difficulty over 2-3 sessions. Wear wrist guards for at least one full season after any significant wrist injury—your injured wrist is statistically 2-3 times more likely to be re-injured.
The History and Evolution of Wrist Guards in Snowboarding
Understanding the history of wrist guards helps appreciate how far protection technology has come and where it’s heading.
The Early Days (1980s)
The first wrist guards were crude adaptations from roller skating and skateboarding. They consisted of simple plastic splints held on with basic Velcro straps. While better than nothing, they were bulky, uncomfortable, often didn’t fit well under snowboard gloves, and provided inconsistent protection. Many early guards were made from the same cheap plastic used in toy manufacturing.
Medical Integration (1990s)
The turning point came when orthopedic surgeons began designing wrist guards specifically for snowboarding’s unique fall patterns. Dr. Dennis Drummond, an orthopedic surgeon who treated hundreds of snowboard wrist injuries, designed the first Flexmeter in 1994. This marked the beginning of “medical-grade” protection in snow sports and established the principle that wrist guards should be designed by medical professionals, not just gear manufacturers.
The Material Revolution (2000s)
Advanced materials like D3O (developed for UK Ministry of Defence applications), G-Force compounds, and other non-Newtonian materials entered the snowboard protection market. These materials allowed for dramatically better protection in smaller, lighter, more comfortable packages. Integrated solutions—guards built directly into gloves and mittens—also became popular during this period, solving the “two pieces of gear” problem.
Smart Protection Era (2010s-Present)
Modern wrist guards incorporate multiple material layers, ergonomic designs informed by biomechanical research, and even impact-sensing technology. Some high-end models now feature:
- Multi-density foam layers calibrated for different impact scenarios
- Ventilation channels and breathable membranes for all-day comfort
- Quick-release mechanisms for easy one-handed on/off
- Integration with other protective gear (elbow pads, back protectors) as unified systems
- Impact data logging that records force and location for injury analysis
- BioMex and similar systems that use anatomical positioning rather than rigid immobilization
Expert Insights: What Ski Patrol and Instructors Recommend
“I’ve broken both my wrists during my snowboarding career, and I can tell you with certainty that wrist guards would have prevented at least one of those injuries. I now wear the Demon Flexmeter Double Sided for every single session—no exceptions, no excuses. The peace of mind alone is worth the extra bulk in my gloves.”
“As an orthopedic surgeon who treats snowboard injuries every winter, I designed the Flexmeter to address the specific mechanisms of snowboard falls. The key innovation is preventing hyperextension while allowing normal functional movement. I believe CE Level 2 protection should be standard for all beginners—it would save the healthcare system millions annually.”
“I ride with the Level Fly Mitts because the BioMex system is completely invisible to me—it just works. I don’t think about my wrists when I’m dropping into 50-foot kickers, and that’s exactly how protective gear should function. Protection should enable confidence, not create anxiety.”
“As a ski patroller, I see wrist injuries every single day during peak season. The vast majority could have been prevented or significantly reduced with proper wrist guards. The riders who wear them almost never need evacuation for wrist injuries—it’s always the ones who ‘didn’t think they needed them.'”
Snow Condition-Specific Protection Guide
Different snow conditions create fundamentally different fall dynamics, impact forces, and injury risks. Adapting your protection to match conditions optimizes both safety and comfort:
Hardpack and Ice: Maximum Danger Zone
Risk level: Highest
Fall dynamics: Fast, sliding falls with minimal snow cushion; high impact forces; significant abrasion risk
Recommended protection setup:
- CE Level 2 wrist guards (Demon Flexmeter Double Sided)
- Full palm protection for ice slides
- Abrasion-resistant materials (reinforced nylon, leather)
- Consider full protective suite: helmet, elbow guards, shoulder pads, back protector
- Impact shorts for hip and tailbone protection
Packed Powder: Moderate Risk
Risk level: Moderate
Fall dynamics: Moderate speed with some natural cushion from snow; predictable fall patterns
Recommended protection setup:
- CE Level 1 wrist guards (Burton Impact) are sufficient for most riders
- Dorsal (back of hand) protection is usually adequate
- Breathable materials for comfort during longer sessions
- Standard helmet and goggles
Deep Powder: Low Risk, Hidden Hazards
Risk level: Low (but hidden obstacles create serious injury potential)
Fall dynamics: Long, cushioned falls through soft snow; risk primarily from hidden rocks, stumps, and tree wells
Recommended protection setup:
- Lightweight guards that prioritize warmth (Level Fly Mitts)
- Integrated solutions reduce the risk of forgetting protection during the excitement of powder days
- Waterproof materials are essential—wet powder soaks through non-waterproof gear quickly
- Consider avalanche safety equipment for backcountry powder riding
Slush and Wet Spring Snow: Low-Moderate Risk
Risk level: Low to moderate
Fall dynamics: Slow falls with good cushion; high moisture exposure; overheating risk
Recommended protection setup:
- Breathable guards to prevent overheating (Seirus Jam Master)
- Waterproof materials to stay dry in wet conditions
- Minimal bulk for comfort in warm temperatures
- Vented gloves to manage moisture buildup
Crud and Choppy Conditions: Moderate-High Risk
Risk level: Moderate to high
Fall dynamics: Unpredictable, often involving rotational forces as uneven snow grabs your board at unexpected angles
Recommended protection setup:
- Bilateral protection (double-sided guards) for rotational injuries
- Secure fit with minimal shift during variable, choppy terrain
- Durable materials that can withstand repeated impacts in a single session
- Full upper body protection recommended for aggressive riders
Man-Made Snow (Machine Groomed): Consistent Risk
Risk level: Moderate
Fall dynamics: Consistent, predictable surface with moderate cushion; typical resort conditions
Recommended protection setup:
- CE Level 1 protection is adequate for most riders on groomed terrain
- Burton Impact or similar low-profile guards work well
- Comfort becomes a priority for all-day resort riding
- Consider the temperature—machine snow is often harder than natural powder
Board Type Considerations: How Your Board Affects Protection Needs
Different types of snowboards produce different riding styles, speeds, and fall patterns—directly affecting your risk profile and protection requirements.
Freestyle and Park Boards
Shorter, softer, and more flexible boards designed for tricks, rails, and jumps. These boards are easier to control at slow speeds but can wash out unpredictably on hardpack. Freestyle riders fall frequently (often 10-30+ times per session) but usually at lower speeds.
Protection priorities: Comfort and dexterity (you need to grab your board), dorsal protection for backward falls from rails, and low profile so guards don’t interfere with binding straps.
Recommended guards: Burton Impact, Demon Single Sided, or Level Fly Mitts
All-Mountain Boards
Medium-length, medium-stiffness boards that handle everything from groomers to powder to park laps. All-mountain boards require versatile protection that works across a wide range of conditions and speeds.
Protection priorities: Versatility, warmth for variable conditions, and moderate protection level suitable for diverse terrain.
Recommended guards: Burton Impact, Dakine Wristguard Glove, or Demon Double Sided
Freeride and Carving Boards
Longer, stiffer boards designed for high-speed carving on groomers and big mountain freeride. These boards generate significantly higher speeds, meaning falls produce proportionally higher impact forces.
Protection priorities: Maximum impact protection (CE Level 2), abrasion resistance for high-speed slides, and full palm protection.
Recommended guards: Demon Flexmeter Double Sided, Hillbilly Wrist Guard Gloves
Powder Boards
Wider, often longer boards with setback stance designed for deep snow. Powder falls are usually cushioned by soft snow, but hidden obstacles (rocks, stumps) create serious injury potential. Warmth and waterproofing become primary concerns for long backcountry days.
Protection priorities: Warmth, waterproofing, and integrated solutions that don’t require fumbling with separate pieces.
Recommended guards: Level Fly Mitts, Dakine Wristguard Glove, Burton Impact
Understanding Grip and Board Feel While Wearing Wrist Guards
Many riders worry that wrist guards will diminish their ability to feel the board through their gloves and interfere with grabs. Here’s how to manage this concern effectively:
Board Feel: What Actually Changes
Palm-side protective plates do reduce direct tactile feedback from the board, but most riders adapt surprisingly quickly—typically within 3-5 runs. The brain is remarkably efficient at recalibrating sensory input through alternative pathways (pressure sensation, temperature changes, vibration through the guard itself).
Techniques to maximize board feel with guards:
- Choose single-sided (unilateral) guards that leave the palm free
- Select guards with flexible hinges rather than rigid splints
- Allow a full day of adaptation—don’t judge board feel in the first hour
- Practice on familiar terrain first while adjusting to the new sensation
- Consider glove liners with silicone grip patterns to enhance tactile feedback
Grip Enhancement: The Surprising Benefit
Riders who wear palm-plate guards often discover an unexpected advantage: enhanced grip during board grabs. The rigid palmar surface provides a consistent, stable platform that prevents the hand from sliding on the board’s edge. Many park riders report that their grabs feel more secure with guards than without.
Binding Strap Adjustment
Wrist guards can make it slightly more difficult to reach and adjust binding straps, especially with bulkier models. Practice strap adjustment at home before your first day on the mountain. Some riders develop a technique of using their teeth to hold strap ends while gloved hands tighten—crude but effective.
Wrist Guards and Complete Protective Gear Integration
Wrist guards work best as part of a comprehensive protection system. Here’s how they integrate with other essential snowboard safety equipment:
Helmet Compatibility
Wrist guards and helmets have no direct interaction, but both are essential elements of a complete safety system. Ensure both are properly fitted: helmets should sit level (not tilted back) with snug retention, and wrist guards should be snug without restricting circulation. Together, they protect the two most vulnerable areas in snowboarding falls.
Elbow Pad Coordination
Wrist guards and elbow pads are frequently paired, especially for park riders and beginners. The critical integration point is the gap between them: ensure your wrist guard’s lower edge doesn’t overlap with your elbow pad’s upper edge, which can create pressure points and reduce both guards’ effectiveness. Most riders find that a 1-2 inch gap between wrist guard and elbow pad provides optimal coverage without interference.
Back Protector and Impact Vest Integration
Back protectors and impact vests are typically worn under your jacket and don’t directly interact with wrist guards. However, the combined bulk of full protective gear can affect mobility. Test your complete protection setup at home—sit down, bend over, reach for your boots, and simulate a few falling motions to ensure everything works together.
Impact Shorts Coordination
Impact shorts protect your tailbone and hips during backward falls—another extremely common snowboarding injury site. Combined with wrist guards, they address the two most frequently injured areas in snowboarding. The total cost of both pieces of protection is typically under $100 and prevents the majority of season-ending injuries.
Debunking Common Myths About Wrist Guards
Many persistent myths about wrist guards prevent riders from protecting themselves. Let’s address each one with evidence:
Myth #1: “Wrist guards just move the break higher up the arm”
Reality: While theoretically possible, forearm fractures above the guard are statistically extremely rare. Multiple studies show that wrist guards reduce overall upper extremity injury risk by 50% without significantly increasing forearm fracture rates. When a radius break does occur above the guard, it’s typically a clean, simple fracture that heals well—far preferable to a complex, multi-bone wrist joint injury that may require surgery and months of rehabilitation.
Myth #2: “Only beginners need wrist guards”
Reality: Falls happen at every skill level. Professional snowboarders wear protection during training and competition. Many injuries occur when experienced riders are tired, riding unfamiliar terrain, or attempting new tricks. Statistics show that 30% of wrist injuries occur to intermediate and advanced riders.
Myth #3: “Wrist guards limit my ability to ride”
Reality: Modern wrist guard design prioritizes minimal interference with normal movement. Most riders adapt within a few runs. The confidence boost from wearing protection often improves performance more than the minor restriction reduces it. No professional coach has ever reported that wrist guards hindered a student’s development.
Myth #4: “All wrist guards are the same”
Reality: Wrist guards vary dramatically in materials, design philosophy, protection level, and intended use. A $15 foam pad and an $80 CE Level 2 guard with D3O technology provide fundamentally different levels of protection—like comparing a paper umbrella to a reinforced storm shelter.
Myth #5: “If I fall correctly, I don’t need wrist guards”
Reality: While proper falling technique significantly reduces injury risk, falls are often too fast and unpredictable for technique alone to prevent injury. Even trained martial artists break bones in falls. Guards provide critical backup protection when technique fails, when falls happen too quickly to react, or when unexpected obstacles appear.
Myth #6: “Wrist guards make you overconfident and ride more dangerously”
Reality: Studies show no increase in risk-taking behavior among riders wearing protection. If anything, the reduced fear of injury allows riders to focus more intently on technique and terrain assessment rather than anticipating pain. The net effect is typically safer, more controlled riding.
Online vs In-Store Shopping: Where to Buy Your Wrist Guards
Where you purchase your wrist guards affects your ability to verify fit, compare options, and return if needed. Here’s a comprehensive guide to both approaches:
In-Store Shopping Advantages
- Try before you buy—critical for verifying fit with your specific gloves
- Professional fitting advice from experienced staff
- Immediate availability—no waiting for shipping
- Easy returns and exchanges if sizing is wrong
- See, touch, and compare materials in person
- Support local businesses that sustain the riding community
Online Shopping Advantages
- Wider selection of brands, models, and sizes
- Often lower prices due to reduced overhead
- Access to thousands of customer reviews and ratings
- Convenient delivery to your door
- Easier price comparison across multiple retailers
- Availability of discontinued or hard-to-find models
The Hybrid Approach: Best of Both Worlds
For first-time buyers: Visit a specialty snowboard shop to try multiple options and get professionally fitted. Note the brands, sizes, and styles that work best, then purchase online if you find a better price.
For experienced buyers who know their size: Online shopping offers convenience and value. Ensure the retailer has a generous return policy (30+ days) in case of fit issues when trying with your actual gloves.
Hybrid method: Buy from retailers with both physical stores and online presence (like REI or Backcountry.com). Try in-store, order online, or buy online and return in-store if needed.
International Sizing Reference Guide
Wrist guard sizing can vary significantly between brands and regions. Use this comprehensive reference to find your correct size regardless of which brand you choose:
| Size | Wrist Circumference | US Sizing | EU Sizing | UK Sizing | Typical Age |
|---|---|---|---|---|---|
| XS (Kids) | 4.5″ – 5.0″ | XS | XS | XS | 4-8 years |
| S (Youth/Women’s) | 5.0″ – 6.0″ | S | S | S | 9-13 years / Small women |
| M (Unisex/Women’s) | 6.0″ – 7.0″ | M | M | M | Large women / Small men |
| L (Unisex/Men’s) | 7.0″ – 8.0″ | L | L | L | Average men |
| XL (Men’s) | 8.0″ – 9.0″ | XL | XL | XL | Large men |
| XXL (Men’s) | 9.0″ – 10.0″ | XXL | XXL | XXL | Extra-large men |
How to measure accurately:
- Use a flexible fabric tape measure (not a rigid metal one)
- Measure around the narrowest part of your wrist, just below the wrist bone (ulnar styloid)
- Keep the tape snug but not tight—you should be able to slide a finger underneath
- Measure both wrists—some people have noticeably different sizes between dominant and non-dominant hands
- If you fall exactly between sizes, always size UP for comfort and to accommodate glove lining
- Measure in the afternoon when hands are at their largest (hands swell during the day)
Warranty, Returns, and Consumer Protection
Understanding warranty coverage and return policies can save you significant money and ensure you get the protection you paid for.
Standard Manufacturer Warranty
Most reputable wrist guard brands offer 1-2 year warranties against manufacturing defects. This typically covers:
- Material defects in rigid components (splints, hinges)
- Stitching failures under normal use conditions
- Hardware malfunctions (buckles, straps, Velcro failure within first season)
- Adhesive failures in bonded components
What warranties typically do NOT cover:
- Normal wear and tear (Velcro wearing out after heavy use)
- Damage from actual impacts (this is exactly what the guard is designed for)
- Improper care or storage (UV damage, heat warping, mold)
- Modifications or alterations to the original product
- Using the product outside its intended purpose
Return Policy Best Practices
Most retailers offer 30-60 day returns for unworn items with original tags attached. Key considerations:
- Keep original packaging for easier returns and potential warranty claims
- Try on guards with your actual riding gloves before removing tags
- Check whether returns are free or require you to pay shipping costs
- Note any restocking fees (typically 10-15% at some retailers)
- Document any defects with photos before returning
- For online purchases, start the return process early if the item doesn’t fit—shipping takes time
Environmental Considerations and Sustainable Choices
As environmental awareness grows among outdoor enthusiasts, many riders consider the sustainability footprint of their protective gear.
Eco-Friendly Materials Emerging in the Market
Forward-thinking brands are incorporating sustainable materials into wrist guard construction:
- Recycled polycarbonate and nylon in rigid protective components
- Organic cotton or recycled polyester in fabric straps and sleeves
- Soy-based or water-based adhesives replacing chemical solvents
- Recycled cardboard and reduced plastic in packaging
- Bio-based foams derived from renewable plant sources
Longevity as the Ultimate Sustainability
The most environmentally responsible wrist guard is one that lasts for many seasons of use. Investing in quality protection reduces waste, requires fewer replacements, and provides better value over time. A $80 guard that lasts 4 seasons is more sustainable than four $20 guards that each last one season.
End-of-Life Disposal and Recycling
When wrist guards finally reach end of life:
- Rigid polycarbonate components may be recyclable through specialized plastic recycling programs
- Fabric and neoprene components are typically not recyclable through standard programs
- Consider repurposing old guards as practice gear for learning or as loaners for friends trying snowboarding
- Some brands (like Burton) offer gear take-back and recycling programs
- Check local recycling guidelines—some municipalities accept mixed-material items
The Psychology of Wearing Protection
Wearing wrist guards affects your mental state and riding performance in ways that go beyond simple physical protection. Understanding these psychological effects can help you make better decisions about gear.
Confidence and Performance Enhancement
Research in sports psychology consistently shows that athletes wearing protective equipment exhibit:
- Lower anxiety levels when attempting new or challenging maneuvers
- Greater willingness to push skill boundaries and try new techniques
- Better focus on technique and terrain rather than anticipating pain
- Faster skill acquisition in beginners (learning accelerates when fear is reduced)
- More positive overall experience, leading to increased participation frequency
Overcoming Social Resistance to Protection
Many riders resist wearing protection due to psychological and social factors:
- Peer pressure: The outdated “real riders don’t need protection” mentality persists in some communities
- Comfort concerns: Fear of restricted movement or reduced performance
- Aesthetic preferences: Not wanting to look like a beginner or appear overly cautious
- Invincibility bias: “It won’t happen to me” thinking, especially common in young riders
How to overcome resistance:
- Focus on performance benefits (confidence, skill progression) rather than fear of injury
- Try multiple brands and styles until you find options that are genuinely comfortable
- Remember that Olympic and professional riders wear protection—there is zero shame in it
- Start with less visible options (thin under-glove guards) and upgrade as your confidence grows
- Talk to riders who have been injured—stories of broken wrists are powerful motivators
Seasonal Buying Strategy: When to Get the Best Deals
Timing your purchase strategically can save you 30-60% while still ensuring you get the right protection for your needs.
Off-Season (April through September)
Pros: Deepest discounts (40-60% off), full size selection, no urgency pressure
Cons: Can’t test in actual riding conditions, may be buying last year’s model
Best for: Experienced riders who know their size and brand preferences, budget-conscious shoppers
Pre-Season (October through November)
Pros: Full selection of new models, current-season technology, can test before peak season begins
Cons: Prices at full MSRP, popular sizes may sell out early, holiday demand inflates some prices
Best for: First-time buyers, those needing new sizes due to growth or weight changes
Peak Season (December through February)
Pros: Can test gear in real conditions, immediate availability, local shop support
Cons: Highest prices, limited selection (popular sizes sold out), time pressure leads to impulse decisions
Best for: Emergency replacements (old guards broke), gift purchases with immediate use planned
End-of-Season Clearance (March through April)
Pros: Significant clearance discounts (30-50% off), shops eager to move inventory
Cons: Limited sizes remaining, next season’s models arriving soon, may not get exactly what you want
Best for: Budget-conscious riders, backup pairs, stocking up for next season
Building Your Complete Snowboard Safety Kit
Wrist guards are the foundation of snowboard safety, but a complete protection system addresses multiple injury risks simultaneously. Here’s how to build your kit progressively:
Essential (Non-Negotiable for Every Rider)
- Helmet: Protects against traumatic brain injuries—never ride without one, period
- Wrist guards: Reduces the most common snowboarding fracture risk by 50%
- Goggles: Protects eyes from UV radiation, wind, snow, and debris while improving visibility
Total cost for essentials: $100-200 depending on quality level
Highly Recommended (For Regular Riders)
- Impact shorts: Protects tailbone and hips during backward falls—the second most common injury site
- Knee pads: Essential for park riding, increasingly recommended for all disciplines
- Waterproof outerwear: Staying dry and warm prevents fatigue-related injuries
Additional cost: $80-150 for quality impact shorts and knee pads
Advanced Protection (For Aggressive and High-Speed Riders)
- Back protector: Critical for high-speed carving, big mountain riding, and park progression
- Elbow guards: Important for park riders and aggressive carvers who push limits
- Chest protector or impact vest: For those hitting the biggest features and riding at highest speeds
- Spine protector: Integrated into some impact vests, protects against catastrophic back injuries
Additional cost: $100-300 for comprehensive upper body protection
For approximately $200-300, you can protect yourself against the injuries that cause 90% of snowboarder ER visits. Compare this to a single ER visit ($500-1,500 with insurance) or a wrist surgery ($5,000+). Protection isn’t an expense—it’s the smartest investment in your snowboarding future.
Final Verdict and Recommendations
After thousands of words analyzing every aspect of wrist guard technology, materials, fit, and function, the conclusion is clear: wrist guards are the single most cost-effective piece of safety equipment in snowboarding. They address the most common injury (wrist fractures account for 40% of all snowboard injuries) with proven effectiveness (50% risk reduction) at a remarkably low cost (often under $1 per riding day).
Whether you choose the stealth approach of the Burton Impact, the fortress-like protection of the Demon Flexmeter, or the seamless integration of the Level Fly Mitts, the most important decision is simple: wear them every time you ride.
Beginners: Demon Flexmeter Double Sided (CE Level 2 maximum protection builds confidence)
Intermediate All-Mountain: Burton Impact (versatile, comfortable, fits under any glove)
Park and Freestyle: Demon Flexmeter Single Sided (dorsal protection with full palm freedom)
Carving and Speed: Demon Flexmeter Double Sided with Hillbilly Gloves (maximum coverage for high impacts)
Backcountry and Powder: Level Fly Mitts with BioMex (integrated warmth and protection)
Budget Conscious: Triple Eight Undercover (legitimate protection under $30)
Women’s Specific: Dakine Wristguard Glove Women’s (narrower fit, proper proportions)
Kids and Youth: Dakine Wristguard Glove Youth (integrated, easy compliance)
Your wrists are precious—they carry your coffee, type your messages, and most importantly, help you balance on a piece of wood hurtling down a frozen mountain. Protect them with the right wrist guards, learn to fall properly, and you’ll enjoy countless seasons of safe, confident snowboarding.
So gear up, check your board wax, and go shred with confidence knowing your wrists are protected from the inevitable FOOSH. The mountain is waiting—ride safe, ride smart, and most importantly, have fun out there.
Best Overall: Burton Impact (versatile, affordable, effective)
Best Maximum Protection: Demon Flexmeter Double Sided (CE Level 2, medical-grade)
Best Integrated: Level Fly Mitts with BioMex (seamless, warm, protective)
Best Budget: Triple Eight Undercover (under $30, effective basic protection)
Best for Park: Demon Flexmeter Single Sided (dorsal protection with palm freedom)
Best for Women: Dakine Wristguard Glove Women’s (narrower fit, proper proportions)
Best for Kids: Dakine Wristguard Glove Youth (integrated, easy compliance)
Last updated: February 2026 | Prices and availability subject to change
Disclaimer: This guide is for informational purposes only. Always consult with medical professionals regarding injuries and follow manufacturer instructions for proper use of protective equipment. Individual results may vary based on riding style, conditions, and proper equipment fit.


