
Snowboard Boot Size Chart: How to Get the Right Fit the First Time
Mondopoint, US, EU and UK conversions, foot-shape troubleshooting, binding clearance and the fit mistakes that ruin your day on the hill — all in one reference you can actually use in a shop.
If you buy one thing for snowboarding with your head instead of your eyes, buy your boots. A board can be a little too long and still be fun. Bindings can be swapped. But boots that don’t fit will quietly wreck every run you take — and the fix is almost never “just lace them tighter.” Getting the fit right starts with understanding what a snowboard boot size chart is actually telling you, and where it stops being useful.
Here’s the uncomfortable truth that most sizing pages bury at the bottom: a size chart is a starting point, not an answer. Boot sizing is measured in Mondopoint, which is simply the length of your foot in centimetres. Everything else on the box — US, EU, UK — is a converted convenience label, and those conversions drift between brands, between men’s and women’s lines, and between model years of the same boot. Two people with identical feet can walk out of a shop with different sizes and both be right.
So this guide does two jobs at once. It gives you the full conversion chart you came for, and it teaches you how to read past it: how to measure your foot properly, what the numbers mean for your bindings and board, how foot shape changes the equation, and how a boot is supposed to feel in the first thirty seconds versus the first thirty days. If you’re brand new to the sport, it’s worth pairing this with our complete snowboard boots guide, which walks through flex ratings, lacing systems and construction. If you already know all that and just want the numbers, jump straight to the chart.
Shopping for Boots Right Now?
Browse current snowboard boot models across sizes and widths.
Check Snowboard Boots on AmazonSection 01
The Snowboard Boot Size Chart You Came For
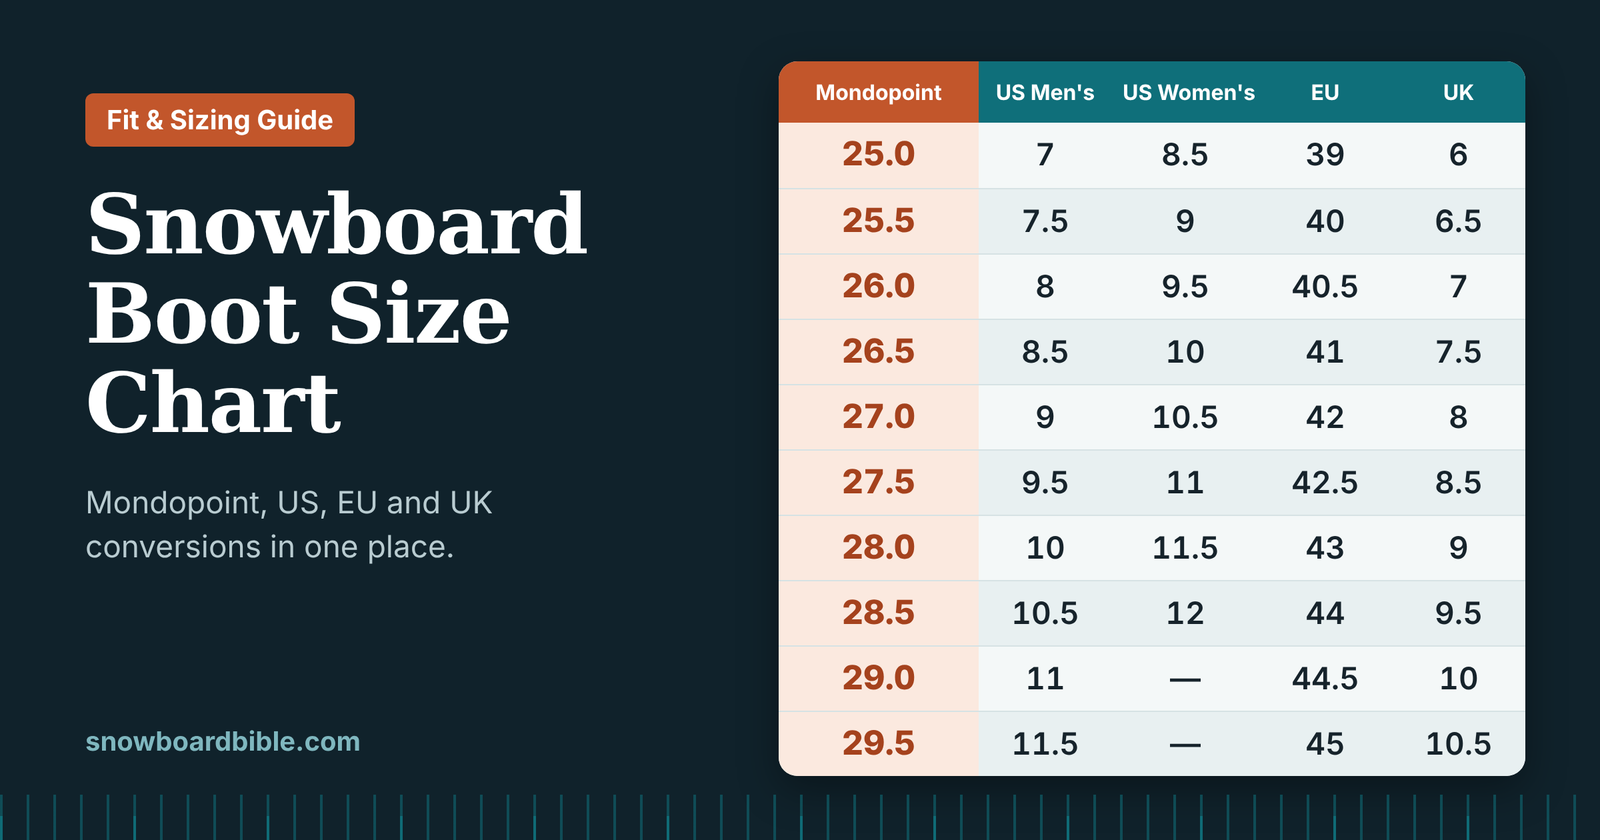
Let’s start with the numbers. The table below converts foot length in centimetres — which is what Mondopoint actually is — into the sizing labels you’ll see on boxes and product pages. Every value here is approximate, because no universal chart accounts for brand-specific lasts, but it will put you within a half size of the truth for the vast majority of riders.
| Mondopoint | Foot Length (cm) | US Men’s | US Women’s | EU | UK |
|---|---|---|---|---|---|
| 22.0 | 22.0 | 4 | 5.5 | 35.5 | 3 |
| 22.5 | 22.5 | 4.5 | 6 | 36 | 3.5 |
| 23.0 | 23.0 | 5 | 6.5 | 36.5 | 4 |
| 23.5 | 23.5 | 5.5 | 7 | 37.5 | 4.5 |
| 24.0 | 24.0 | 6 | 7.5 | 38 | 5 |
| 24.5 | 24.5 | 6.5 | 8 | 38.5 | 5.5 |
| 25.0 | 25.0 | 7 | 8.5 | 39 | 6 |
| 25.5 | 25.5 | 7.5 | 9 | 40 | 6.5 |
| 26.0 | 26.0 | 8 | 9.5 | 40.5 | 7 |
| 26.5 | 26.5 | 8.5 | 10 | 41 | 7.5 |
| 27.0 | 27.0 | 9 | 10.5 | 42 | 8 |
| 27.5 | 27.5 | 9.5 | 11 | 42.5 | 8.5 |
| 28.0 | 28.0 | 10 | 11.5 | 43 | 9 |
| 28.5 | 28.5 | 10.5 | 12 | 44 | 9.5 |
| 29.0 | 29.0 | 11 | — | 44.5 | 10 |
| 29.5 | 29.5 | 11.5 | — | 45 | 10.5 |
| 30.0 | 30.0 | 12 | — | 45.5 | 11 |
| 30.5 | 30.5 | 12.5 | — | 46 | 11.5 |
| 31.0 | 31.0 | 13 | — | 47 | 12 |
| 31.5 | 31.5 | 13.5 | — | 47.5 | 12.5 |
| 32.0 | 32.0 | 14 | — | 48 | 13 |
Youth and kids’ boots follow their own scale, and the crossover point matters more than people expect. A child with a 22 cm foot technically fits both a large kids’ boot and a small adult boot — and the right choice depends on weight, strength and how aggressively they ride, not just length. Here’s the youth side of the chart:
| Mondopoint | Foot Length (cm) | US Kids’ | EU | UK |
|---|---|---|---|---|
| 17.0 | 17.0 | 7K–8K | 24–25 | 6–7 |
| 18.0 | 18.0 | 9K–10K | 26–27 | 8–9 |
| 19.0 | 19.0 | 11K–12K | 29–30 | 10–11 |
| 20.0 | 20.0 | 13K–1 | 31–32 | 12–13 |
| 21.0 | 21.0 | 2–3 | 33–34 | 1–2 |
| 22.0 | 22.0 | 4–5 | 35–36 | 3–4 |
How to use this chart without getting burned
Measure your foot, find the closest Mondopoint row, and treat the US/EU/UK columns as cross-references rather than gospel. If your measurement lands between two rows, that’s the single most common scenario and the one where people make their worst decisions. We’ll cover the between-sizes problem in detail later, but the short version is this: snug is right, crushed is wrong, and “it’ll break in” is only true for volume, never for length.
Ready to Compare Boots in Your Size?
Filter by size, width and flex on Amazon.
Shop Snowboard Boots on AmazonSection 02
Why Snowboard Boot Sizing Isn’t Like Shoe Sizing
The single biggest sizing error in snowboarding is buying boots the way you buy trainers. It feels logical — you know your shoe size, so you order it. But a snowboard boot and a sneaker are solving completely different problems. A sneaker is designed for walking comfort, with a soft upper, a flexible sole and room for your foot to slide and roll through each step. A snowboard boot is a control device. It has to translate tiny movements of your foot and ankle into edge pressure, hold your heel down through turns, and stay comfortable while doing it for six hours in the cold.
That difference changes everything. In a shoe, a little extra room feels forgiving. In a snowboard boot, extra room becomes a lag between your intent and your board. When you tip your knee to engage a heel-side turn, a boot with dead space has to take up that space before anything happens. Multiply that by a few millimetres across a day of riding and you end up working harder, riding sloppier, and finishing with sore calves and aching feet.
Snug is not the same as tight
New riders hear “snug fit” and picture pain. That’s not what anyone means. A properly fitted boot feels like a firm handshake around your whole foot: even pressure, no isolated hot spots, no pinching across the top, and no ability to lift your heel when you pull up on the tongue. Your toes should contact the front when you stand tall, then retract a little when you bend your knees into a riding position. That’s the gold standard, and it’s the same standard a bootfitter uses.
The reason this matters is that snowboard boots pack out — the foam liner compresses over the first dozen or so days of use and the fit loosens. A boot that felt “perfectly roomy” on day one can feel sloppy by day fifteen. A boot that felt snug-but-not-painful on day one generally lands in the right place after break-in. This is why experienced riders almost universally size for a slightly tighter new-boot feel and let the liner do the rest.
Volume, width and length are three separate problems
A size chart only addresses length. But most fit complaints have nothing to do with length. Width is how much room there is across the ball of the foot and the heel. Volume is the total three-dimensional space inside the boot — a high instep or a thick foot needs more volume even if the foot is narrow. Length is simply foot length, and it’s the easiest thing to get right.
- Length wrong, width right — toes slam the front on descents, or float in space. Fix: change size.
- Width wrong, length right — pinching across the ball of the foot or a “cramped” feeling within minutes. Fix: a wider last or a different model.
- Volume wrong, both others fine — pressure on the instep, lace bite, or a heel that won’t stay put. Fix: a higher-volume boot, a thinner liner, or a custom footbed.
This is why a rider with wide feet can follow the chart perfectly and still end up in agony. For that situation specifically, we put together a dedicated guide to the best snowboard boots for wide feet, and it’s worth reading before you commit to a purchase.
Find Boots Built for Your Foot Shape
Search wide, mid and low-volume options in one place.
Check Price on AmazonSection 03
How to Measure Your Feet Properly at Home
You can get a genuinely accurate measurement at home with a piece of paper, a wall and a pencil. The trick is doing it at the right time of day and in the right posture, because both change your foot length noticeably. Feet swell over the course of a day — they’re smallest first thing in the morning and largest in the late afternoon, which is exactly when you’ll be finishing a session on the hill. Measure in the afternoon or evening, wearing the socks you actually ride in.
The step-by-step measurement
- Tape a sheet of paper to the floor and stand on it with your heel touching a wall. Wear your riding socks — a thin liner sock and a thick mid-weight sock give different results, and you want the number that matches what you’ll ride in.
- Keep your weight evenly distributed on both feet. Don’t lean forward, don’t stand on one leg, and don’t press down on the pencil with your other hand. Simply stand naturally.
- Mark the tip of your longest toe — that’s not always the big toe. For plenty of people it’s the second toe, and if you measure to the wrong one you’ll come up short.
- Measure from the wall to the mark in centimetres. That number is your Mondopoint. Round to the nearest half centimetre, never down.
- Repeat for the other foot. Almost everyone has one foot slightly larger, sometimes by half a size or more. Always size to the larger foot.
Two more measurements help enormously if you’re shopping online. First, measure the width across the widest part of the ball of your foot — this tells you whether a standard last will work or whether you need a wide-fitting model. Second, note whether a shoe tongue sits high on your instep and leaves a mark, which indicates high volume. Together, those three data points — length, width, instep volume — give you a far better picture than any size chart can.
Why afternoon measurements fit better
It sounds fussy, but it’s real physiology. Feet hold more fluid later in the day, ligaments relax slightly, and the arch flattens a touch under load. If you size a boot against a cold, first-thing-in-the-morning foot, you’re optimising for the one time of day you will never be riding. This same logic applies to socks: measure in the pair you’ll wear on the hill, and if you switch between sock weights seasonally, measure in the thicker pair.
Need Better Socks Before You Measure?
Snowboard-specific socks change fit more than you’d think.
Shop Snowboard Socks on AmazonSection 04
Mondopoint Explained: The Only Number That Matters
Mondopoint is beautifully simple: it is the length of your foot in centimetres. A size 27 boot is built for a 27 cm foot. There is no rounding convention, no regional quirk, no historical accident — unlike every other sizing system on the box. It was designed for exactly this kind of technical equipment, where precision beats tradition.
Compare that to the systems it replaces. The US and UK scales descend from an old barleycorn unit and have been adjusted, standardised and re-adjusted so many times that they no longer describe anything physical. The EU scale is based on a “Paris point” of two-thirds of a centimetre, and even within it, manufacturers leave differing amounts of toe room — which is why an EU 43 in one brand can feel half a size bigger than an EU 43 in another. When a boot box says EU 43, it’s telling you which last the manufacturer built around. When it says Mondopoint 27.0, it’s telling you the length of the foot it was designed for.
Why conversions drift
Because Mondopoint is the physical measurement and everything else is a label applied afterwards, brands can and do shift their conversion tables. One brand’s 27.0 might be labelled US 9, another US 9.5. Neither is lying; they’re choosing different amounts of nominal toe room in the label. The practical consequence is that you should size in Mondopoint and cross-check the others, never the reverse.
| Sizing System | What It Actually Measures | Consistency Across Brands | How to Use It |
|---|---|---|---|
| Mondopoint | Foot length in centimetres | High — the reference standard | Primary number; size to this |
| US Men’s | Converted label with assumed toe room | Moderate — brand dependent | Cross-check only |
| US Women’s | Same scale offset, built on a women’s last | Moderate | Use with women’s-specific models |
| EU | Paris points, last-dependent | Lower — toe room varies | Cross-check only |
| UK | Barleycorn-based, narrower assumed fit | Moderate | Cross-check only |
Half sizes and the five-millimetre problem
Mondopoint is normally offered in 5 mm increments — 26.0, 26.5, 27.0. That half size is roughly a fifth of an inch, and it’s meaningful. Too many riders treat it as rounding error and buy the size up “to be safe.” But a 5 mm length increase also changes the boot’s internal volume, its heel pocket geometry and where the instep pressure falls. If your foot measures 26.6 cm, a 26.5 boot with a heat-moldable liner is almost always the better answer than a 27.0 that will never grip your heel.
The only time you should size up is if your foot measures closer to the upper size and you have high volume or a wide forefoot. In that case, the larger size solves a volume problem, not a length problem. If that’s you, our roundup of the best snowboard boots flags which models run roomy and which run narrow.
Shop by Mondopoint Size
Look for the centimetre number on the box, then compare models.
Check Price on AmazonSection 05
Men’s, Women’s and Youth Boots: What Actually Changes
It’s tempting to think of men’s and women’s boots as the same product in different colours. They aren’t. Women’s-specific boots are built on a genuinely different last, and that last reflects real anatomical averages: a narrower heel relative to the forefoot, a lower calf muscle insertion, a shorter foot for a given height, and generally lower body mass for a given foot length. Youth boots change again, prioritising low weight, easy entry and softer flex over outright performance.
| Attribute | Men’s Boots | Women’s Boots | Youth / Kids’ Boots |
|---|---|---|---|
| Last shape | Wider forefoot, higher-volume heel pocket | Narrower heel, lower cuff, shaped for a shorter Achilles | Simple, roomy, easy to slide into |
| Cuff height | Taller, built for longer lower legs | Lower to avoid calf pinch and pressure points | Short and soft for developing legs |
| Flex | Broad range, soft through stiff | Generally softer for a given rating | Very soft so light riders can drive the boot |
| Sizing scale | US Men’s / Mondopoint | US Women’s / Mondopoint, roughly 1.5 sizes offset | Kids’ scale, some overlap with small adult |
| Best suited to | Riders with wider, higher-volume feet | Narrower heels, lower calves, lighter riders | Lightweight riders still building strength |
Can a woman wear a men’s boot, or vice versa?
Absolutely — if the shape fits. If you’re a woman with wide, high-volume feet and men’s boots consistently feel better, that’s not unusual, and you should follow comfort rather than the label. Just be aware of the compensation: men’s boots usually have a stiffer flex for a given rating and a taller cuff, which can feel unwieldy for a lighter rider. Pairing a men’s boot with a women’s-specific binding is also worth checking, since the mounting and strap geometry are designed around different boot shapes.
Conversely, a man with narrow feet and slim ankles often gets a far better hold from a women’s model. The label is marketing; the last is engineering. If you’re going down that road, it helps to read up on the differences in women’s snowboarding gear and to look at women’s-specific bindings so the whole system works together.
When to move a child into adult boots
Foot length alone shouldn’t decide it. An adult boot is heavier, stiffer and harder to get on and off, and a light child simply may not have the leg strength to flex it — which produces a locked, upright stance and slower progression. The better trigger is body weight and confidence: once a young rider is heavy enough to load a stiffer boot and is linking turns with intent, an adult soft-flexing boot becomes a sensible step. If you’re weighing the timing, our guide to the best age to teach a child to snowboard covers the wider progression picture.
Section 06
Why Different Brands Fit Differently
Every boot brand builds around its own last — the foot-shaped form the boot is constructed on — and those lasts vary enough that the same Mondopoint number can feel like a different boot entirely. This is the part of sizing that no chart captures, and it’s why “just order your size” is such unreliable advice.
Rather than pretend there’s a universal truth here, the honest way to present this is as general tendencies that you should verify by trying things on. Fit character changes between models within a brand too: a brand’s freestyle boot and its stiff freeride boot can share a size label and fit completely differently.
| Fit Tendency | Who It Usually Suits | What to Watch For |
|---|---|---|
| Runs true to Mondopoint | Most riders; straightforward, medium-width feet | Still verify with your sock thickness — it shifts the fit by several millimetres |
| Runs snug / low volume | Narrow feet, slim ankles, riders who want precise response | Instep pressure early on; can be relieved with heat molding or a thinner insole |
| Runs roomy / high volume | Wide feet, high insteps, riders who value all-day comfort | Heel lift once the liner packs out; consider a volume-reducing footbed |
| Runs narrow in the heel | Riders who struggle with heel lift elsewhere | Good hold, but check for Achilles pressure at the back of the cuff |
| Runs short | Riders between sizes who want a race-style fit | Toes may stay in contact even in a riding stance — that’s intentional for some designs |
Brand-specific sizing questions we get asked constantly
Certain brands attract sizing questions more than others, usually because their fit is distinctive enough that people want reassurance before ordering. Vans boots are a classic example — their fit draws on footwear heritage and often feels different from a traditional snowboard brand, so we wrote a detailed breakdown of whether Vans snowboard boots run true to size. K2 is another frequent one, with a broad range that spans several fit philosophies; our K2 snowboard boots review covers how the different models sit on the foot.
The universal advice is boring but true: if you can try before you buy, do. If you can’t, buy from somewhere with a good returns policy, keep the tags on, and walk around the house in them on carpet for a solid half hour before committing. Thirty seconds in a shop tells you very little; thirty minutes tells you almost everything.
Explore Boots Across Brands
Compare fit profiles side by side before you order.
Check Price on AmazonSection 07
Your Boot Size Decides Your Bindings and Board Width
Boot sizing doesn’t happen in isolation. The size of your boot determines the size of your binding, which in turn constrains which board widths will work without your boot dragging in the snow during a turn. This is called boot out, and it’s the reason a rider with size 13 boots can’t just buy any board they like the look of.
Board width and boot size
The general relationship is straightforward: the longer your foot, the wider the board needs to be so the boot overhangs less at the heel and toe. Here’s a rough guide to waist width by boot size, assuming an average stance angle.
| US Men’s Boot Size | Suggested Board Width | US Women’s Boot Size | Suggested Board Width |
|---|---|---|---|
| Under 8 | Narrow | Under 7 | Narrow |
| 8 to 10.5 | Regular / mid | 7 to 9.5 | Regular / mid |
| 11 and above | Wide | 10 and above | Wide |
That’s the coarse version. The finer version involves your stance angles — a more angled stance points the toe and heel along the edge rather than across it, which buys clearance and lets you get away with a slightly narrower board. Riders with a duck stance on a narrow board are the most likely to boot out on deep carves. If you’re tuning stance width and angles, our snowboard stance setup guide walks through the geometry, and regular versus goofy stance covers the direction question that feeds into it.
Bindings: matching the size band
Bindings are sold in size bands — small, medium, large, and sometimes extra-large — and each band corresponds to a boot size range printed on the binding. The correct binding is the one whose range contains your boot size with room to spare for adjustment. Two things go wrong here routinely: people buy a binding one size too large “for growth” and lose strap contact, or they buy exactly at the top of a range and run out of adjustment when the boot is slightly different in shape.
- Aim for the middle of the range if you can. It leaves room for different boot models and for strap wear over time.
- Check the strap travel before riding. The ankle strap should centre over the boot’s instep, not pull toward the toe or heel.
- Highbacks and heelcups should sit flush against the boot’s heel. A floating heelcup is a heel-lift generator.
- Re-check after pack-out. A boot that loosens over the first weeks may need a strap adjustment.
If you’re still choosing bindings, our snowboard bindings guide covers the categories and what they’re for. Riders on a tighter budget should look at the best budget snowboard bindings, and anyone deciding between two popular mid-range options can read our Mission versus Cartel comparison or the Union Force versus Atlas breakdown. If you’re curious about stepping in rather than strapping in, see how two-step-in systems compare.
Board choice beyond width
Once width is sorted, the rest of board selection follows your riding, not your feet. If you’re early in the process, our guide to choosing your first snowboard and the general snowboard sizing guide will save you a lot of second-guessing. Riders comparing shapes should look at directional versus twin boards, the meaning of a directional twin, and the classic camber versus rocker question. And if you want a broader view of how boards stack up, there’s a full snowboard comparison hub waiting.
Building a Full Setup?
Match your boot size to compatible bindings.
Shop Snowboard Bindings on AmazonSection 08
Wide Feet, Narrow Feet, High Insteps and Other Shape Problems
Here’s the situation: you’ve measured correctly, you’ve ordered the right Mondopoint, and the boot still doesn’t fit. That almost always means you’ve hit a shape mismatch rather than a size mismatch, and shape problems need shape solutions. Sizing up is the wrong fix — it trades one problem for a worse one.
| Problem | What It Feels Like | The Right Fix |
|---|---|---|
| Wide forefoot | Pinching across the ball of the foot within minutes | A wide-fitting last, or heat molding the shell at the fifth metatarsal |
| Narrow foot / small heel | Heel lifts on every toeside turn | A narrower last, a volume-reducing footbed, or a J-bar style heel wrap |
| High instep | Pressure or lace bite across the top of the foot | Higher-volume boot, thinner insole, or a staggered lacing pattern that relieves the mid-zone |
| Low arch / flat foot | Foot collapses and tires; ache along the arch | Supportive aftermarket footbed — often the single biggest comfort upgrade |
| Bunion or prominent joint | Sharp localised pain at the side of the forefoot | Shell punching at that spot; avoid simply going bigger |
| Long toes / Morton’s toe | Second toe slams the front on long descents | Correct sizing to the longest toe, plus a footbed that holds the heel back |
Heat molding is your friend
Most modern snowboard boot liners are heat-moldable, and many shells can be stretched or punched at specific points. Heat molding doesn’t change the shell — it shapes the liner foam to your foot, filling voids and relieving pressure. It’s included with most boot purchases at proper shops and is well worth the twenty minutes it takes. Expect the boot to feel slightly snugger immediately afterwards as the foam conforms, then settle.
Shell work — punching out a bunion spot or stretching a narrow forefoot — is more specialised but very effective. A good bootfitter can often solve in ten minutes a problem that would otherwise cost you a whole season of discomfort. If your main issue is heel movement specifically, we wrote an entire guide on how to stop heel lift in snowboard boots.
Foot pain is a signal, not a rite of passage
“My feet hurt” is treated as normal in snowboarding, and some fatigue is unavoidable — you’re standing on a moving edge for hours. But sharp, localised or persistent pain is telling you something specific. Ignoring it can lead to real problems, including plantar fascia strain from snowboarding, which can linger long after the season ends. A supportive footbed and a correct fit are far cheaper than a physiotherapy bill.
Sizing for shape (correct approach)
- Keeps length accurate and heel locked
- Fixes the actual source of the pain
- Maintains board feel and response
- Works long-term as the liner packs out
Sizing up for comfort (wrong approach)
- Adds length you don’t need
- Creates heel lift and toe drag risk
- Feels worse after the liner packs out
- Forces a larger binding and possibly a wider board
Fix Fit With the Right Footbed
Supportive insoles solve more problems than sizing up ever will.
Shop Boot Insoles on AmazonSection 09
Half Sizes, Socks, Insoles and How Liners Pack Out
A snowboard boot is not a static object. The fit you feel on day one is not the fit you’ll have on day twenty, and the difference is almost entirely down to the liner. Understanding how that changes over time is the difference between a boot that feels right all season and one that’s perfect for a week then falls apart.
What pack-out actually means
Inside every boot is a foam liner, and foam compresses under repeated load and body heat. During the first several days of riding, that foam moulds to your foot and loses some thickness — typically a few millimetres, which is exactly the width of a half size. This is normal, desirable and slightly inevitable. It’s also why experienced riders and fitters talk about sizing for day ten rather than day one.
| Stage | How It Feels | What’s Happening | What to Do |
|---|---|---|---|
| Day one | Snug, toes touching the front when standing | Liner foam uncompressed, shell still stiff | Ride it; don’t loosen the laces to compensate |
| Days 2–10 | Pressure points ease, fit starts to feel “yours” | Liner moulding to foot, shell flexing | Heat mold if the shop offers it; adjust lacing zones |
| Days 10–30 | Comfortable, possibly slightly roomier | Liner has packed out in key areas | Add or swap a footbed; check binding strap tension |
| Later season | Noticeable looseness, heel lift appearing | Foam fully compressed, structure softening | Consider a replacement liner or plan a new boot |
The sock question
Socks matter more than riders expect. The right snowboard sock is thin to mid-weight, seamless at the toe, moisture-wicking and tall enough to sit above the cuff. Thick socks are not warmer in a well-fitted boot — they squeeze blood vessels, reduce circulation and make cold feet worse while simultaneously ruining your fit. One pair only; doubling up creates folds that become hot spots.
Material matters too. Merino wool regulates temperature and resists odour impressively, while synthetics dry faster and are often cheaper. We wrote a full comparison of merino wool versus synthetic base layers that applies equally to socks, and our best snowboard socks guide covers the specific options. For the wider clothing picture, see the snowboard layering guide and our picks for the best mid-layers.
Insoles: the cheapest upgrade in snowboarding
Most boots ship with a flat, thin insole that provides essentially no arch support. Replacing it with a properly supportive footbed does three things at once: it supports the arch so your foot muscles fatigue less, it holds your heel back in the pocket, and it can subtly adjust volume. If you’re between sizes, a thicker footbed can take up a little room in a slightly large boot — a far better fix than a second pair of socks.
Half sizes, honestly assessed
Should you choose a half size down or up when you land between them? In most cases, down — provided it doesn’t crush the width. The rule is: length should be snug and precise, while width and volume can be adjusted with molding, footbeds and lacing. If a half size down is unbearably tight across the ball of the foot, that’s a width problem and you need a different model, not a bigger size.
Section 10
Trying Boots On in Store: A Fit Checklist That Works
If you have the chance to try boots on in person, take it — and go in knowing what you’re testing for. Most bad purchases happen because someone stood up, said “yeah, feels fine” and walked to the till. A proper fitting takes fifteen to twenty minutes and involves more than standing still.
Before you try anything on
- Bring your riding socks. Not the ones you wore to the shop.
- Bring your footbed if you use one, and try boots with it installed.
- Go in the afternoon if possible, when your feet are at riding size.
- Know your Mondopoint from your own measurement, so you can sanity-check the shop’s opinion.
- Allow time. If the shop is rushed, come back another day.
The in-store test sequence
- Slide the foot in and tap the heel back. Tap the heel of the boot on the floor several times before lacing. This settles your heel into the pocket and gives you the true starting position.
- Lace it properly, in the correct order. The liner first, then the shell — or whatever system the boot uses. Ask if you’re unsure. Testing an unlaced boot is meaningless.
- Stand up and check toe contact. Standing tall with straight legs, toes should brush the front gently. Not curled, not jammed, not floating.
- Flex into a riding stance. Bend your knees deeply, as if you’re about to drop in. Your toes should pull back slightly and feel free of the front. This is the real test.
- Try to lift your heel. Push your toes down hard and try to raise your heel inside the boot. A small amount of movement is normal; a centimetre of lift is a problem.
- Walk around for a full five minutes. Hot spots take time to appear. Don’t rush this part.
- Check pressure across the instep. There should be even contact, not a single hard line of pressure under the laces.
- Stand in the bindings if you can. Some shops have demo bindings, and it reveals issues that standing in the boot alone won’t.
What a good fit feels like versus a bad one
| Check | Good Fit | Bad Fit |
|---|---|---|
| Toes standing tall | Light contact with the front | Crushed or nowhere near |
| Toes in riding stance | Slight pull-back, free to wiggle | Still jammed, or fully floating |
| Heel | Held down with minimal lift | Rises on every movement |
| Instep | Even pressure across the top | One hard pressure line |
| Ball of foot | Held without pinching | Sharp side compression |
| Overall feeling | Firm, even, “handshake” snug | Roomy at rest, painful in one spot |
Buying online instead
If you’re ordering online, replicate the process at home: wear the boots indoors on carpet for at least thirty minutes, lace them exactly as you would on the hill, and simulate a riding stance repeatedly. Don’t take them outside or onto a deck — that marks the sole and typically voids a return. If they’re wrong, send them back immediately rather than hoping they’ll break in. Our broader snowboard boots guide has more on what to expect from each lacing system.
Order, Try, Return if Needed
Shop boots with easy returns so fit is never a gamble.
Check Price on AmazonSection 11
The Most Common Boot Sizing Mistakes (and How to Fix Them)
Nearly every painful boot story traces back to one of a handful of predictable errors. Here they are, with the fix for each, so you can avoid learning them the hard way.
Mistake 1: Buying your sneaker size
Shoe sizes are inconsistent between brands and unrelated to foot length in centimetres. Fix: measure your foot and buy on Mondopoint. If you already own boots in the wrong size, use an aftermarket footbed to take up volume and tighten the lacing zones — but be aware that a fundamentally oversized boot is difficult to fully correct.
Mistake 2: Sizing up “to be comfortable”
Comfort in a shop comes from room. Comfort on day ten comes from hold. A boot that feels generous when new will feel sloppy once the liner packs out. Fix: choose snug-and-even now, and let the liner do the rest.
Mistake 3: Trying boots on in the morning with thin socks
You’ll under-size by a meaningful margin. Fix: afternoon fitting, riding socks, one pair only.
Mistake 4: Ignoring width and volume
Length correct, width wrong, and you end up with pain that lacing can’t fix. Fix: measure width too, and read up on boots designed for wide feet.
Mistake 5: Assuming all brands run the same
A Mondopoint 27 from two brands can fit like different sizes. Fix: research model-specific fit, and see whether Vans boots run true to size if that’s a brand you’re considering.
Mistake 6: Confusing heel lift with a sizing problem
Sometimes heel lift comes from a loose binding strap or a worn-out liner rather than the wrong size. Fix: diagnose properly using our heel lift troubleshooting guide before buying new boots.
Mistake 7: Overlooking the binding and board chain
A right-sized boot in the wrong binding size loses all its benefits. Fix: match binding size bands to your boot, and check board width against boot length. The bindings guide covers sizing bands in detail.
| Mistake | Short-Term Result | Long-Term Result |
|---|---|---|
| Sized up for comfort | Feels roomy and fine in the shop | Heel lift, toe drag, poor response |
| Sized by shoe size | Often close enough to seem right | Cumulative discomfort, wrong binding size |
| Ignored width | Mild pinching at first | Nerve pain, bruised nails, shortened days |
| Thick socks for warmth | Feels warmer initially | Cold feet from poor circulation, ruined fit |
| Skipped heat molding | Boot feels generic | Pressure points persist all season |
| Laced only across the top | Quick and easy | Loose heel, uneven pressure |
Lacing technique is part of sizing
It’s worth saying plainly: how you lace a boot changes how it fits. Most boots have distinct zones — lower, mid and upper — and you can tension them independently. Relieving tension across the instep while keeping the upper cuff tight solves a lot of “this boot doesn’t fit” complaints. Speed-lace and BOA systems handle zoning differently, and each has trade-offs around heel hold and flex; we break that down in BOA versus speed lace for heel lock and flex. If your laces are worn or the wrong length, see how long snowboard boot laces should be.
Replace Worn Laces and Parts
Fresh laces restore hold faster than you’d expect.
Shop Boot Laces on AmazonSection 12
Break-In, Care and When to Replace Your Boots
Getting the right size is the start. Keeping that fit all season — and knowing when the boot has genuinely reached the end of its life — is the rest of the story. Boots are the most-used and most-abused piece of gear in a snowboard setup, and they rarely get the attention boards do.
Breaking in a new boot
Give a new boot a few shorter days before committing to a big one. The shell flexes at specific hinge points, the liner compresses, and your foot finds its natural seat. Riding a brand-new boot hard on day one is the fastest way to create blisters and bad memories. Heat molding accelerates the process, and if it’s offered when you buy, take it.
Drying them properly
Wet liners are the number one cause of cold, uncomfortable boots — and of accelerated liner breakdown. Pull the liner out after every session if the design allows it, and dry boots at room temperature, away from direct heat. Radiators, fires and heated boot dryers on high all degrade foam and adhesives over time. A gentle, low-heat dryer is fine; a scorching one is not.
Storage in the off-season
- Fully dry before storing. Even slightly damp boots grow problems.
- Loosen all laces and straps so the shell isn’t held in a flexed position.
- Store upright in a cool, dry place away from direct sunlight, which breaks down plastics.
- Keep them in a breathable bag, not sealed plastic.
- Check hardware — eyelets, lace guides, BOA dials — before the season starts, not on the first chair.
Signs it’s time for new boots
Boots don’t have a fixed lifespan — it depends on how many days you ride, how hard you ride and how you store them. Rather than quoting numbers, watch for the signals. When heel lift appears and can’t be corrected with lacing, footbeds or strap adjustment; when the shell has softened so much that you’ve lost all support; when the liner is compressed flat; when the outer is cracked at the flex points — those are the moments to move on. Continuing to ride a dead boot is how people develop the kind of chronic foot problems that follow them off the mountain.
| Signal | What It Suggests | Action |
|---|---|---|
| Heel lift returns | Liner packed out or shell fatigued | New footbed first; new boot if that fails |
| Cold feet despite warm socks | Collapsed liner reducing circulation | Replace liner or boot; check drying routine |
| Calf and foot fatigue early | Shell no longer supporting the ankle | Time to replace |
| Visible cracking at flex points | Material near end of life | Replace before it fails on the hill |
| Lace hardware slipping | Worn guides or dials | Repair or replace laces/hardware |
Looking after the rest of the setup
Boot care works best as part of a general routine. A well-maintained board and binding system keeps your boots doing their job. Our snowboard maintenance guide is the place to start, along with how often to wax, the best tune kits and our picks for the best snowboard wax. It’s also worth understanding how long a snowboard lasts, since boots and boards often reach the end of their lives around the same time.
Protecting the feet you’re fitting for
Everything in this guide assumes you want your feet to survive the sport intact. Beyond fit, the biggest factors are strength and impact management. Riders who do targeted fitness work for snowboarding and build core strength ride longer before fatigue sets in, which is when form breaks down and injuries happen. On the protective side, look at wrist guards, impact shorts and our wider injury prevention and fall safety resources. New riders often get the most out of the basics first: stopping techniques, beginner turns and the beginner tips that make early days less bruising.
Keep Your Boots in Shape
Dryers, bags and care gear for the off-season and beyond.
Check Price on AmazonReference
Frequently Asked Questions
Should snowboard boots be a size bigger or smaller than my shoes?
Neither, in the sense that shoe sizes aren’t a reliable reference at all. Snowboard boots are sized in Mondopoint — foot length in centimetres — and shoe sizes vary wildly between brands. Measure your foot and use the chart. If you force a comparison, most riders find a snowboard boot label numerically close to their sneaker size but far snugger in feel.
How tight should snowboard boots be when new?
Snug and evenly pressured, with toes lightly touching the front when you stand upright and pulling back slightly when you bend into a riding stance. You should be able to wiggle your toes. You should not be able to lift your heel more than a small amount. Any sharp, localised pain is a shape problem, not a tightness problem.
Do snowboard boots stretch out?
The liner packs out and the shell flexes, so the overall fit loosens by roughly a half size’s worth of volume over the first several days of riding. The shell itself doesn’t stretch in length. This is why you should size for the broken-in fit rather than the day-one fit.
What is Mondopoint sizing?
Mondopoint is the length of your foot in centimetres. A Mondopoint 27 boot is designed for a 27 cm foot. It’s the most consistent sizing system available because it describes something physical rather than a converted label, so it should be your primary reference when buying.
Can I wear my normal shoe size in snowboard boots?
You can try, but you shouldn’t rely on it. Two brands can use the same number and build to different lasts. Use the number only as a rough cross-check after you’ve measured your foot in centimetres.
What if my feet are two different sizes?
Nearly everyone has one foot larger. Size to the larger foot and use a footbed or a slightly thicker sock on the smaller foot if there’s noticeable room. Trying to split the difference usually means both feet are wrong.
Do women need women’s-specific snowboard boots?
Not necessarily. Women’s boots are built on a different last — typically narrower in the heel with a lower cuff — which suits many riders better. But plenty of women fit men’s models and vice versa. Choose whichever holds your foot correctly, and make sure the bindings match the boot shape.
Should my toes touch the front of the boot?
Yes, lightly, when you’re standing tall with straight legs. When you bend your knees into a riding position, the toes should pull back and feel free. If they never touch at all, the boot is too long; if they’re jammed in both positions, it’s too short or too low-volume.
Are thicker socks warmer in snowboard boots?
Generally the opposite. Thick socks compress in a fitted boot, restrict circulation and make your feet colder while destroying the fit. Wear one pair of purpose-made snowboard socks in a thin-to-mid weight.
How do I stop my heel from lifting?
Start with the footbed and lacing: a supportive footbed holds the heel back, and proper zone lacing pulls the boot around the ankle. Then check binding strap tension. If heel lift persists, the boot is likely too large or the wrong volume — see our dedicated guide on stopping heel lift for the full diagnosis.
Do snowboard boots work with any bindings?
Boots and bindings are largely interchangeable across brands, but the binding size must match the boot size band. A boot that’s too large for its binding won’t get proper strap contact and will feel loose no matter how well it fits.
How long do snowboard boots last?
It depends on riding days, intensity and storage rather than a fixed number. Replace them when heel lift can’t be corrected, the shell no longer supports your ankle, the liner is compressed flat, or the outer shows cracking at flex points. Rider weight and how hard you flex the boot matter as much as days on snow.
Still Deciding on a Pair?
Compare current boots across sizes, widths and flex ratings.
Check Price on AmazonFinal Verdict: Measure Once, Ride Happy
A snowboard boot size chart is a map, not the destination. The chart gets you into the right postcode — the correct Mondopoint, the correct half size, the correct binding band. Everything that turns a “right size” boot into a boot you forget you’re wearing comes from the details: measuring in the afternoon with your riding socks, sizing for the broken-in fit rather than the box-fresh one, matching width and volume to your actual foot shape, and letting a bootfitter solve the last stubborn millimetre instead of hoping it goes away.
If you take one thing from this guide, take this: size for length, adjust for volume. Never size up to fix a width problem, never size down to fix a heel-lift problem you haven’t diagnosed, and never trust a conversion label over a centimetre measurement. Do that, and the rest of your setup — bindings, board width, stance — falls into place quickly.
From there, the fun starts. A correctly fitted boot makes your board feel sharper, your legs last longer and your days on snow better, full stop. When you’re ready to go further, dig into the full snowboard boots guide, find the right boots for your riding style, and if you want the whole picture, browse everything we publish at Snowboard Bible.
Find Your Perfect Fit Today
Browse snowboard boots by size and width, then get out there.
Shop Snowboard Boots on AmazonYou May Also Like
More guides, comparisons and gear reviews from Snowboard Bible.


